• About
  • Archive
  • Contact
The Greening of Gavin
  • Home
  • Our Green Shop
    • Little Green Workshops
  • Green Workshops
    • Cheese Making
    • Soap Making
    • Soy Candle Making
  • eBooks
    • Clay Oven eBook
    • Keep Calm and Make Cheese eBook
  • Podcast
    • TGOG Podcast
    • TGoG Podcast Archive
    • Little Green Cheese
  • Vlog
  • Cheese
  • Green Living
    • Chickens
    • Gardening
    • Soap Making
    • Recipes
    • Climate Change
    • Peak Oil
    • Solar Power
  • Resources

Archives for February 2012

Worm Farm Workshop

February 27, 2012 @ 20:56 By Gavin Webber 13 Comments

Last Saturday week, I held a workshop at my house for the Melton Sustainable Living group.  It was a simple workshop, but fun to present.  It took me about an hour to build and populate the new worm farm (rectangle box in photo), and additionally, I showed the audience how to harvest worm castings from my existing worm farm (round one in the photo).  Both of these worm farm kits are made by Reln plastics, and marketed under the Tumbleweed brand (I have no association with this company, I just like the product).  They are made from 100% post consumer recycled plastic.  All of the packaging (except for a small plastic strap) is utilised in the construction process and eaten by the worms!

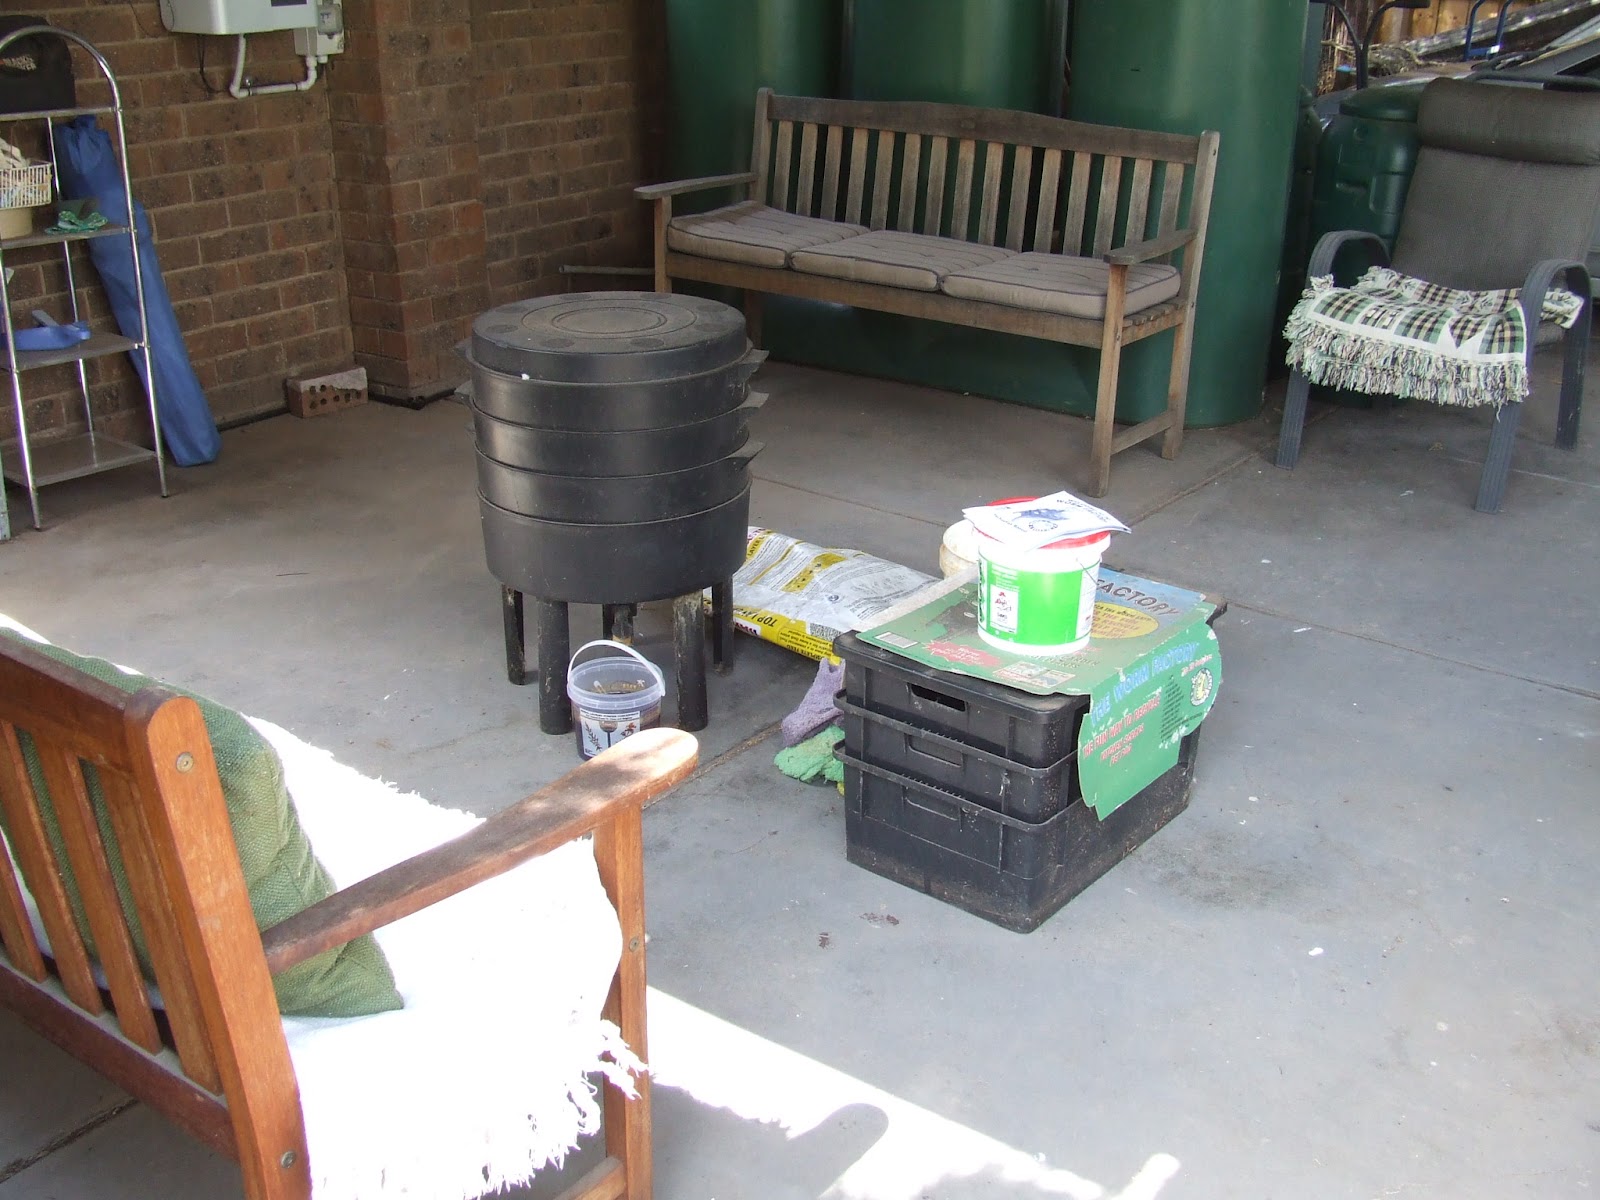
As you can see, it is all set up ready to go, and it also gave me an opportunity to clean at least half of the carport!

Now, in a moment of silliness, I forgot to give Ben the camera to take photo’s during the workshop, so you will have to use your imagination.  Here are the basic instructions on how to put one of these things together.

1.  Locate in a cool position in afternoon shade. Morning sun is OK.  I place mine on the south side of the house, northern side for northern hemisphere readers, or somewhere where they will not freeze in winter.
2.  Setting up the base as per instructions.  Some have legs, others do not and my new one had legs that were unusually difficult to figure out and the instructions were no help.  Both my worm farms have legs.
3.  Put the first working tray on top of the base with legs, then fill a bucket with about 7 litres of water and place the worm farm bedding block in it.  This is made from coconut coir husk.
As the bedding block expands, start to break it up into an even mix. It took about 10 minutes. Use the
paper wrapper too because all the paper and cardboard packaging has been designed to be worm friendly.
4.  Fold and place your cardboard packaging into the base of the working tray, then spread the expanded worm bedding block on top of this. The worms will eventually eat all the bedding and cardboard.

5.  Spread your worms (minimum of 1000 composting worms) on top of the bedding, and cover with a a few layers of wet newspaper or cardboard.  The more worms you initially add, the more food they will compost for you.  I used an old cotton dressing gown soaked in water, that Ben had grown out of.   One of the audience mentioned that this must be the Taj Mahal of worm farms, and that I must love them very much.  I replied that yes, I do!

6.  Don’t feed the worms at this stage, and let them settle in for one or two days.  Here some of them are their new home.  From experience it will take about 3-4 months for the initial 1000 odd worms to fill up their first tray.  Once the tray is full up to the lip inside, then pop on the next tray and start feeding the worms from the new tray.  Just make sure that the first tray is full enough to come in contact with the new tray so the little worms can climb through.

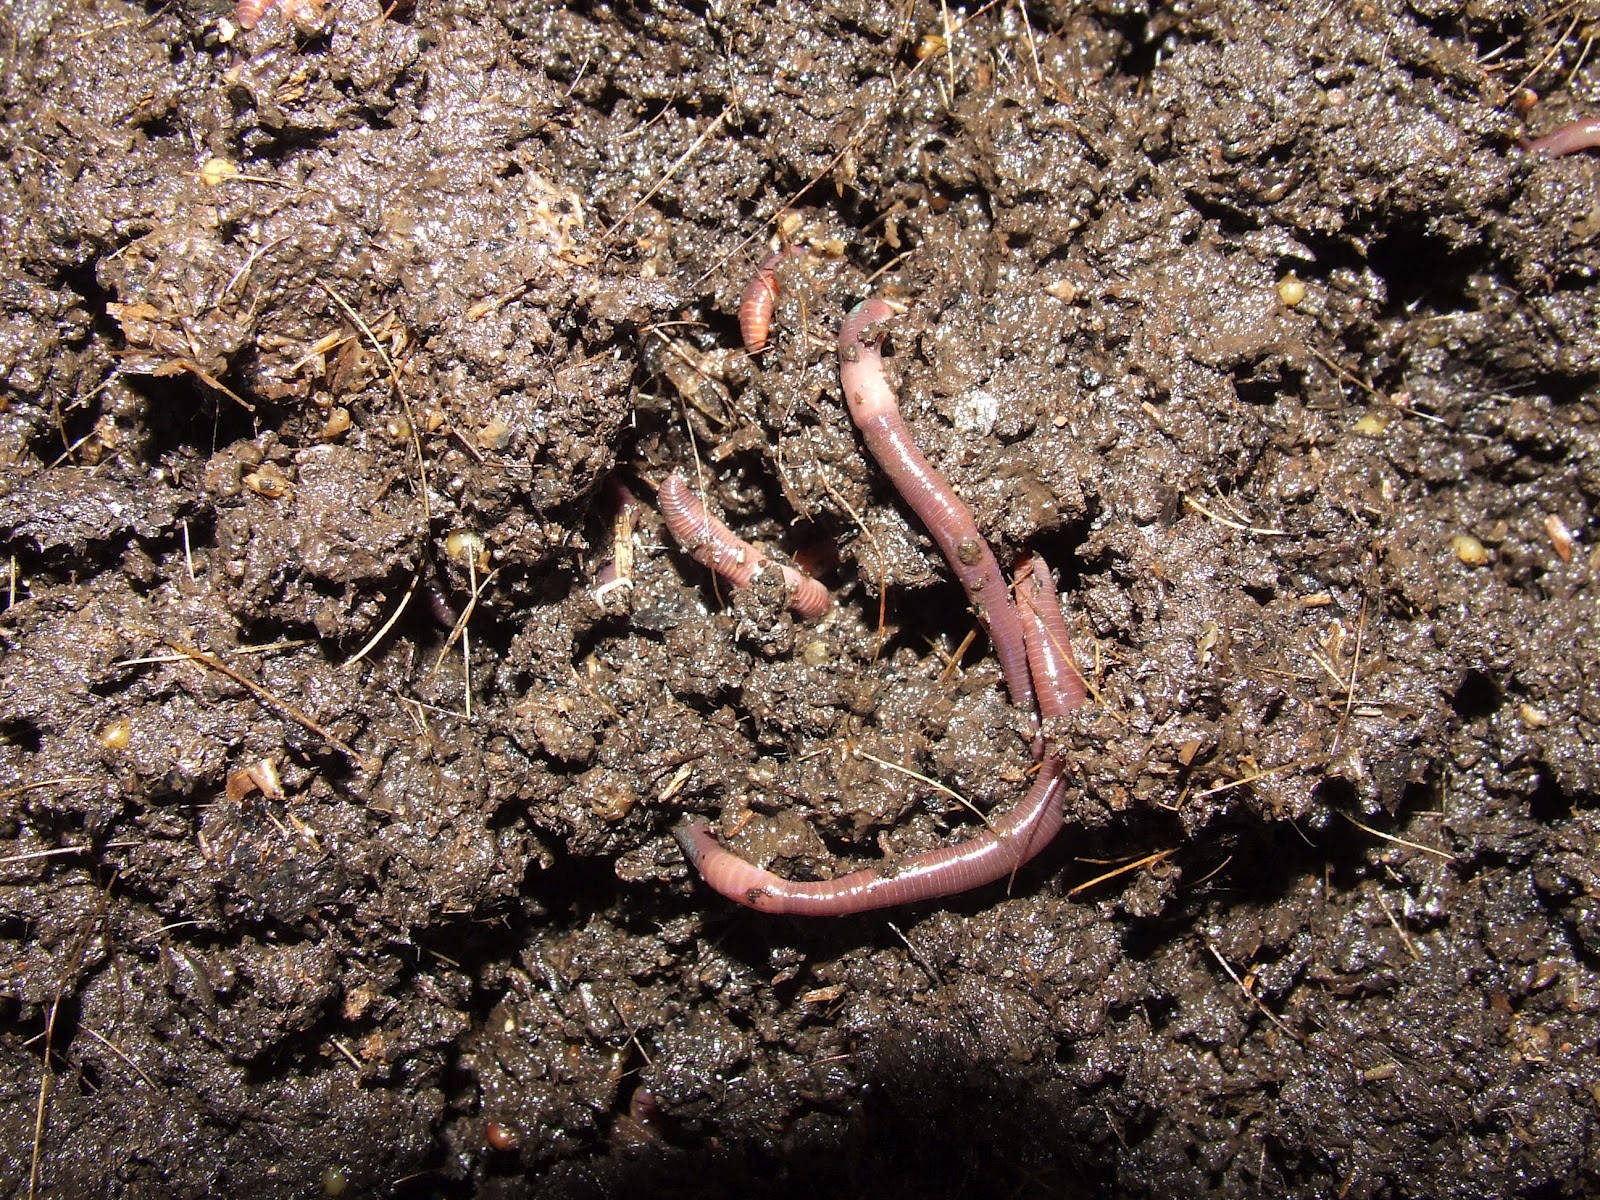
So now that I have a second worm farm, I have the means to create lots more worm wee tee and castings.  The worms can be fed most kitchen scraps but steer clear of onions and citrus, as it is a little too acidic for them.

As a guide worms will eat anything that was once living. This includes:

– Left over vegetable scraps, fruit and vegetable peelings
– Tea leaves/bags and used coffee grounds
– Vacuum cleaner dust or you hair clippings (also animal)
– Torn up newspapers, egg and milk or soaked pizza cartons
– Crushed egg shells (These will help with the pH balance)

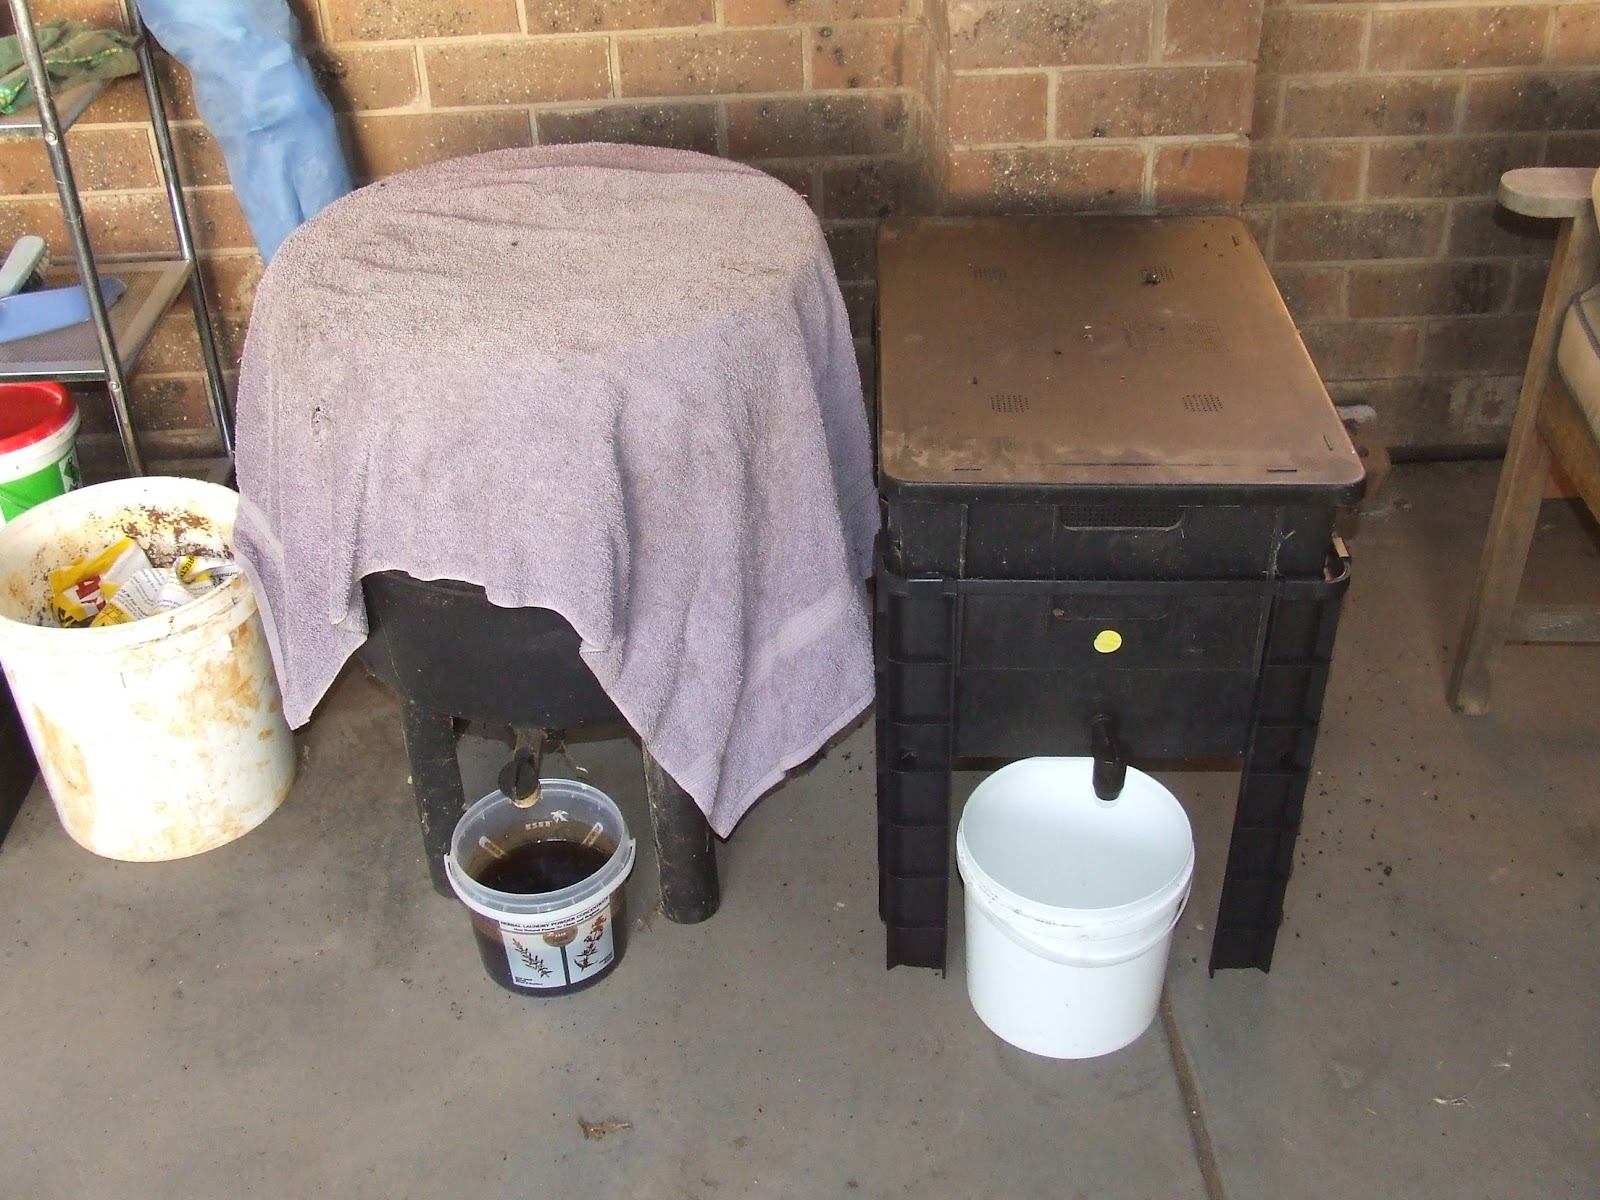
As I mentioned in my post titled “Home-made Liquid Fertiliser“, you can used the worm wee tea as a liquid fertiliser, so as they increase in number, I will be able to keep up with supply for the garden.

Just in case you wanted to know more, here are some worm facts that I found at ResourceSmart Victoria which also has instructions on how to make your own worm farm without having to buy a kit.

  • There are 350 species of earthworms in Australia and most of those found on farms and in gardens are introduced species. Compost worms are rare in the bush because the conditions are not suitable. 
  • Compost worms are a special type of earthworm. Compost worms are generally more active than normal earthworms. They thrive in the rich, moist and warm environment of a worm farm and can eat about half their body weight in one day. 
  • The population in a well maintained worm farm doubles every two to three months. Earthworms are hermaphrodites, which means each worm has female and male sex organs, so every worm can have babies. But reproduction can only occur between two mature worms of the same species. 
  • After mating, both earthworms form a capsule (or cocoon) containing up to 20 eggs. Even though each mature compost worm might mate every 7 to 10 days and produce about 4 to 20 capsules a week, only 3 of these capsules produce babies. Each capsule produces around 4 baby worms, which makes a total of 12 babies per adult per week. 
  • Babies hatch after about 30 days and are ready to breed 55 to 70 days later. Earthworm eggs can survive in very dry conditions for a long time. The babies usually hatch when the soil becomes moist. 
  • Although earthworms do not have eyes, they sense light as well as vibrations and temperature through special organs in their skin. 
You can also add compost worms to standard compost bins or heaps, as long as you do not let the contents of the bin get too hot.  About 2 years ago, I put a big handful into my Aerobin, and they have multiplied greatly.  They don’t live in the top 20 cm as it is too hot, but prefer to work at a lower level.  I just keep piling on brown and green garden waste and they keep gobbling it up.  When I take compost from the bottom, there are no worms to be found as they live higher up.
I also saved the old laundry sink, since we have just had this room renovated, and will be turning this into a worm farm in the next few months, so more on that further along the sustainable living journey.  When I was a teenager, my dad used to use an old bath tub as a worm farm and it was most successful in producing many worms that we used for fishing.  I think he used Tiger worms, however most worms that you buy in boxes or from a large worm farms today are ‘Red Wrigglers’ and ‘Indian Blues or Dendra’s’.
So, hopefully this post has given you enough information to start your own worm farm.  The good thing is that as pets, they don’t bark, bite, kill birds, or annoy you in any way, and their droppings are the most useful matter on the planet!  To finish off, here are some wormy quotes;

“Worms are the Intestines of the Earth”
ARISTOTLE

“It may be doubted whether there are many other animals which have played so important a part in the history of the world as these lowly organised(sic) creatures”
CHARLES DARWIN ON EARTHWORMS, 1881

“Without the work of this humble creature, who knows nothing of the benefits he confers upon mankind, agriculture, as we know it, would be very difficult, if not wholly impossible”
CHARLES DARWIN ON EARTHWORMS, 1881

Will this article help someone you know? If so help them out by sharing now!

  • Click to share on Facebook (Opens in new window) Facebook
  • Click to share on X (Opens in new window) X
  • Click to share on LinkedIn (Opens in new window) LinkedIn
  • Click to share on Reddit (Opens in new window) Reddit
  • Click to share on Pinterest (Opens in new window) Pinterest
  • Click to share on Tumblr (Opens in new window) Tumblr
  • Click to print (Opens in new window) Print
  • Click to email a link to a friend (Opens in new window) Email
  • More
  • Click to share on Pocket (Opens in new window) Pocket

Filed Under: worms

Ceres Community Environmental Park

February 23, 2012 @ 22:20 By Gavin Webber 10 Comments

As it was downshift Wednesday, Kim and I took Ben on a home school excursion to Ceres Community Environmental Park.  We had a great outing, picked up some organic fruit,  some seeds and plants for the garden and checked out all the fantastic eco stuff.

Let me take you on a little photo expose courtesy of Ben himself.  He was the designated photographer for the day, and he has a great eye for detail!

This is the organic market.  We bought some apples and peaches.  All of the produce had the food miles listed against each fruit and vegetable.  Most of it was very local.

Then there were lots of chickens that looked like they were very happy.

The organic shop was so full that we couldn’t get in the door, so we had to skip it.

There were a few craft stalls selling clothes and things.

There was a bakery, that was not in use on the day.  The oven was massive, and just a little bit larger than my one!  I was impressed.

This is the renewable energy education classroom.  There was a high school class in the room at the time.

We then headed towards the market garden and on towards the cafe for a organic coffee.

Along side a neglected area, but it was home to quite a few more chooks.

There was even some chook art!

And a shade house for seedlings.

We came to the cafe,

round the corner,

past a very old workshop covered in a grape vine and lots of very old solar panels,

on to the cafe for a muffin and a coffee.  We talked and ate, and noticed that all the local mums used the cafe as a meeting place, as there were so many enjoying the surroundings with their little toddlers and babies.

There was lots of art work dotted around the park.  This mosaic piece caught our eye,

as did this beautiful sacred kingfisher.

After morning tea we stopped past the bicycle repair area, where there were lots of spare parts.  I believe that this is open on weekends for anyone who wants to fix their bike.

Then there was a lovely gravel path meandering towards the community gardens.

This sign told us all about storm water and what gets washed into the sewers and local waterways.

There were maps of the park at most locations so that you did not get lost.

This grand old fellow must protect all of the trees in the park.  He does a great job.

This is one of the community gardens.  It had tomatoes, pumpkins, and a very large grafted eggplant.  It was at least 5 foot tall and very healthy.

Kim fancied this old wrought iron gate for our yard, but it was just too heavy to carry in my backpack! 😉

This billabong had lots of creatures swimming around and very healthy plant life.

We approached the energy park.  There are large mounts that hold many solar photovoltaic panels.

Here they are in more detail.

 Part of the energy park featured wind power, including a water wheel and an old school wind mill that was used to pump water from bores.

We moved on to the inverter room which had a display with gauges that I believe once worked.  It was broken which was a bit of a disappointment.  I would have loved to know what the output of the energy park was at the time.

Then on to the nursery.

There was just so many plants,

and fertilizer and wind chimes.

The wheeley bins were converted into basic water barrels.

 These chairs were made entirely from old tires.  Ben said that they were very comfortable and bouncy.

It is a beautiful nursery.  So many things to look at.

Of course everything is for sale, and the plants were quite reasonably priced.

I spied these massive specimens, which look quite like a zucchini and I have seen these on other gardening blogs.  What are they?

The final picture is of a wise old owl that was protecting all of the plants from the mice.  It must have worked because I didn’t see any sign of mice anywhere!

We had a great day out, and if you in the city of Melbourne, or more specifically Brunswick East, then pay it a visit.  It is free and open every day.  Here is a link to their website.  It was just like visiting a great big version of my place!

Will this article help someone you know? If so help them out by sharing now!

  • Click to share on Facebook (Opens in new window) Facebook
  • Click to share on X (Opens in new window) X
  • Click to share on LinkedIn (Opens in new window) LinkedIn
  • Click to share on Reddit (Opens in new window) Reddit
  • Click to share on Pinterest (Opens in new window) Pinterest
  • Click to share on Tumblr (Opens in new window) Tumblr
  • Click to print (Opens in new window) Print
  • Click to email a link to a friend (Opens in new window) Email
  • More
  • Click to share on Pocket (Opens in new window) Pocket

Filed Under: home school, Sustainable Living

Chicken Intelligence

February 21, 2012 @ 21:32 By Gavin Webber 3 Comments

After yesterdays post, I have been on the prowl for a video about how clever chickens are.  It is no news to me, because having lived with them for nearly 4 years now, I know the sorts of things they get up to.

A big thanks goes out to Stewart over at My Veggie Garden for posting this on Facebook for me to find.


I also found this thought provoking comment posted underneath the video on YouTube.  It really made sense to me.

“he’s a dumb bird brain… she’s a greedy, filthy pig… he’s a disloyal dog… she’s a fat lazy cow… he’s a stubborn jackass… he’s a cowardly chicken… so much propaganda that animal enterprise businesses use to ingrain in peoples’ heads that animals are stupid, filthy and worthless with no redeeming qualities.
If people realized how similar animals are to us in all the “good” ways, how could they ever reconcile what horrors have been perpetrated upon them & continue to participate?  blakmira“

Quite true when you think about it and I never thought about these sayings in that way before.  What do you think about the video and the comment?


P.S. I don’t have a question to post for Wise Words Wednesday.  If anyone has a burning question they would like answered by the readership, please send it through via email.

Will this article help someone you know? If so help them out by sharing now!

  • Click to share on Facebook (Opens in new window) Facebook
  • Click to share on X (Opens in new window) X
  • Click to share on LinkedIn (Opens in new window) LinkedIn
  • Click to share on Reddit (Opens in new window) Reddit
  • Click to share on Pinterest (Opens in new window) Pinterest
  • Click to share on Tumblr (Opens in new window) Tumblr
  • Click to print (Opens in new window) Print
  • Click to email a link to a friend (Opens in new window) Email
  • More
  • Click to share on Pocket (Opens in new window) Pocket

Filed Under: Animals, Chickens

« Previous Page
Next Page »

Search This Blog

Follow my work

About Gavin Webber

About Gavin Webber

An Ordinary Australian Man Who Has A Green Epiphany Whilst Watching A Documentary, Gets a Hybrid Car, Plants A Large Organic Vegetable Garden, Goes Totally Solar, Lowers Consumption, Feeds Composts Bins and Worms, Harvests Rainwater, Raises Chickens, Makes Cheese and Soap, and Eats Locally. All In The Effort To Reduce Our Family's Carbon Footprint So We Can Start Making A Difference For Our Children & Future Generations To Come.

Delve Into the Archives

Visit Our Online Simple Living Shop

Little Green Workshops

Top Posts & Pages

Hot Chilli Chutney
Curing Black Olives
Home Made Bread Rolls
The Seven Stages Of Change
How To Remove Scaly Leg Mites
Black Aphids On Garlic
2 Fruit Marmalade
Outdoor Solar Shower
Tips for Growing Citrus in Pots
The Ant and the Grasshopper

Recent Awards

Recent Awards

Local Green Hero

Categories

Favourite Daily Reads

Debt Free, Cashed Up, and Laughing

The Off-Grid Solar House

Greener Me

The Rogue Ginger

Little Eco Footprints

Down To Earth

Surviving the Suburbs

Little Green Cheese

Eight Acres

The Witches Kitchen

TGOG Readers On-line

Carbon Offset website

Copyright - Gavin Webber © 2026