• About
  • Archive
  • Contact
The Greening of Gavin
  • Home
  • Our Green Shop
    • Little Green Workshops
  • Green Workshops
    • Cheese Making
    • Soap Making
    • Soy Candle Making
  • eBooks
    • Clay Oven eBook
    • Keep Calm and Make Cheese eBook
  • Podcast
    • TGOG Podcast
    • TGoG Podcast Archive
    • Little Green Cheese
  • Vlog
  • Cheese
  • Green Living
    • Chickens
    • Gardening
    • Soap Making
    • Recipes
    • Climate Change
    • Peak Oil
    • Solar Power
  • Resources

Clay Cob Oven Progress – Part 2

October 4, 2011 @ 12:00 By Gavin Webber 3 Comments

On Sunday, we put the final layer of cob on the oven. 

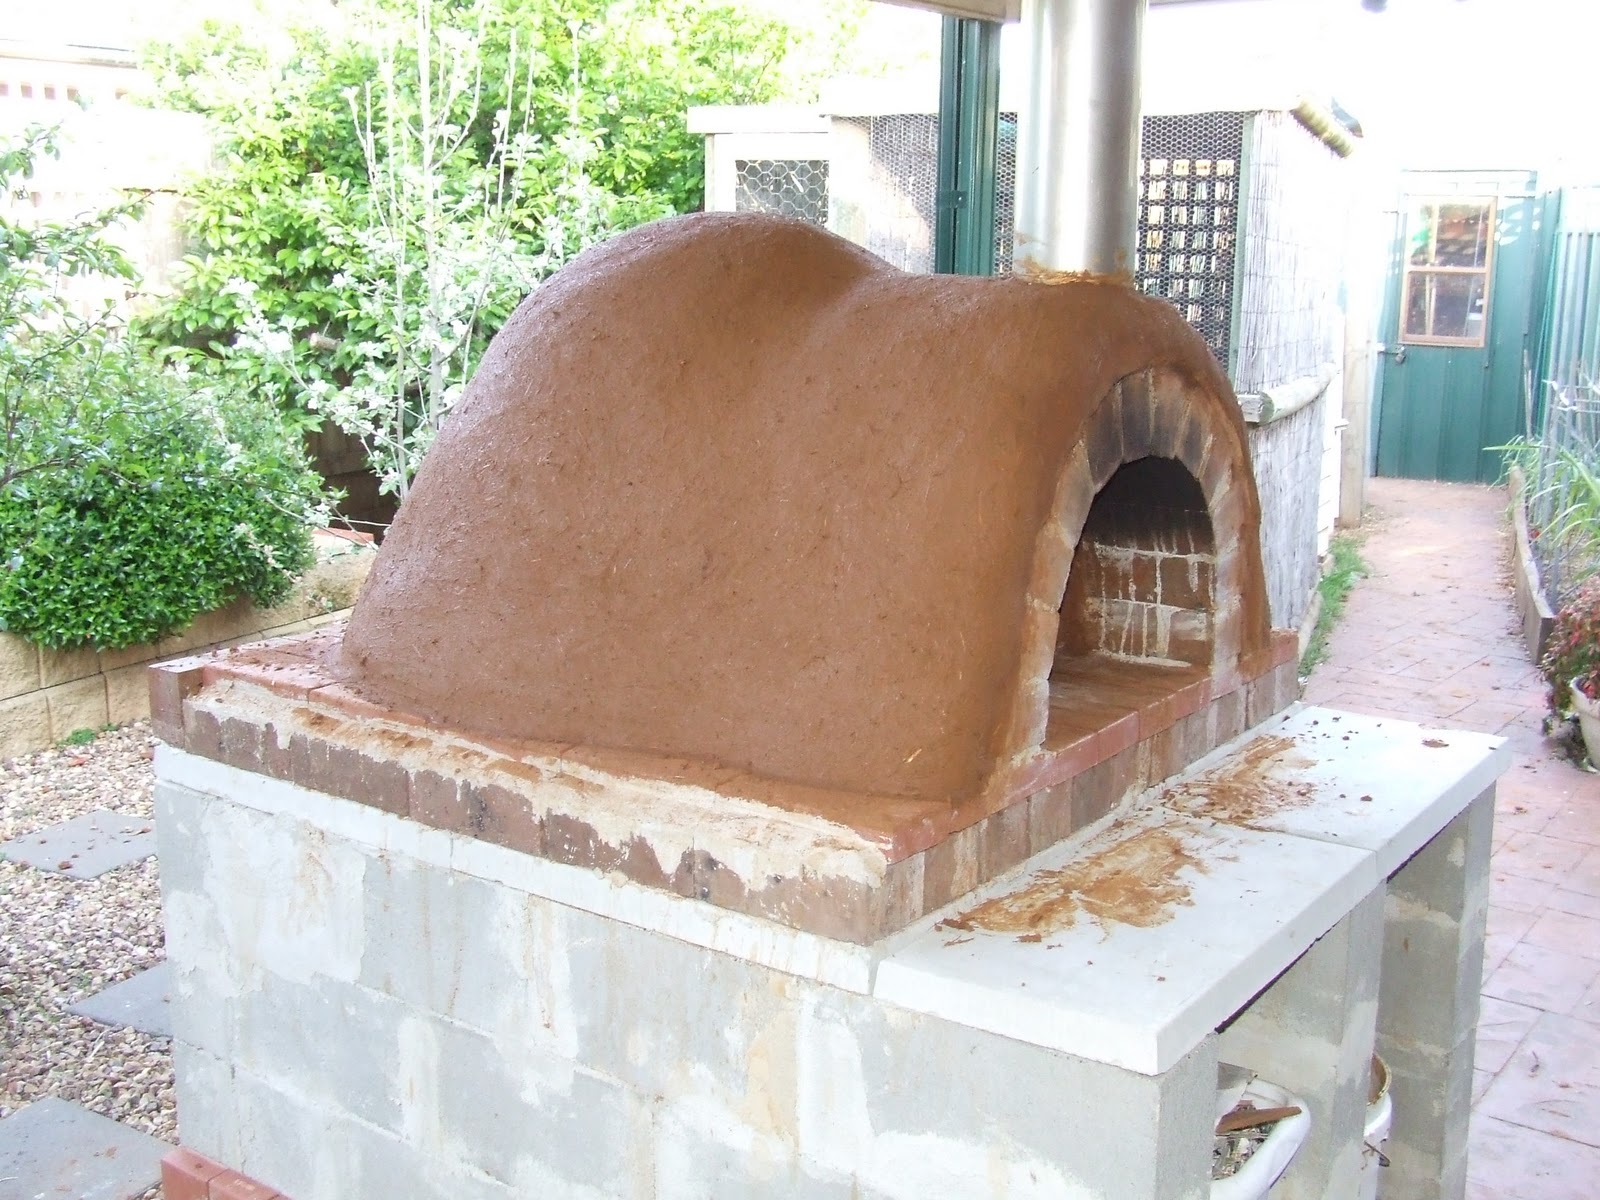
This layer we found was necessary as the oven did not keep its heat for more than an hour after an hour of fire.  It was 5 parts builders sand, 1/2 part clay, 2 parts sugar cane mulch (straw is fine).  All stomped in by foot by yours truly and young Benjamin.   We added a little water to make a firm mud.  Then Kim and I applied the cob about 4 cm thick over the dome, the top being about 5cm, and about 1 cm over the archway. 

I also fixed up the door seal.  It performed poorly during the first cookout, so I made it about 2 cm all around and placed the door against it when it was wet so that I could see if the clay left an imprint on the door.  That way I knew that it was touching all around the door.

This is the other angle.  Kim thinks it looks like a Hippo’s bum, but I just think it looks wonderful (the oven, not a hippo’s bum that is).  I checked it when I got home on Monday night, and it had a few hairline cracks, so I smoothed it all over with wet hands and pushed the cracks together.  The cracks form mostly because of air gaps between the lumps of cob when we applied it.

Here is the finish (click to enlarge).  As you can see, it is very sandy, but because I still used clay and straw, it has gone rock hard today.  I will give the oven a light firing on Wednesday night to speed up the drying, as Kim wants to apply the mosaics this weekend.  To do that, I will add a light coat of render made up of sand and cement with a oxide mixed through it.  It will only be about 1 cm in thickness, but should hold the mosaic tiles firmly in place.  At the same time, I will render the besser bricks, and fix up the mantle which I have the materials for.

I am anxious to see the finished product and hope it performs to my expectations.  It should lock in the heat, with all that extra thickness.   Another update next weekend.  Looking forward to inner clay oven artist in Kim bursting out and putting on the finishing touches.

Will this article help someone you know? If so help them out by sharing now!

  • Click to share on Facebook (Opens in new window) Facebook
  • Click to share on X (Opens in new window) X
  • Click to share on LinkedIn (Opens in new window) LinkedIn
  • Click to share on Reddit (Opens in new window) Reddit
  • Click to share on Pinterest (Opens in new window) Pinterest
  • Click to share on Tumblr (Opens in new window) Tumblr
  • Click to print (Opens in new window) Print
  • Click to email a link to a friend (Opens in new window) Email
  • More
  • Click to share on Pocket (Opens in new window) Pocket

Related

Filed Under: Cob Oven

← Limoncello Update Ditching the Clothes Dryer →

About Gavin Webber

Gavin Webber's daily goal is to live a more sustainable lifestyle, in an effort to reduce his family's environmental footprint so we can all make a difference for our children & future generations to come.

Learn more about him here and connect with him on Twitter, Facebook, and Google+.

Comments

  1. HAZEL says

    October 4, 2011 at 17:11

    Woo Hoo! I looks fantastic…bit more like my bum than that of a hippo, though. LOL Can;t wait to see what Kim does with the mosaics.

    Reply
  2. Gavin says

    October 4, 2011 at 22:24

    Hi Hazel, well I can’t comment on your bum, but I know the mosaics are going to be something special!

    Gav x

    Reply
  3. becky3086 says

    July 17, 2012 at 03:44

    LOL, that was good. Anyway, I think it looks wonderful. I hope when we get a chance to build one that ours will look at least half that good.

    Reply

Comments build lively communities. Let me know your thoughts, but keep it clean and green! Spam is removed instantly.Cancel reply

This site uses Akismet to reduce spam. Learn how your comment data is processed.

Search This Blog

Follow my work

About Gavin Webber

About Gavin Webber

An Ordinary Australian Man Who Has A Green Epiphany Whilst Watching A Documentary, Gets a Hybrid Car, Plants A Large Organic Vegetable Garden, Goes Totally Solar, Lowers Consumption, Feeds Composts Bins and Worms, Harvests Rainwater, Raises Chickens, Makes Cheese and Soap, and Eats Locally. All In The Effort To Reduce Our Family's Carbon Footprint So We Can Start Making A Difference For Our Children & Future Generations To Come.

Delve Into the Archives

Visit Our Online Simple Living Shop

Little Green Workshops

Top Posts & Pages

Hot Chilli Chutney
Strawbridge Family Inspiration
Fabulous Front Orchard
Black Aphids On Garlic
Tips for Growing Citrus in Pots
Chicken Nipple Installation
Farmhouse Cheddar with Peppercorns
Growing Queensland Blue Pumpkins (Winter Squash)
The Seven Stages Of Change
Contact

Recent Awards

Recent Awards

Local Green Hero

Categories

Favourite Daily Reads

Debt Free, Cashed Up, and Laughing

The Off-Grid Solar House

Greener Me

The Rogue Ginger

Little Eco Footprints

Down To Earth

Surviving the Suburbs

Little Green Cheese

Eight Acres

The Witches Kitchen

TGOG Readers On-line

Carbon Offset website

Copyright - Gavin Webber © 2026