• About
  • Archive
  • Contact
The Greening of Gavin
  • Home
  • Our Green Shop
    • Little Green Workshops
  • Green Workshops
    • Cheese Making
    • Soap Making
    • Soy Candle Making
  • eBooks
    • Clay Oven eBook
    • Keep Calm and Make Cheese eBook
  • Podcast
    • TGOG Podcast
    • TGoG Podcast Archive
    • Little Green Cheese
  • Vlog
  • Cheese
  • Green Living
    • Chickens
    • Gardening
    • Soap Making
    • Recipes
    • Climate Change
    • Peak Oil
    • Solar Power
  • Resources

3 Veggie Soup High in Vitamin A

August 18, 2015 @ 21:07 By Gavin Webber 8 Comments

Kim hasn’t been feeling the best lately.  Not quite sure what it is but it has the typical symptoms of MS fatigue.

So to boost her immune system a bit more, I cooked up a 3 veggie soup that is high in Vitamin A.  The soup was recommended to us by one of our students on Sunday’s soap making workshop.  We had nothing to lose as Kim had felt blah for over a week and I had been working from home to care for her, so I was cooking dinner anyway.

Now as I was only given scant instructions I kind of made it up as I went along, so here is my version of a high Vitamin A soup.  I think it turned out quite well if I do say so myself.

3 Veggie Soup

3 Veggie Soup with crusty bread

3 Veggie soup

Ingredients

  • 500g Pumpkin, peeled and diced (home-grown)
  • 5 Carrots peeled and diced
  • 3 medium Sweet Potatoes, peeled and diced
  • 2 teaspoons grated Ginger
  • 1 teaspoon vegetable stock powder
  • 1 pinch chilli powder
  • ¼ teaspoon ground turmeric
  • 1.5 litres hot water
  • Salt and Pepper to taste

Method

  1. Add all veggies to a 4 litre stock pot.  Add stock powder, spices and water.  The water should just cover the vegetables.

    Add Stock to veggies

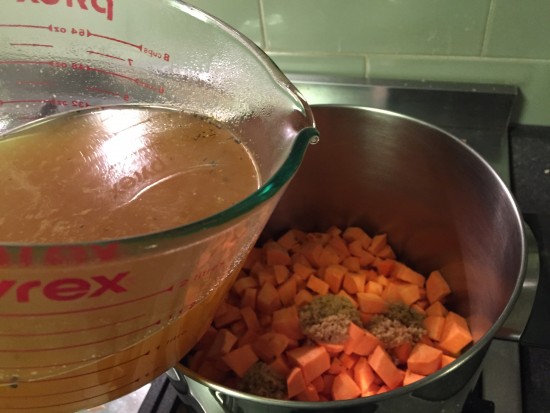
    Add Stock, spices, and water to veggies

  2. Bring to the boil, then cover and simmer for 30 minutes.
  3. Once the veggies are soft, stick blend the 3 veggie soup in the pot until smooth.
  4. Season to taste.  Makes 4 generous portions.  Serve with crusty bread and butter.

Who would have imagined that you could make something so delicious with just 3 vegetables and a few spices.

I can tell that this is going to be a regular at our dinner table, especially because I have so many pumpkins from my last harvest yet to eat.

This soup was surprisingly delicious and it warmed the cockles on this cold winters evening.  Just the boost I think we all needed!

And has it helped Kim?  Well, she seems to think so.

Will this article help someone you know? If so help them out by sharing now!

  • Click to share on Facebook (Opens in new window) Facebook
  • Click to share on X (Opens in new window) X
  • Click to share on LinkedIn (Opens in new window) LinkedIn
  • Click to share on Reddit (Opens in new window) Reddit
  • Click to share on Pinterest (Opens in new window) Pinterest
  • Click to share on Tumblr (Opens in new window) Tumblr
  • Click to print (Opens in new window) Print
  • Click to email a link to a friend (Opens in new window) Email
  • More
  • Click to share on Pocket (Opens in new window) Pocket

Filed Under: recipes, vegetables, Vegetarian

Making Pepita Bread

July 26, 2015 @ 21:51 By Gavin Webber 7 Comments

I love all the bread made by my talented wife Kim, and her Pepita Bread is no exception.  The Pepitas (aka Pumpkin seeds) have an amazing flavour and crunch that makes this bread something quite special.

Pepita bread

Pepita bread

Kim and I use our trusty bread maker to knead the dough, but always shape it and bake it in the oven.  This is because we have more control over the baking process and can make it into any shape we desire.  It also saves time.

We love making our own bread because the beauty is that you know exactly what goes into it.  Something much better than a commercial loaf with a list of ingredients as long as your arm!

For those of you who want to give it a crack, Kim has kindly let me share the recipe with all of you today.

Kim’s Pepita Bread

Ingredients

  • 300ml (10 US oz) Skimmed milk
  • 1 egg yolk
  • 1½ Tablespoons Olive Oil
  • 1 teaspoon Salt
  • 1½ Tablespoons Rapadura Sugar
  • 3½ cups Bread Flour
  • ¾ cup Pepitas
  • 1 teaspoon Bread Improver
  • 2¼ teaspoons Dried Yeast

Method

  1. Add all the ingredients in order into your bread maker pan and start on the dough setting.
  2. Once the dough has been kneaded, remove and roll out into two loaves and score across the top.  If the dough is a little dry, wet your hands when shaping them, which helps add a bit of moisture.
  3. Place the loaves on a greased baking tray and leave in a warm place for 1½ to 2 hours to rise.
  4. Once risen, bake in a preheated oven at 180°C (356°F) for 20 minutes until golden brown and the loaf sounds hollow when knocked on the bottom.
  5. Allow to cool on a cooling rack.  Slice and serve with butter.
Sliced Pepita Bread

Sliced Pepita Bread

I hope you enjoy this bread as much as I do!  It even tastes amazing toasted because the pepitas roast a little bit more which enhances the flavour.

The smell of fresh bread baking in the oven is one I never tire of.

Will this article help someone you know? If so help them out by sharing now!

  • Click to share on Facebook (Opens in new window) Facebook
  • Click to share on X (Opens in new window) X
  • Click to share on LinkedIn (Opens in new window) LinkedIn
  • Click to share on Reddit (Opens in new window) Reddit
  • Click to share on Pinterest (Opens in new window) Pinterest
  • Click to share on Tumblr (Opens in new window) Tumblr
  • Click to print (Opens in new window) Print
  • Click to email a link to a friend (Opens in new window) Email
  • More
  • Click to share on Pocket (Opens in new window) Pocket

Filed Under: Cooking, recipes

Yummy Key Lime Pie

May 12, 2015 @ 23:33 By Gavin Webber 3 Comments

Well Kim did it again!  She made one of the most amazing desserts using ingredients fresh from our garden.  This time it was Key Lime Pie!  I think I want to marry her all over again.

Fun fact:  Key Lime Pie is the official pie of the state of Florida!

Key Lime Pie

Made with limes fresh from the Tahitian lime tree, and eggs from our feathered girls, this pie was about as fresh as you could make it.

But what about the taste?  Well, I kid you not.  It was just melt in the mouth amazing.

Yes it is sweet, but not sickly sweet because the acid from the limes balance the flavour of the condensed milk.  I have seen this type of pie with a meringue but I think that would be over the top.

Key Lime Pie

Key Lime Pie

For those interested, here is her recipe.

Key Lime Pie (Serves 6)

Ingredients

  • 200g Granita or digestive biscuits
  • ¼ cup ground almonds
  • 1 tablespoon caster sugar
  • 100g salted butter, melted
  • 4 fresh eggs, lightly beaten
  • 400g can condensed milk
  • 2/3 cup (160ml) cream
  • Finely grated rind and juice of 4 Tahitian limes with extra slices for decoration.

Method

  1. Preheat your oven to 170°C. Line the base of a 20cm springform tin with greaseproof paper.
  2. Process biscuits until fine crumbs either with a food processor or alternatively place the biscuits between two clean tea towels and roll over with a rolling-pin until you have fine crumbs.
  3. Add almonds, sugar and butter, mix thoroughly until combined.  Press mixture firmly into the base of the tin. Refrigerate until firm (about 15 minutes).
  4. Whisk the eggs, condensed milk, cream, lime rind and juice until smooth. Pour into biscuit crust.
  5. Place on a baking tray and bake for 40-45 mins or until set. Cool. Serve with extra lime slices.

Our Key Lime Pie certainly didn’t last long.  With the first mouthful, I thought I had died and gone to heaven!

The great thing about the slices of lime on top is that you can get that sour hit just before you plunge into the sweet filling and crust.  It’s an amazing combination of flavours for a dessert.

We love desserts made with that little bit of extra love from our garden!  What do you think?  Is it a winner?

Will this article help someone you know? If so help them out by sharing now!

  • Click to share on Facebook (Opens in new window) Facebook
  • Click to share on X (Opens in new window) X
  • Click to share on LinkedIn (Opens in new window) LinkedIn
  • Click to share on Reddit (Opens in new window) Reddit
  • Click to share on Pinterest (Opens in new window) Pinterest
  • Click to share on Tumblr (Opens in new window) Tumblr
  • Click to print (Opens in new window) Print
  • Click to email a link to a friend (Opens in new window) Email
  • More
  • Click to share on Pocket (Opens in new window) Pocket

Filed Under: eggs, fruit, recipes

« Previous Page
Next Page »

Search This Blog

Follow my work

About Gavin Webber

About Gavin Webber

An Ordinary Australian Man Who Has A Green Epiphany Whilst Watching A Documentary, Gets a Hybrid Car, Plants A Large Organic Vegetable Garden, Goes Totally Solar, Lowers Consumption, Feeds Composts Bins and Worms, Harvests Rainwater, Raises Chickens, Makes Cheese and Soap, and Eats Locally. All In The Effort To Reduce Our Family's Carbon Footprint So We Can Start Making A Difference For Our Children & Future Generations To Come.

Delve Into the Archives

Visit Our Online Simple Living Shop

Little Green Workshops

Top Posts & Pages

Hot Chilli Chutney
Curing Black Olives
Home Made Bread Rolls
The Seven Stages Of Change
Black Aphids On Garlic
How To Remove Scaly Leg Mites
Outdoor Solar Shower
2 Fruit Marmalade
Tips for Growing Citrus in Pots
The Ant and the Grasshopper

Recent Awards

Recent Awards

Local Green Hero

Categories

Favourite Daily Reads

Debt Free, Cashed Up, and Laughing

The Off-Grid Solar House

Greener Me

The Rogue Ginger

Little Eco Footprints

Down To Earth

Surviving the Suburbs

Little Green Cheese

Eight Acres

The Witches Kitchen

TGOG Readers On-line

Carbon Offset website

Copyright - Gavin Webber © 2026