Do you desperately want to grow vegetables, but all you have is concrete all around you? Do you have blazing hot summers that turn your soil into dust?
Well if you answered yes to either of these questions, I have a DIY gardening project for you. Building a wicking bed on concrete!
I had an unused space on some concrete in the backyard, so I decided it was just the place to grow food. I built the frame out of spare wood I had lying around and wrote about it in this post titled Yet Another Garden Bed!, way back in January. Yes, I know that it has been four months, but I had to find a spare day in which to complete the project.
So this is where we left the project.

Garden bed made from scrap wood
You can see all the concrete beneath it. Impossible for a garden bed to drain properly, and obviously not a good place to dig into!
So we must build up and provide the proper conditions for vegetables to grow. Enter the wicking bed. It has a water reservoir and proper drainage if we have a lot of rain, so the veggies never get waterlogged.
The entire project cost me $11 in hardware, and I reused a lot of things that I had lying around or scrounged.
Firstly, we put in the liner. I opted for some builders plastic that I had leftover from some other job. I made sure that the concrete was well swept and had nothing that could piece the liner.
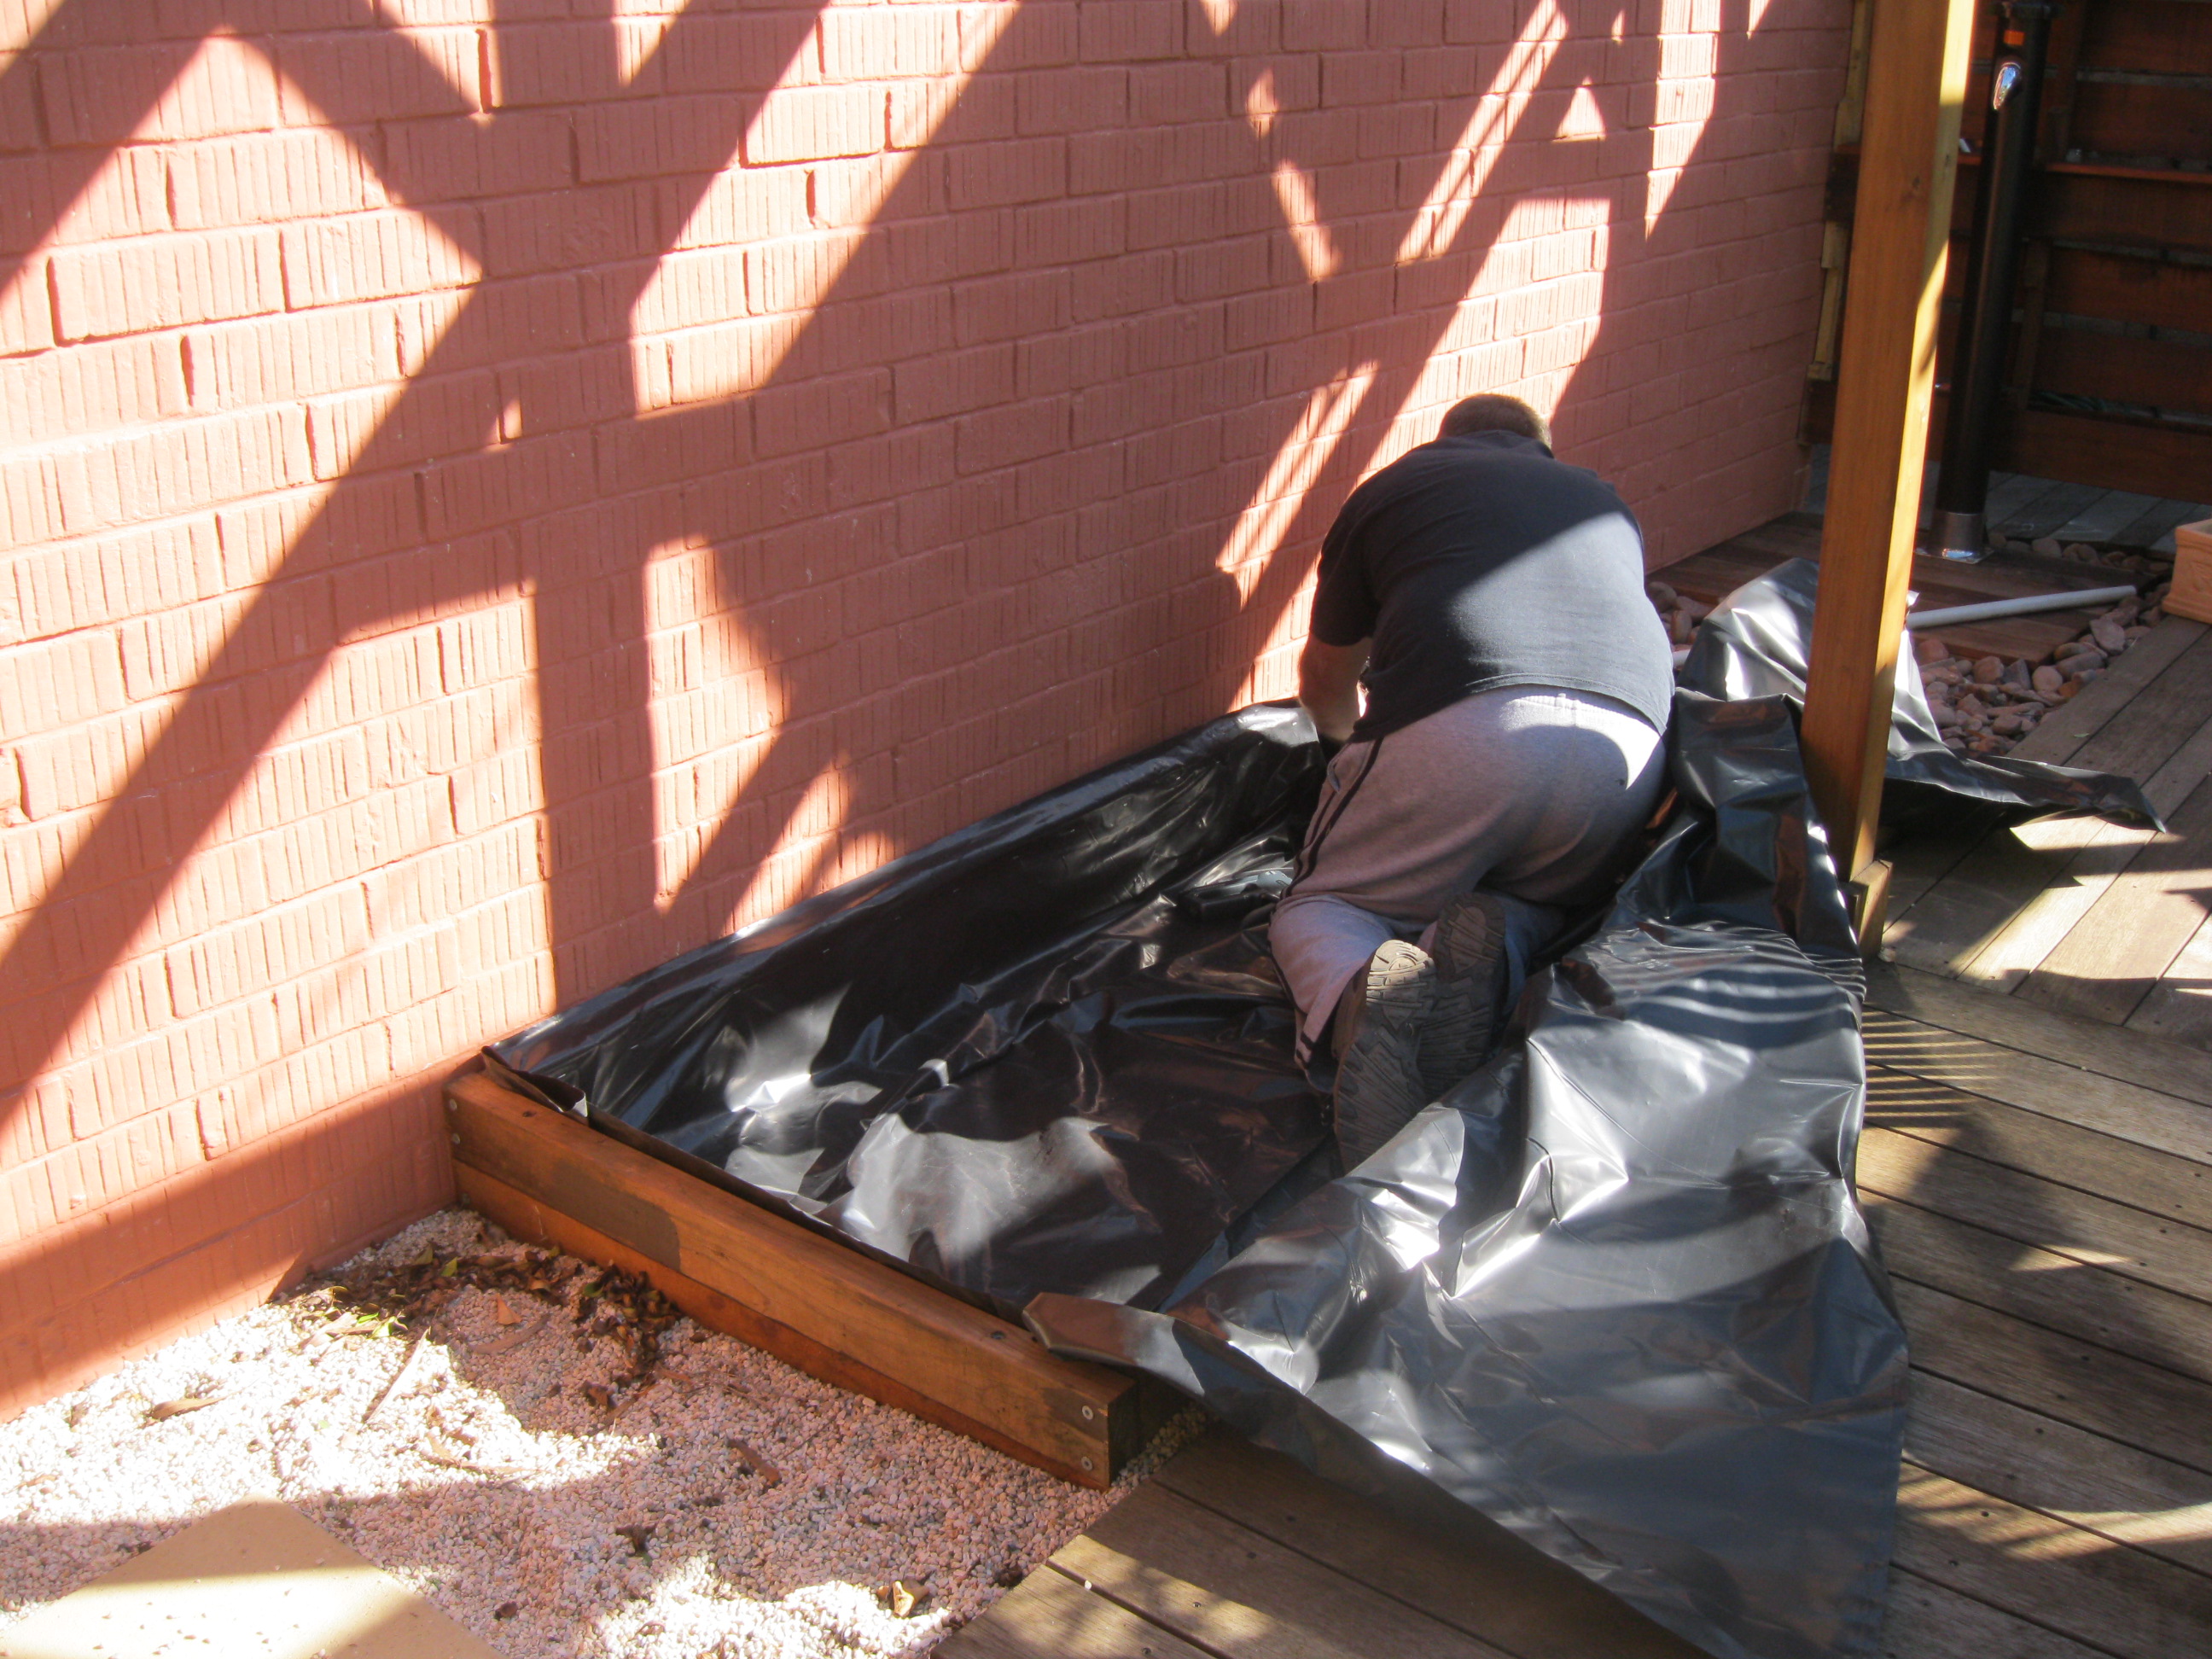
Stapling the liner to the wicking bed
The liner gets stapled to the top of the bed, spacing the staples about 15 cm apart. Here is a close up. Nothing too fancy.
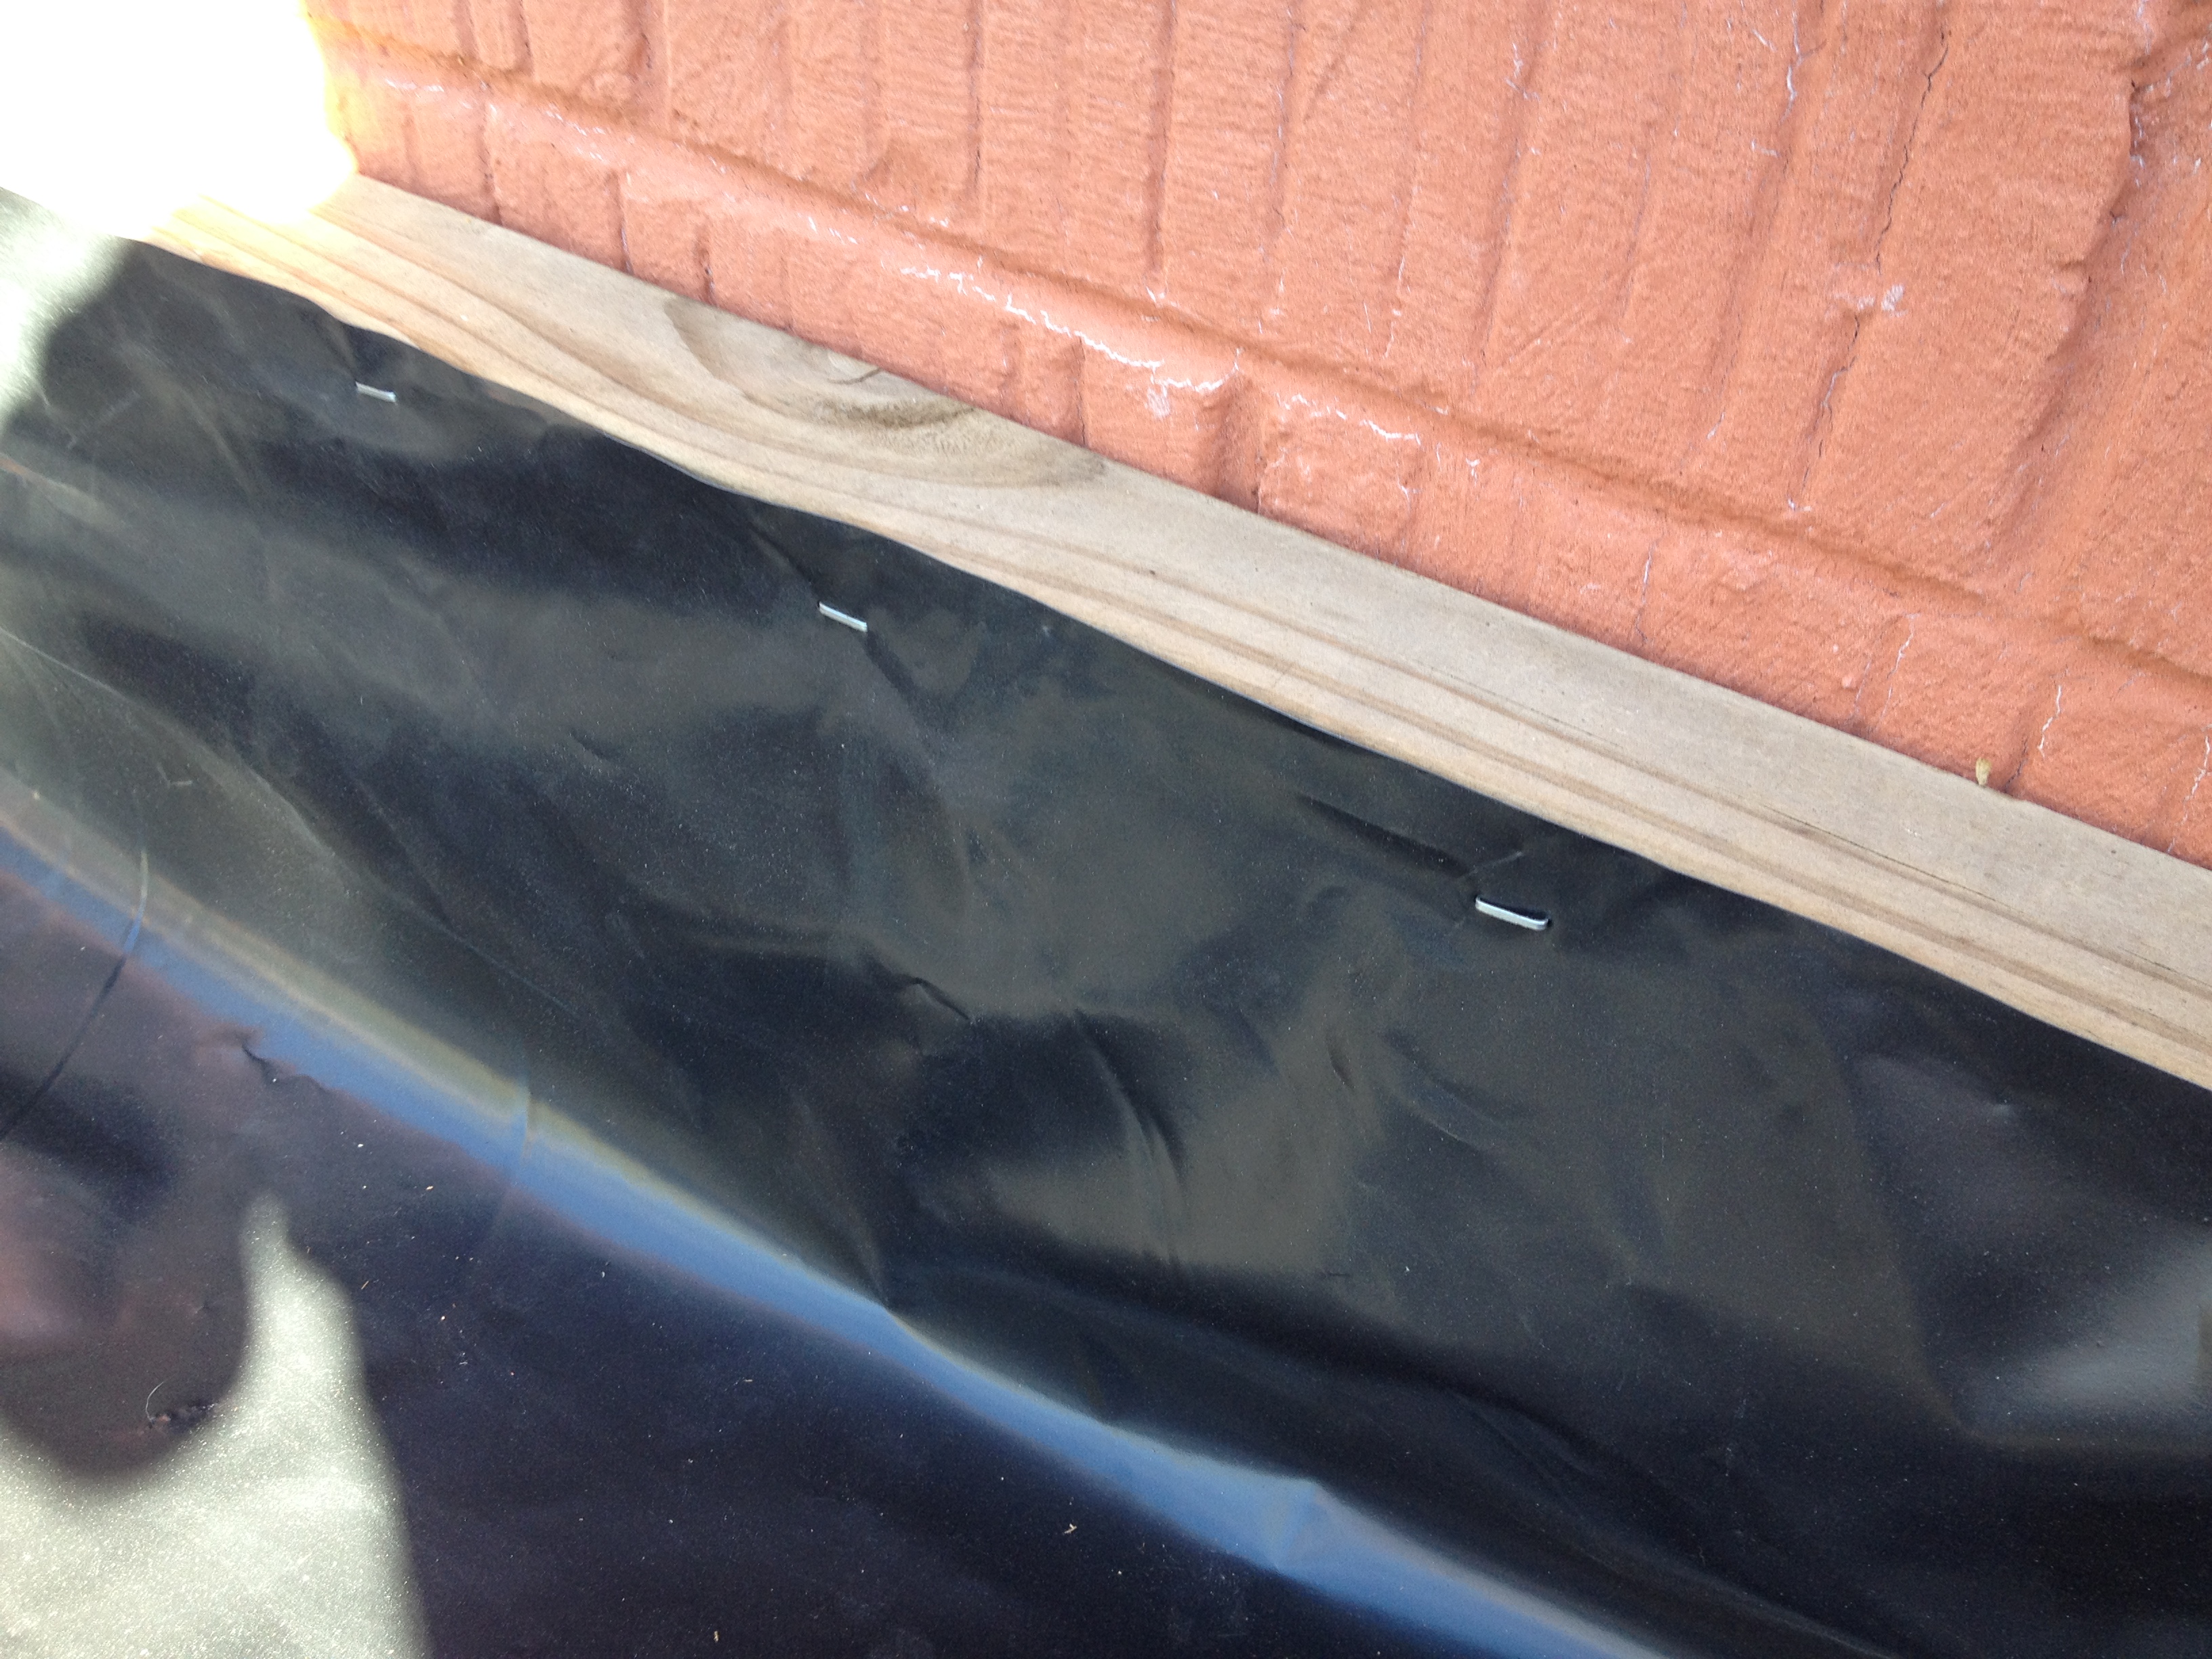
Stapled liner on wicking bed
I found that by starting at one edge of the liner made the job a lot easier. I trimmed off the excess using a Stanley knife leaving about an inch above the wood just in case I needed to make any adjustments with the liner.

Wicking Bed lined with builders plastic
Next I fitted an overflow pipe. I used a 22 mm spade bit on my drill and drilled a hole just below the centre line of the bed. Be careful to drill from the outside in. When you see the tip of the spade bit against the plastic liner, stop. Drill from the inside out so that you don’t rip a tear in the liner.
Then I fitted a piece of 19mm poly irrigation pipe and sealed it in place with more silicon. It won’t move from the liner.
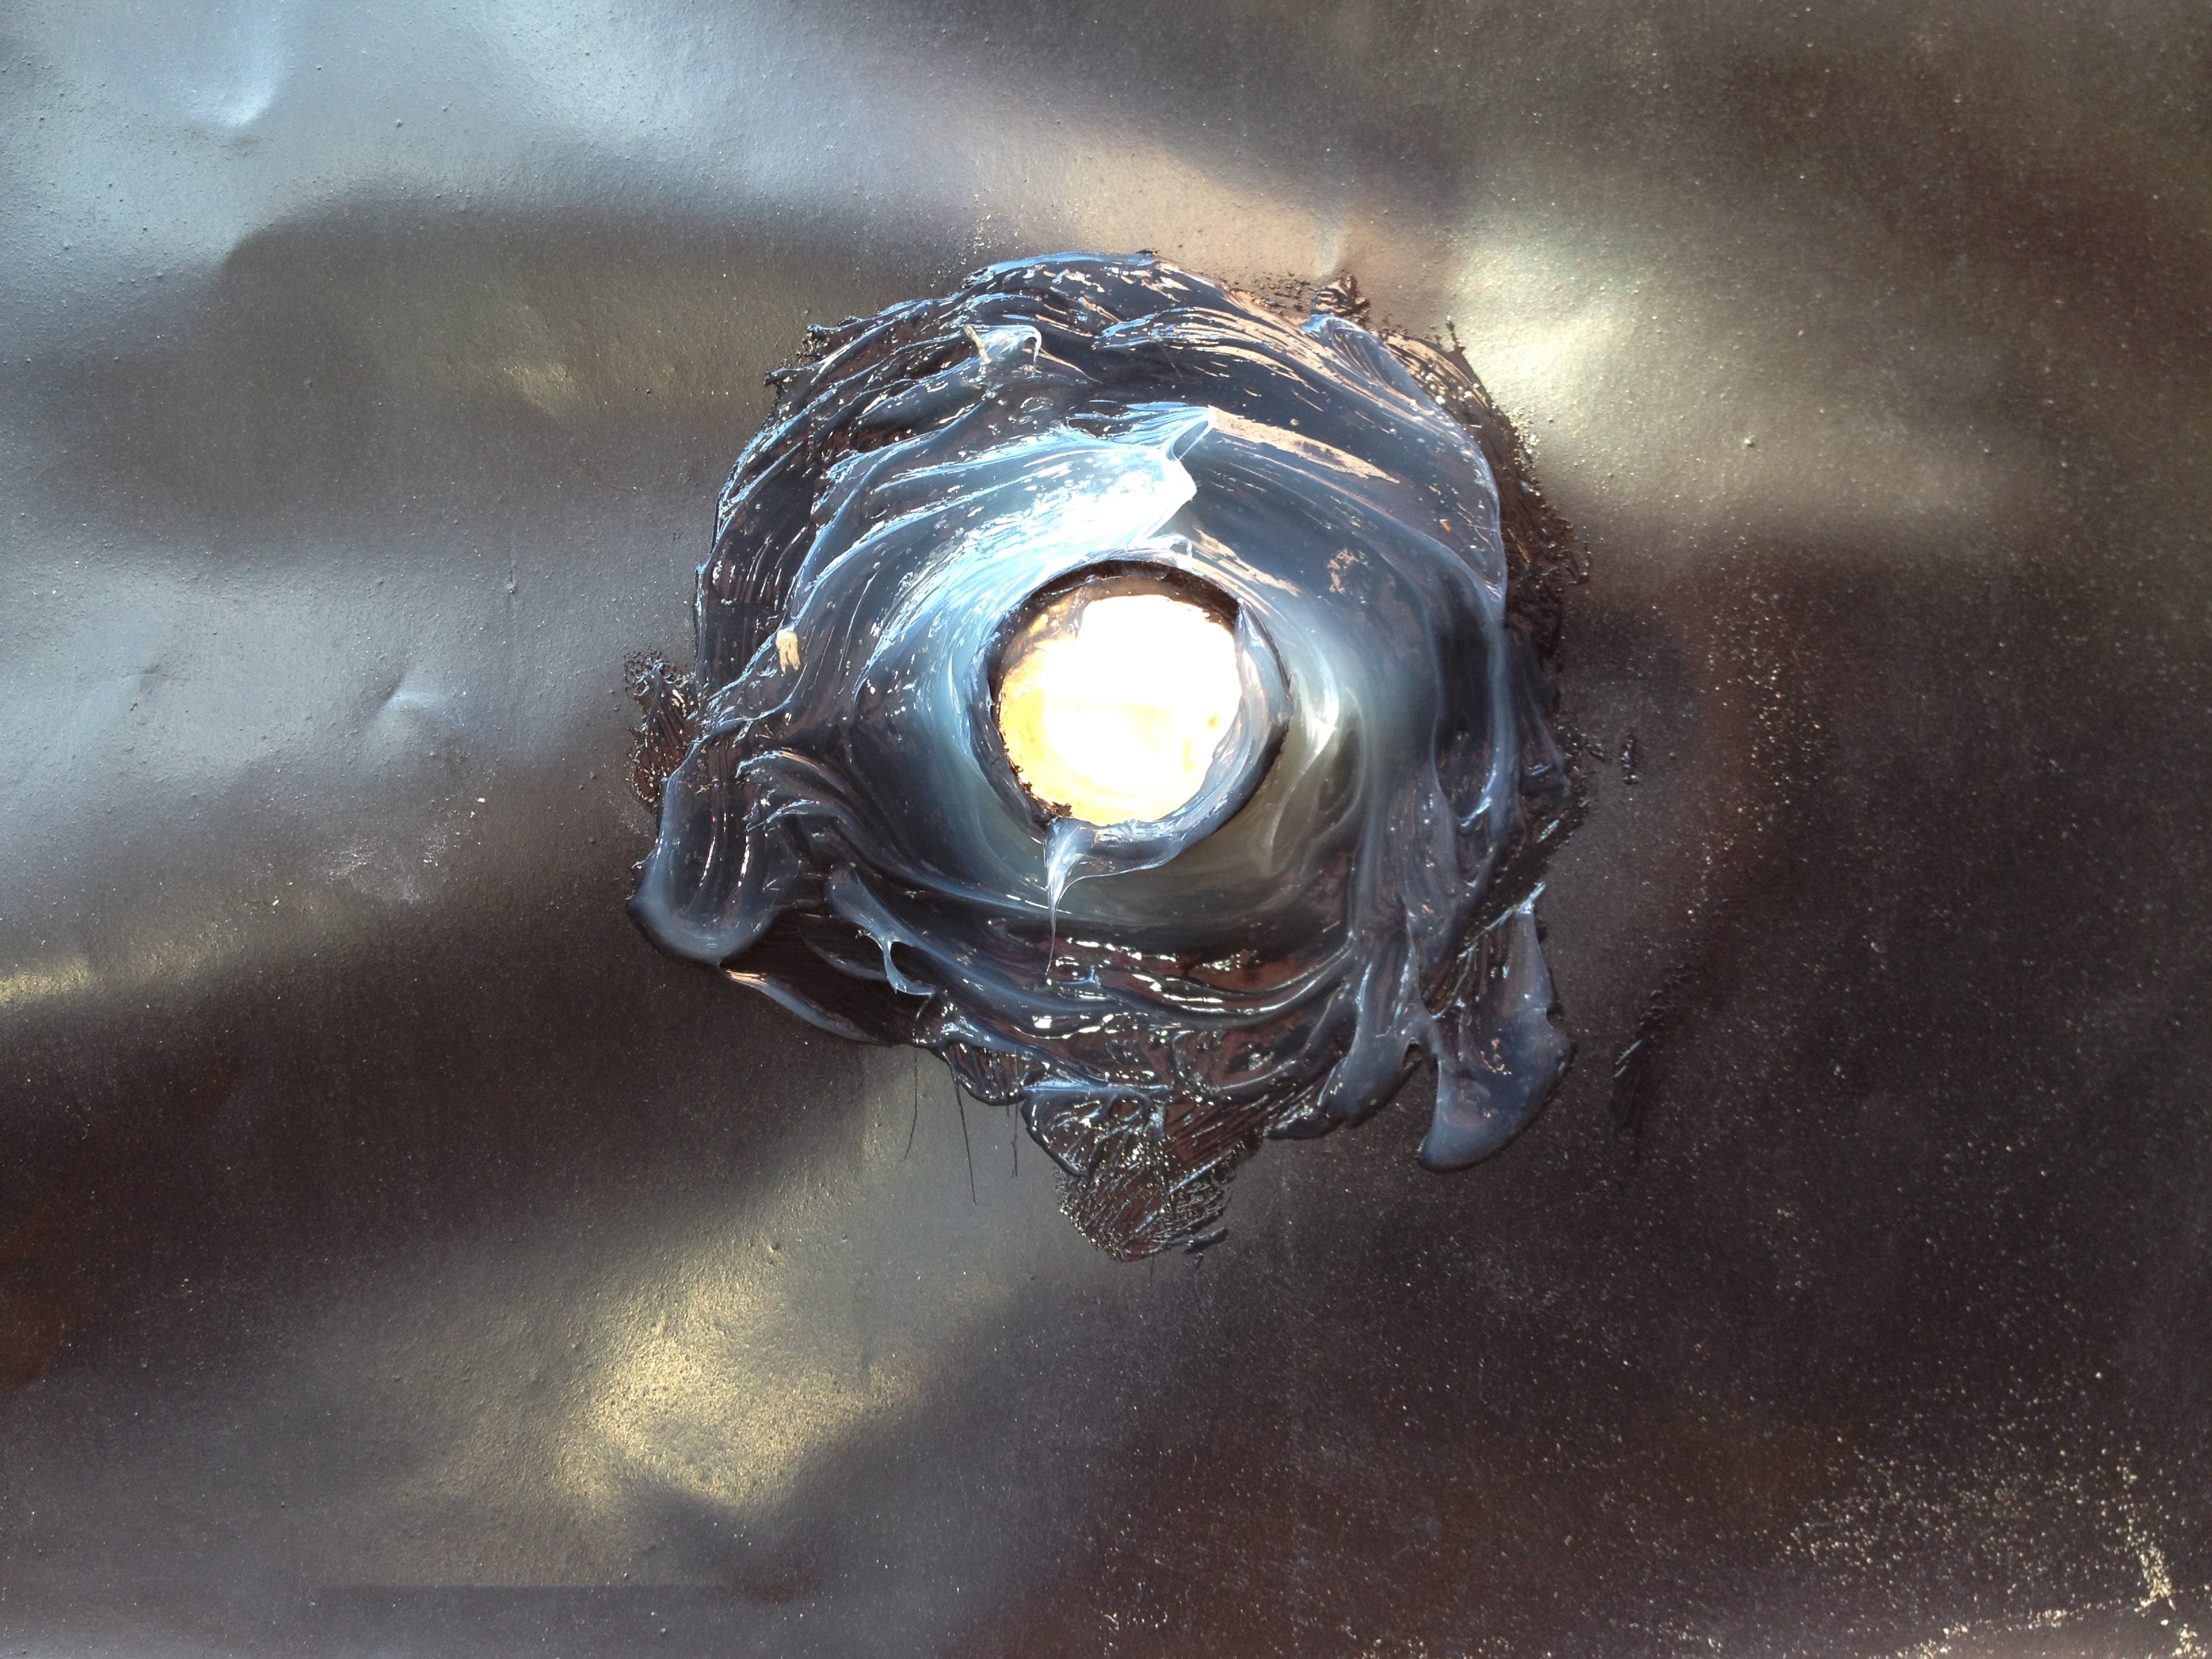
Overflow pipe about half way down bed
Just so you get an idea of how much pipe sticks out, here it is from the other side.

Outside view of overflow pipe
It will only move if someone accidentally kicks it. Otherwise, it is pretty sturdy.
Now it was time for the watering tube. I found some 32 mm electrical conduit on the side of the road a while back which was ideal for this project. You can also use slotted ag pipe, but as this bed is quite narrow, I decided to use the conduit.
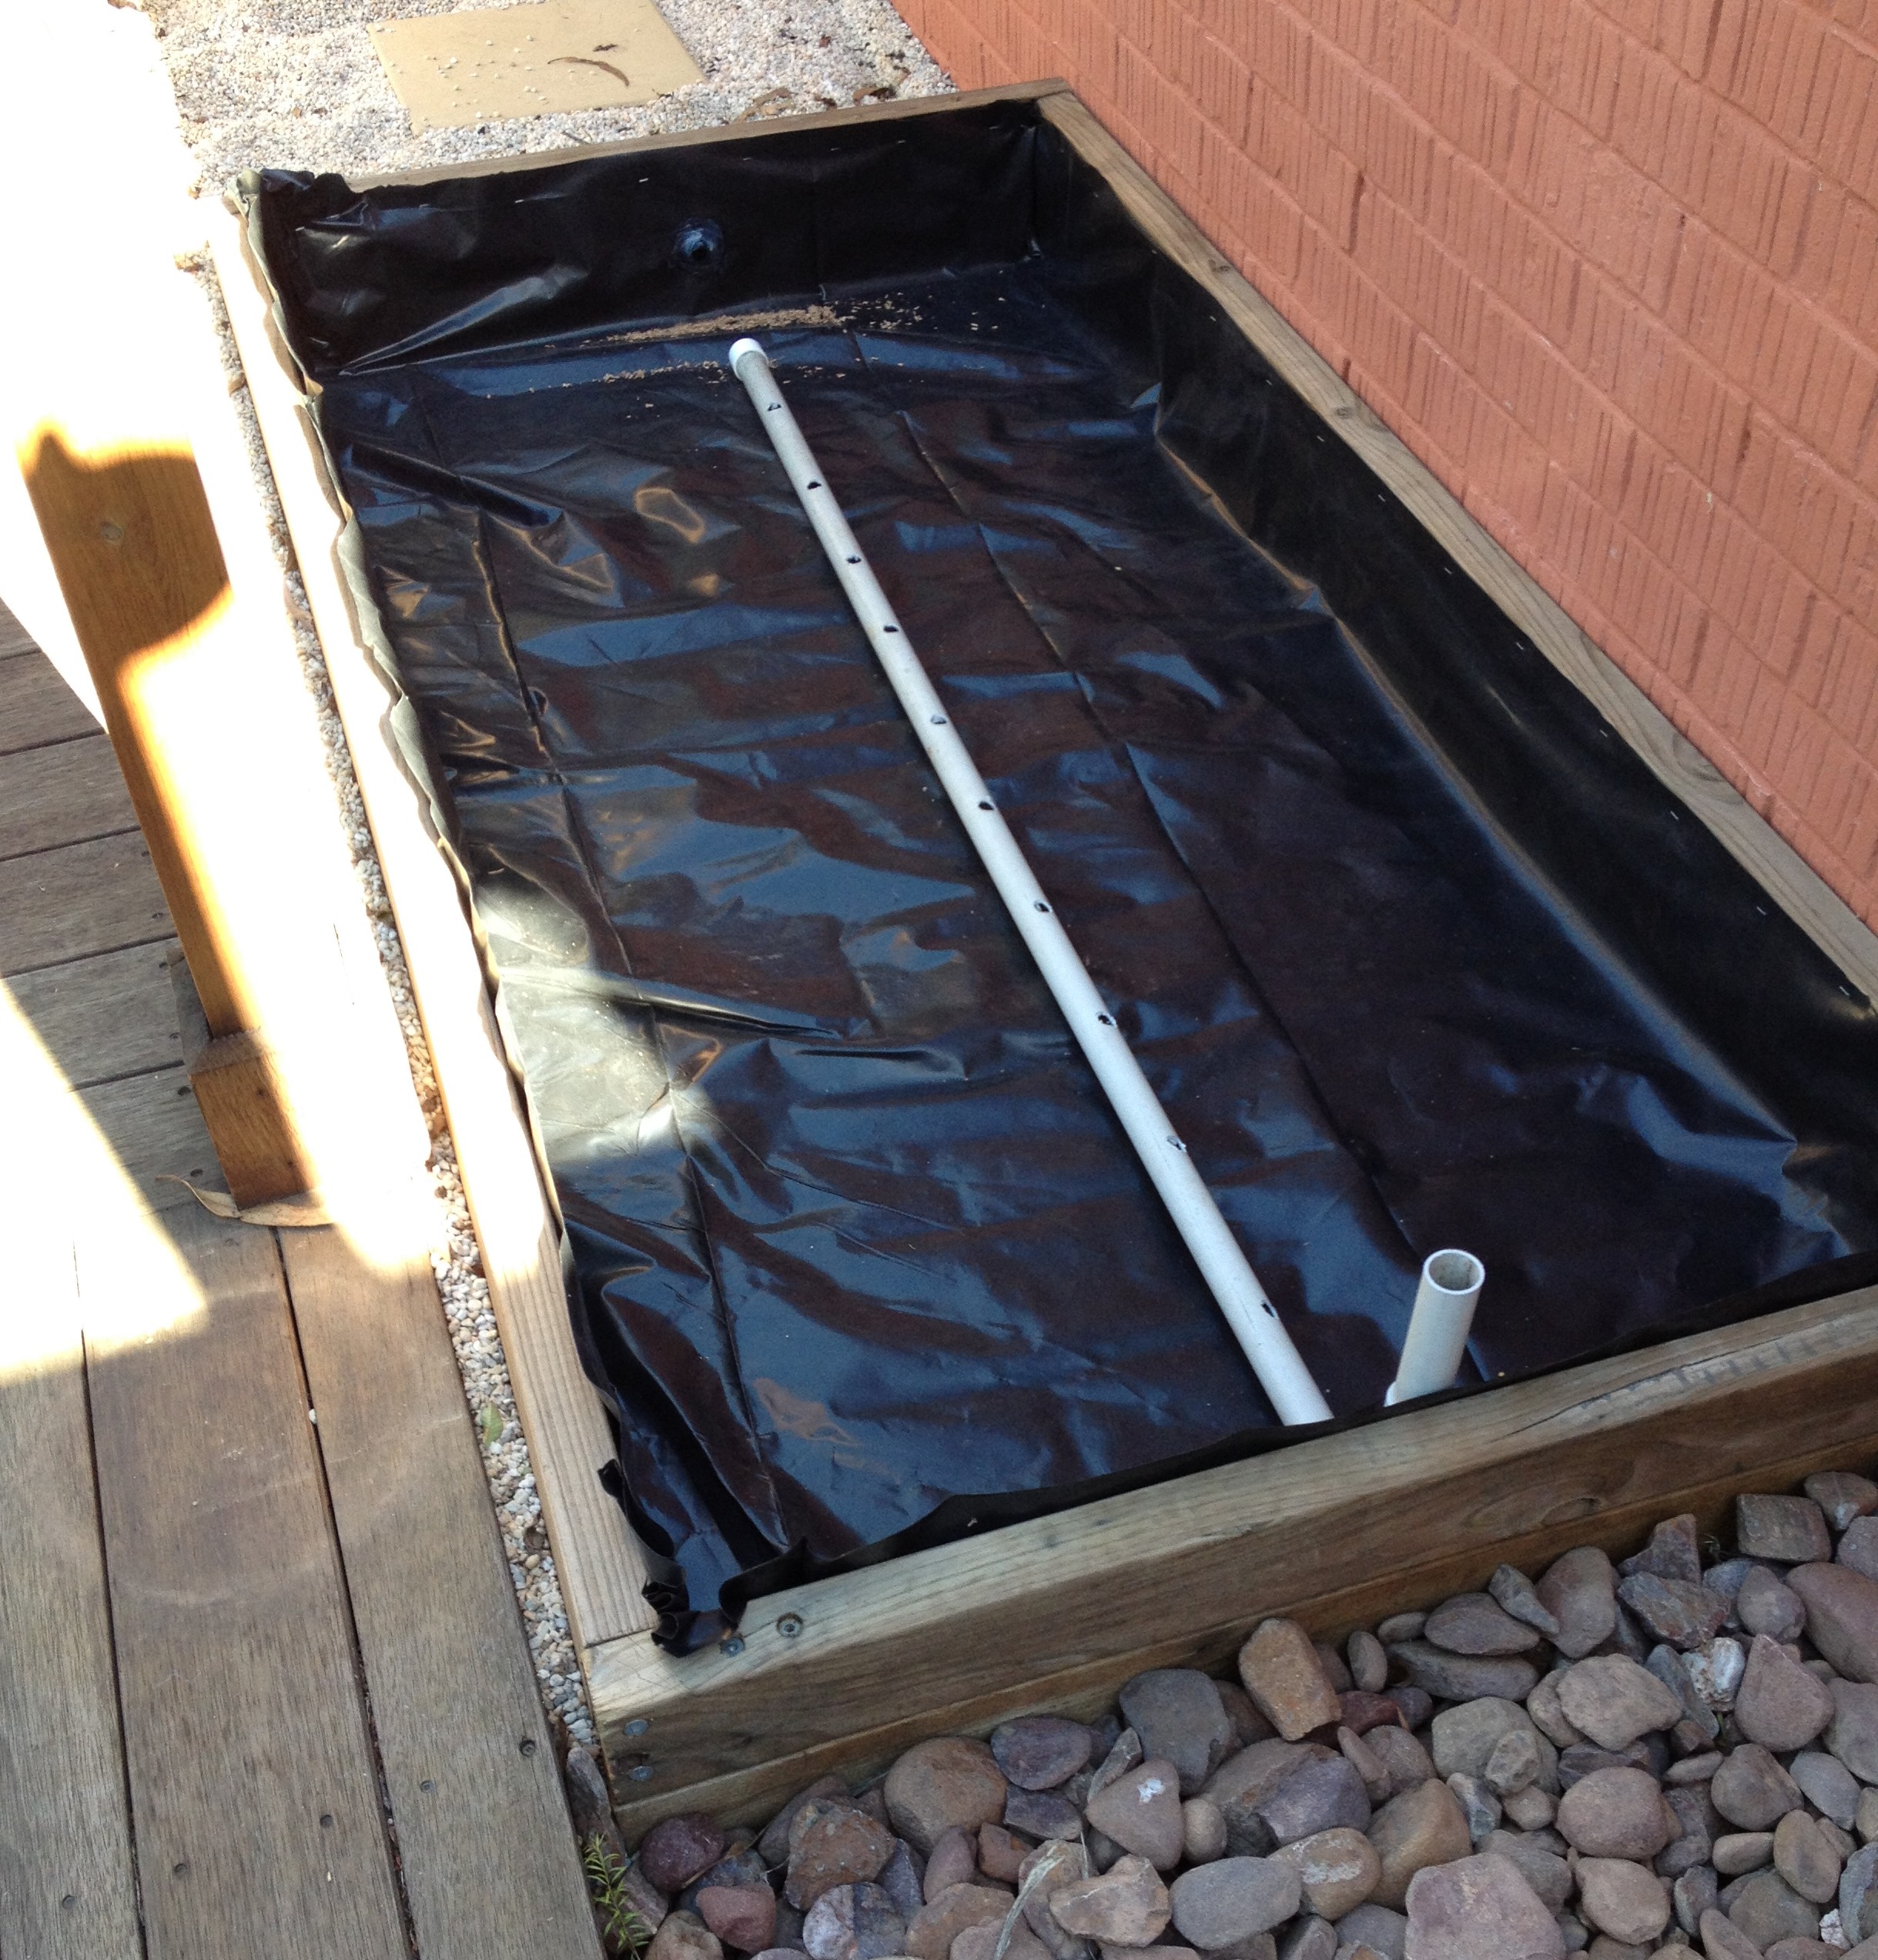
I drilled 16 mm holes along the pipe, added an 90° elbow joint to the watering tube, and capped it off at the end. I joined all the parts together with more silicon sealers. I use silicon because I wanted something that I could dismantle in the future. Normally when working with PVC pipe you would join it with PVC Solvent (blue glue), but I figured that it too toxic in a wicking bed for growing food.

32 mm electrical conduit joined together with silicon sealer
I fastened the watering tube to the bed at the staple line with a saddle clamp so that it will not move when watering.
Sand to stop watering tube from moving
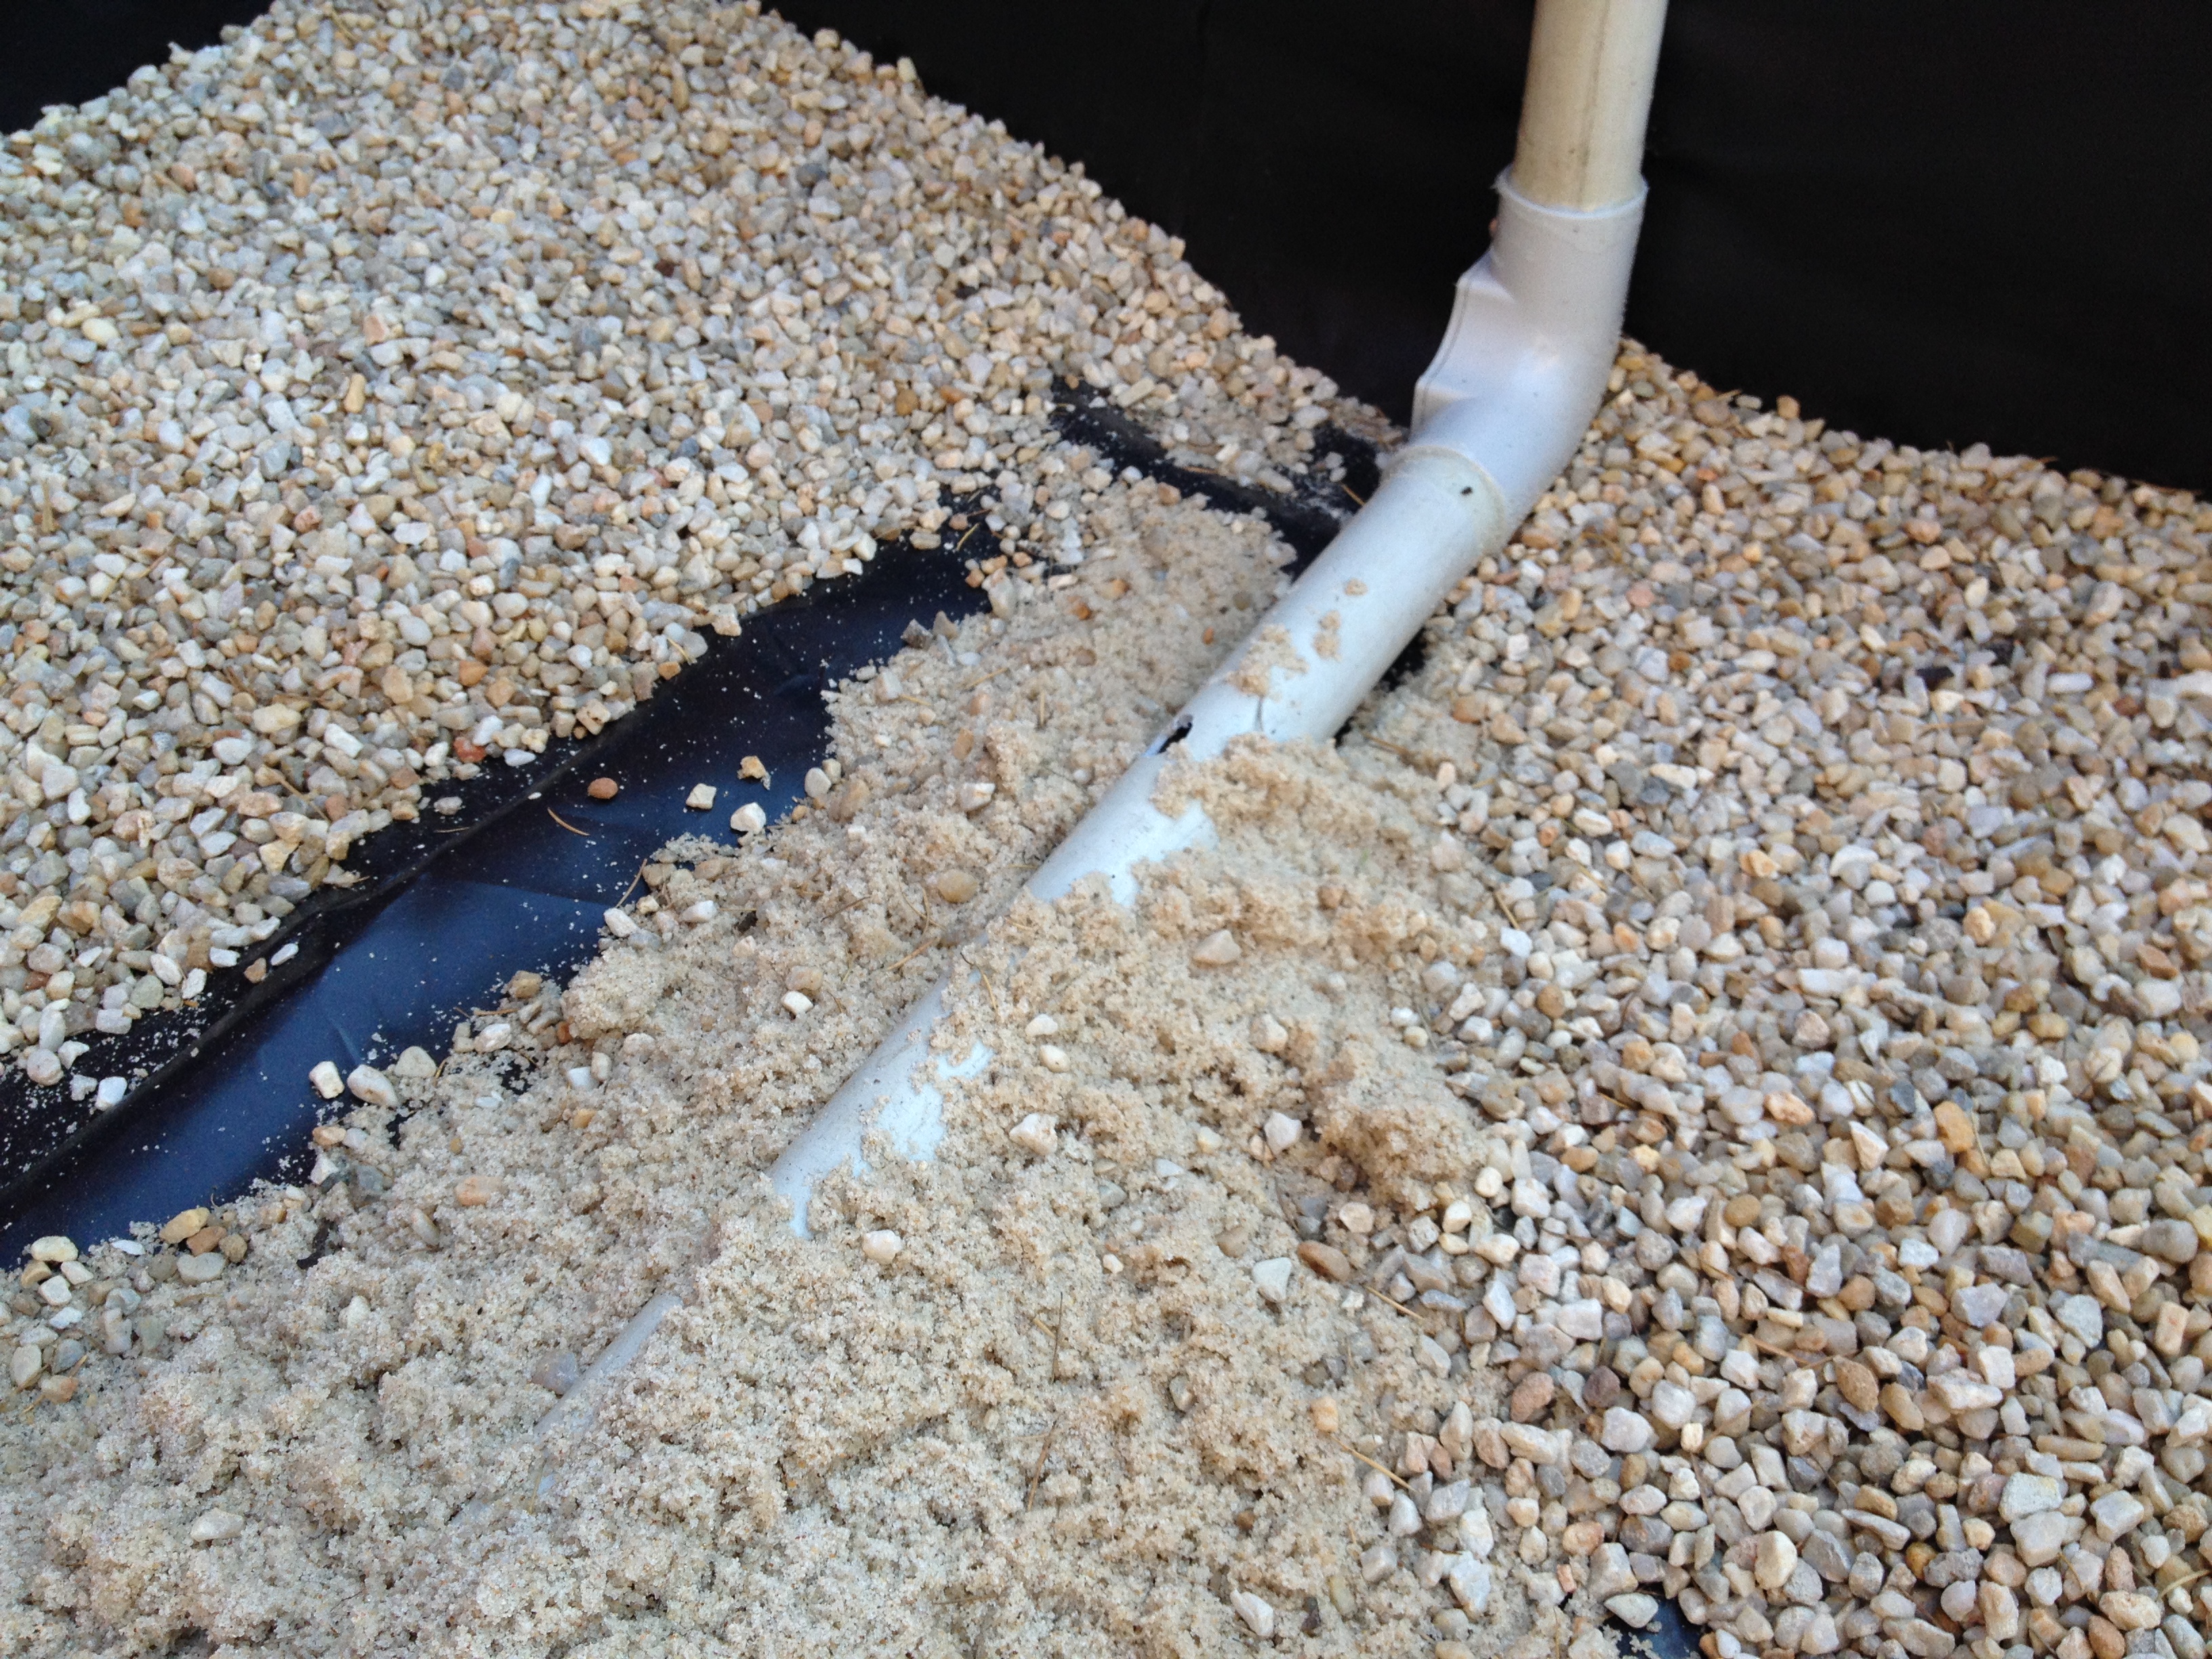
To stop the pipe from moving further, especially when filling the bed, I put a few shovelfuls of washed sand (had a bag lying around from my last paving project). Then I filled the bed with smooth gravel up to the level of the overflow tube, and raked it as level as I could.

Leveling out the gravel in the reservoir
With the reservoir now complete, it was time to lay the separating textile so that the soil that I am about to add will not mix with the gravel.
Kim gave me this old blanket to use. It was made from acrylic and kept on shedding everywhere and the dogs had contributed to its demise. It was perfect, as it will not rot, even though Kim says that it is the most expensive wicking bed layer ever. The last wicking bed I made, I used a thick cotton blanket, however it rotted down within six months, with the aid of some worms. Best to stick with some sort of non-organic fabric that is porous.

Loose weave non biodegradable blanket
Once I laid the blanket on top of the gravel, I then folded over the edges and started adding soil.

Filling the wicking bed with soil
I had some really great soil over in the garden bed near Cluckingham Palace that I had been building up. It was a mixture of chook house bedding, mushroom compost, and clay. It had broken down over the years and the bed was just overflowing with great soil. I need to remove some as I am planning to relocate and espalier some apple trees in that spot. Win-win all round.
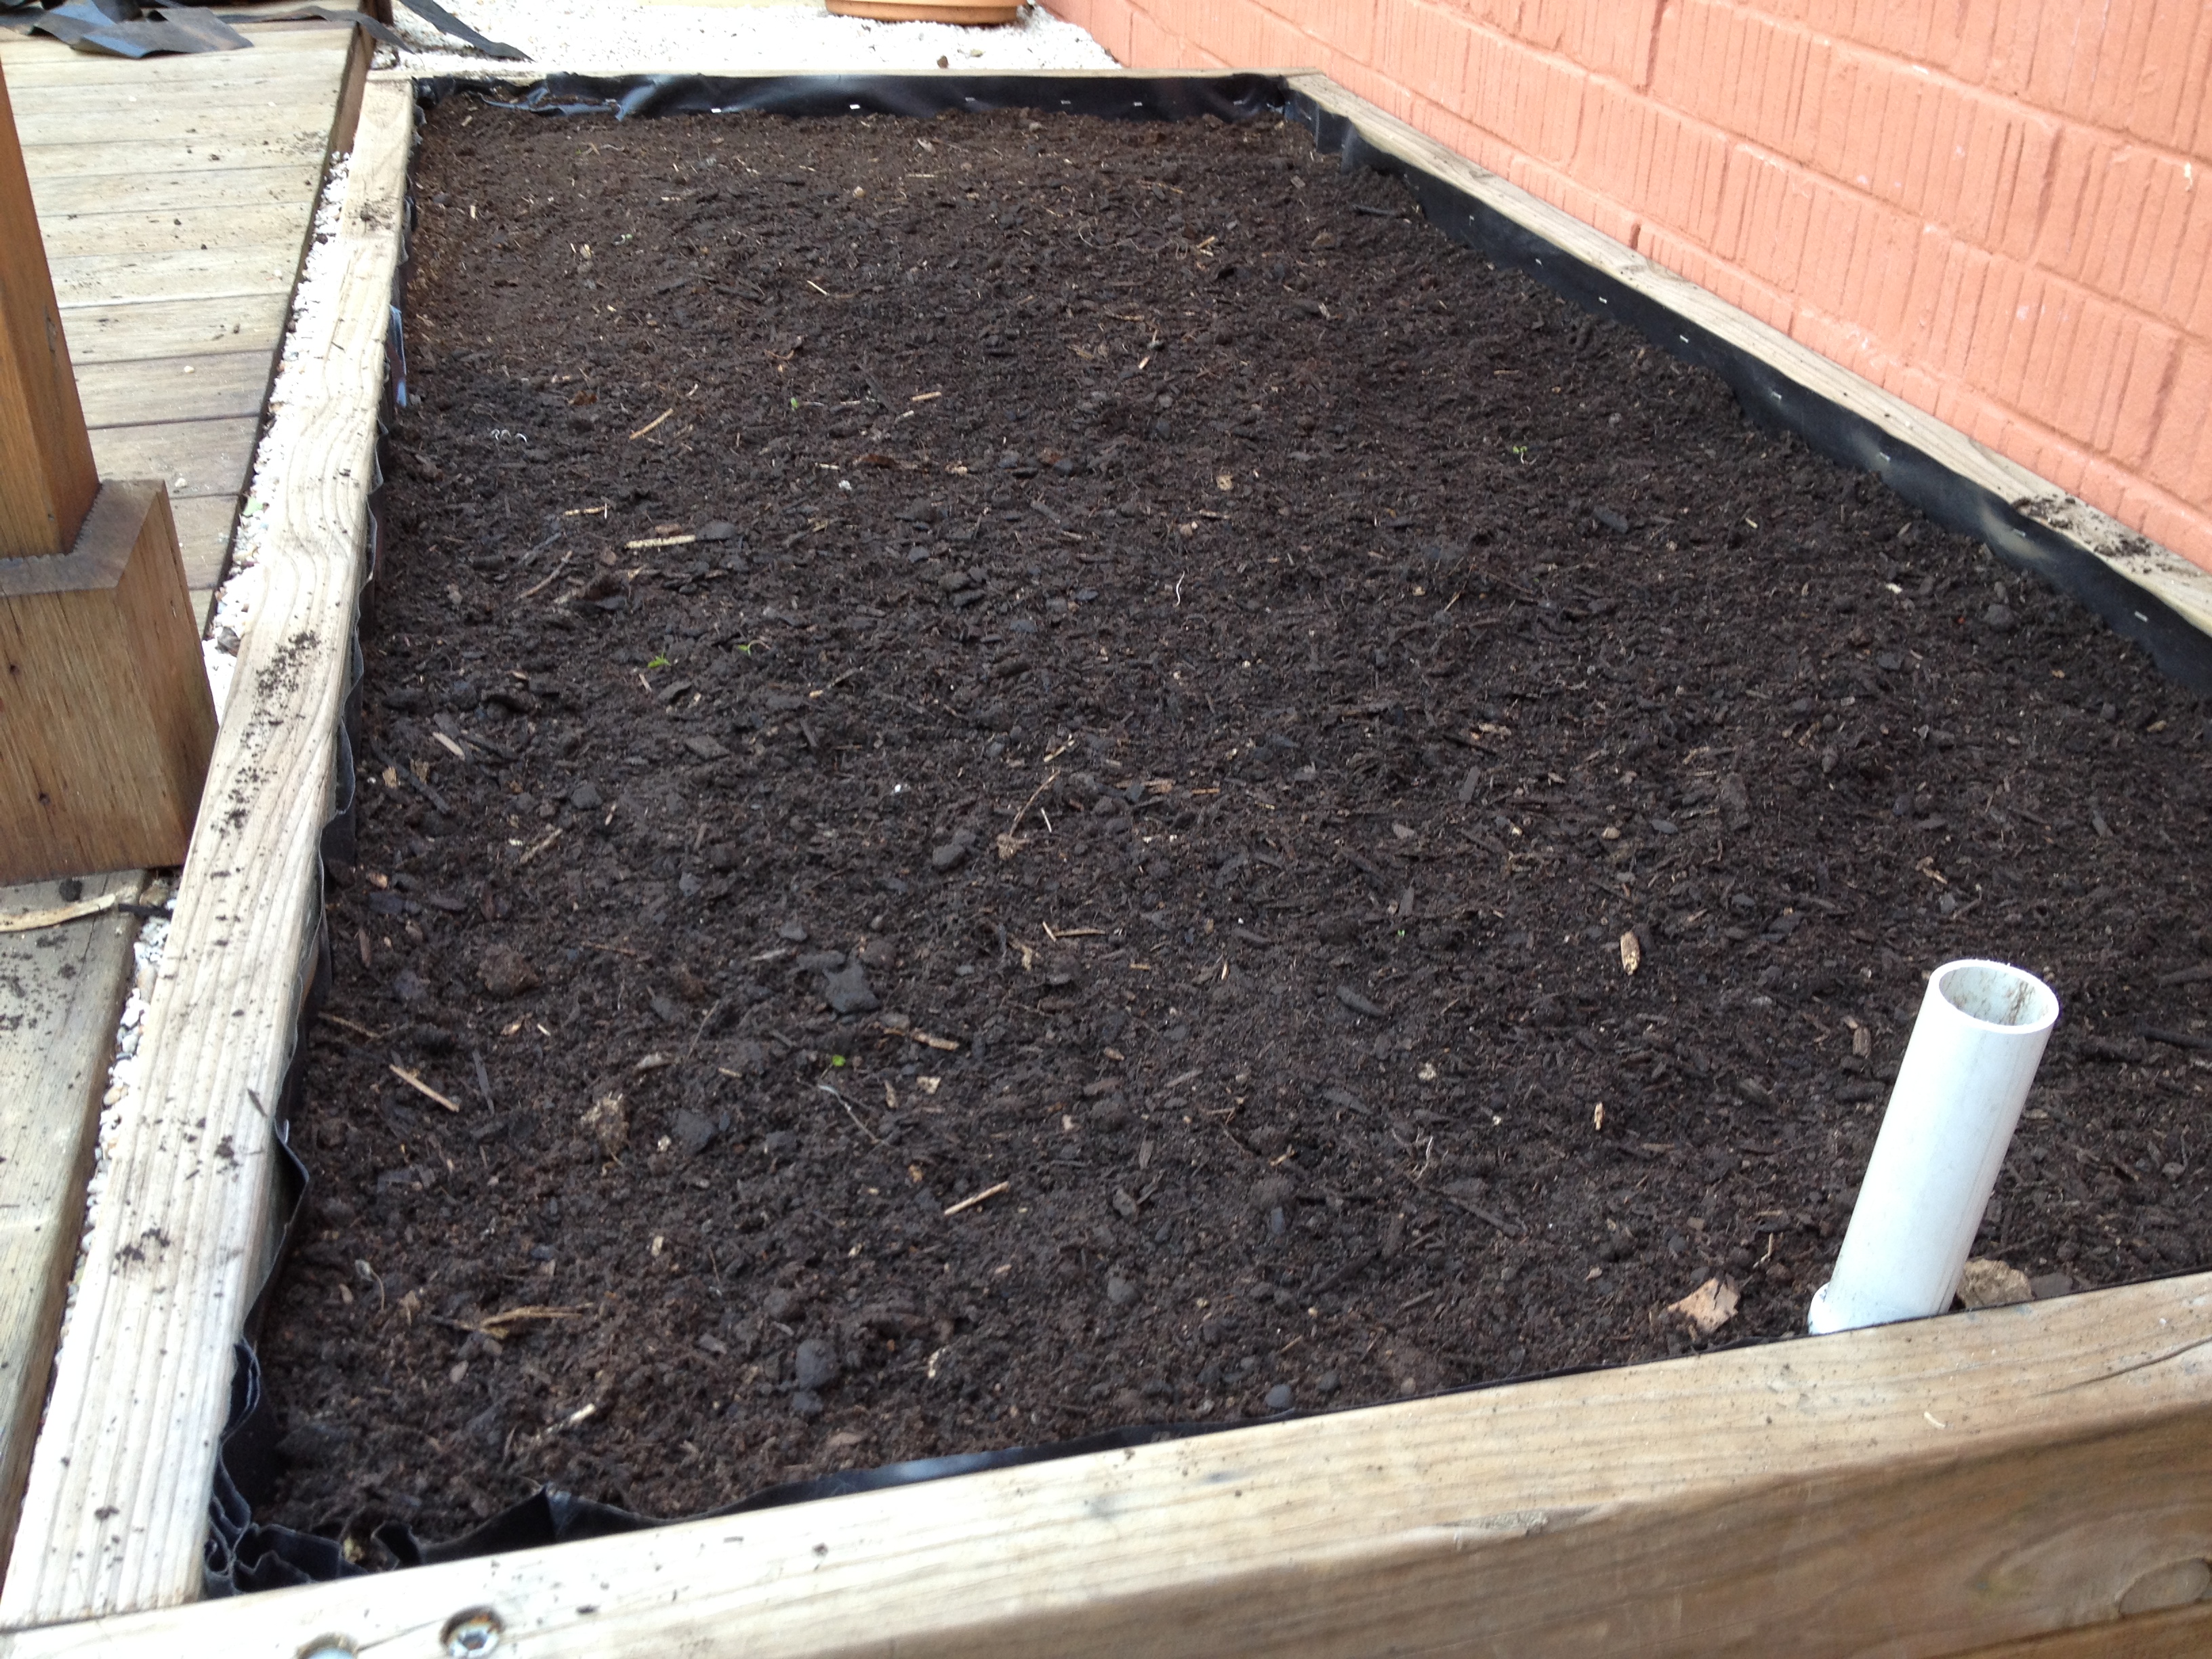
Filling the wicking bed with soil
I didn’t quite have enough soil, so I threw in a bag of compost from the hardware store, and mixed it through. Just the right level and about 7.5 cm (3 inches) deep. Most annual vegetables are shallow rooted so will have no problem with this depth.
I left enough room for some pea straw mulch if needs be in summer, and the soil will probably settle anyway.
Now for the big test. To see if I managed to keep the liner intact and that the overflow pipe worked sufficiently. I put the hose in one end, and thankfully, water came out the other end after about 3 minutes. That means that at 20 litres per minute (flow from hose) the bed contains about 60 litres of water in the reservoir.
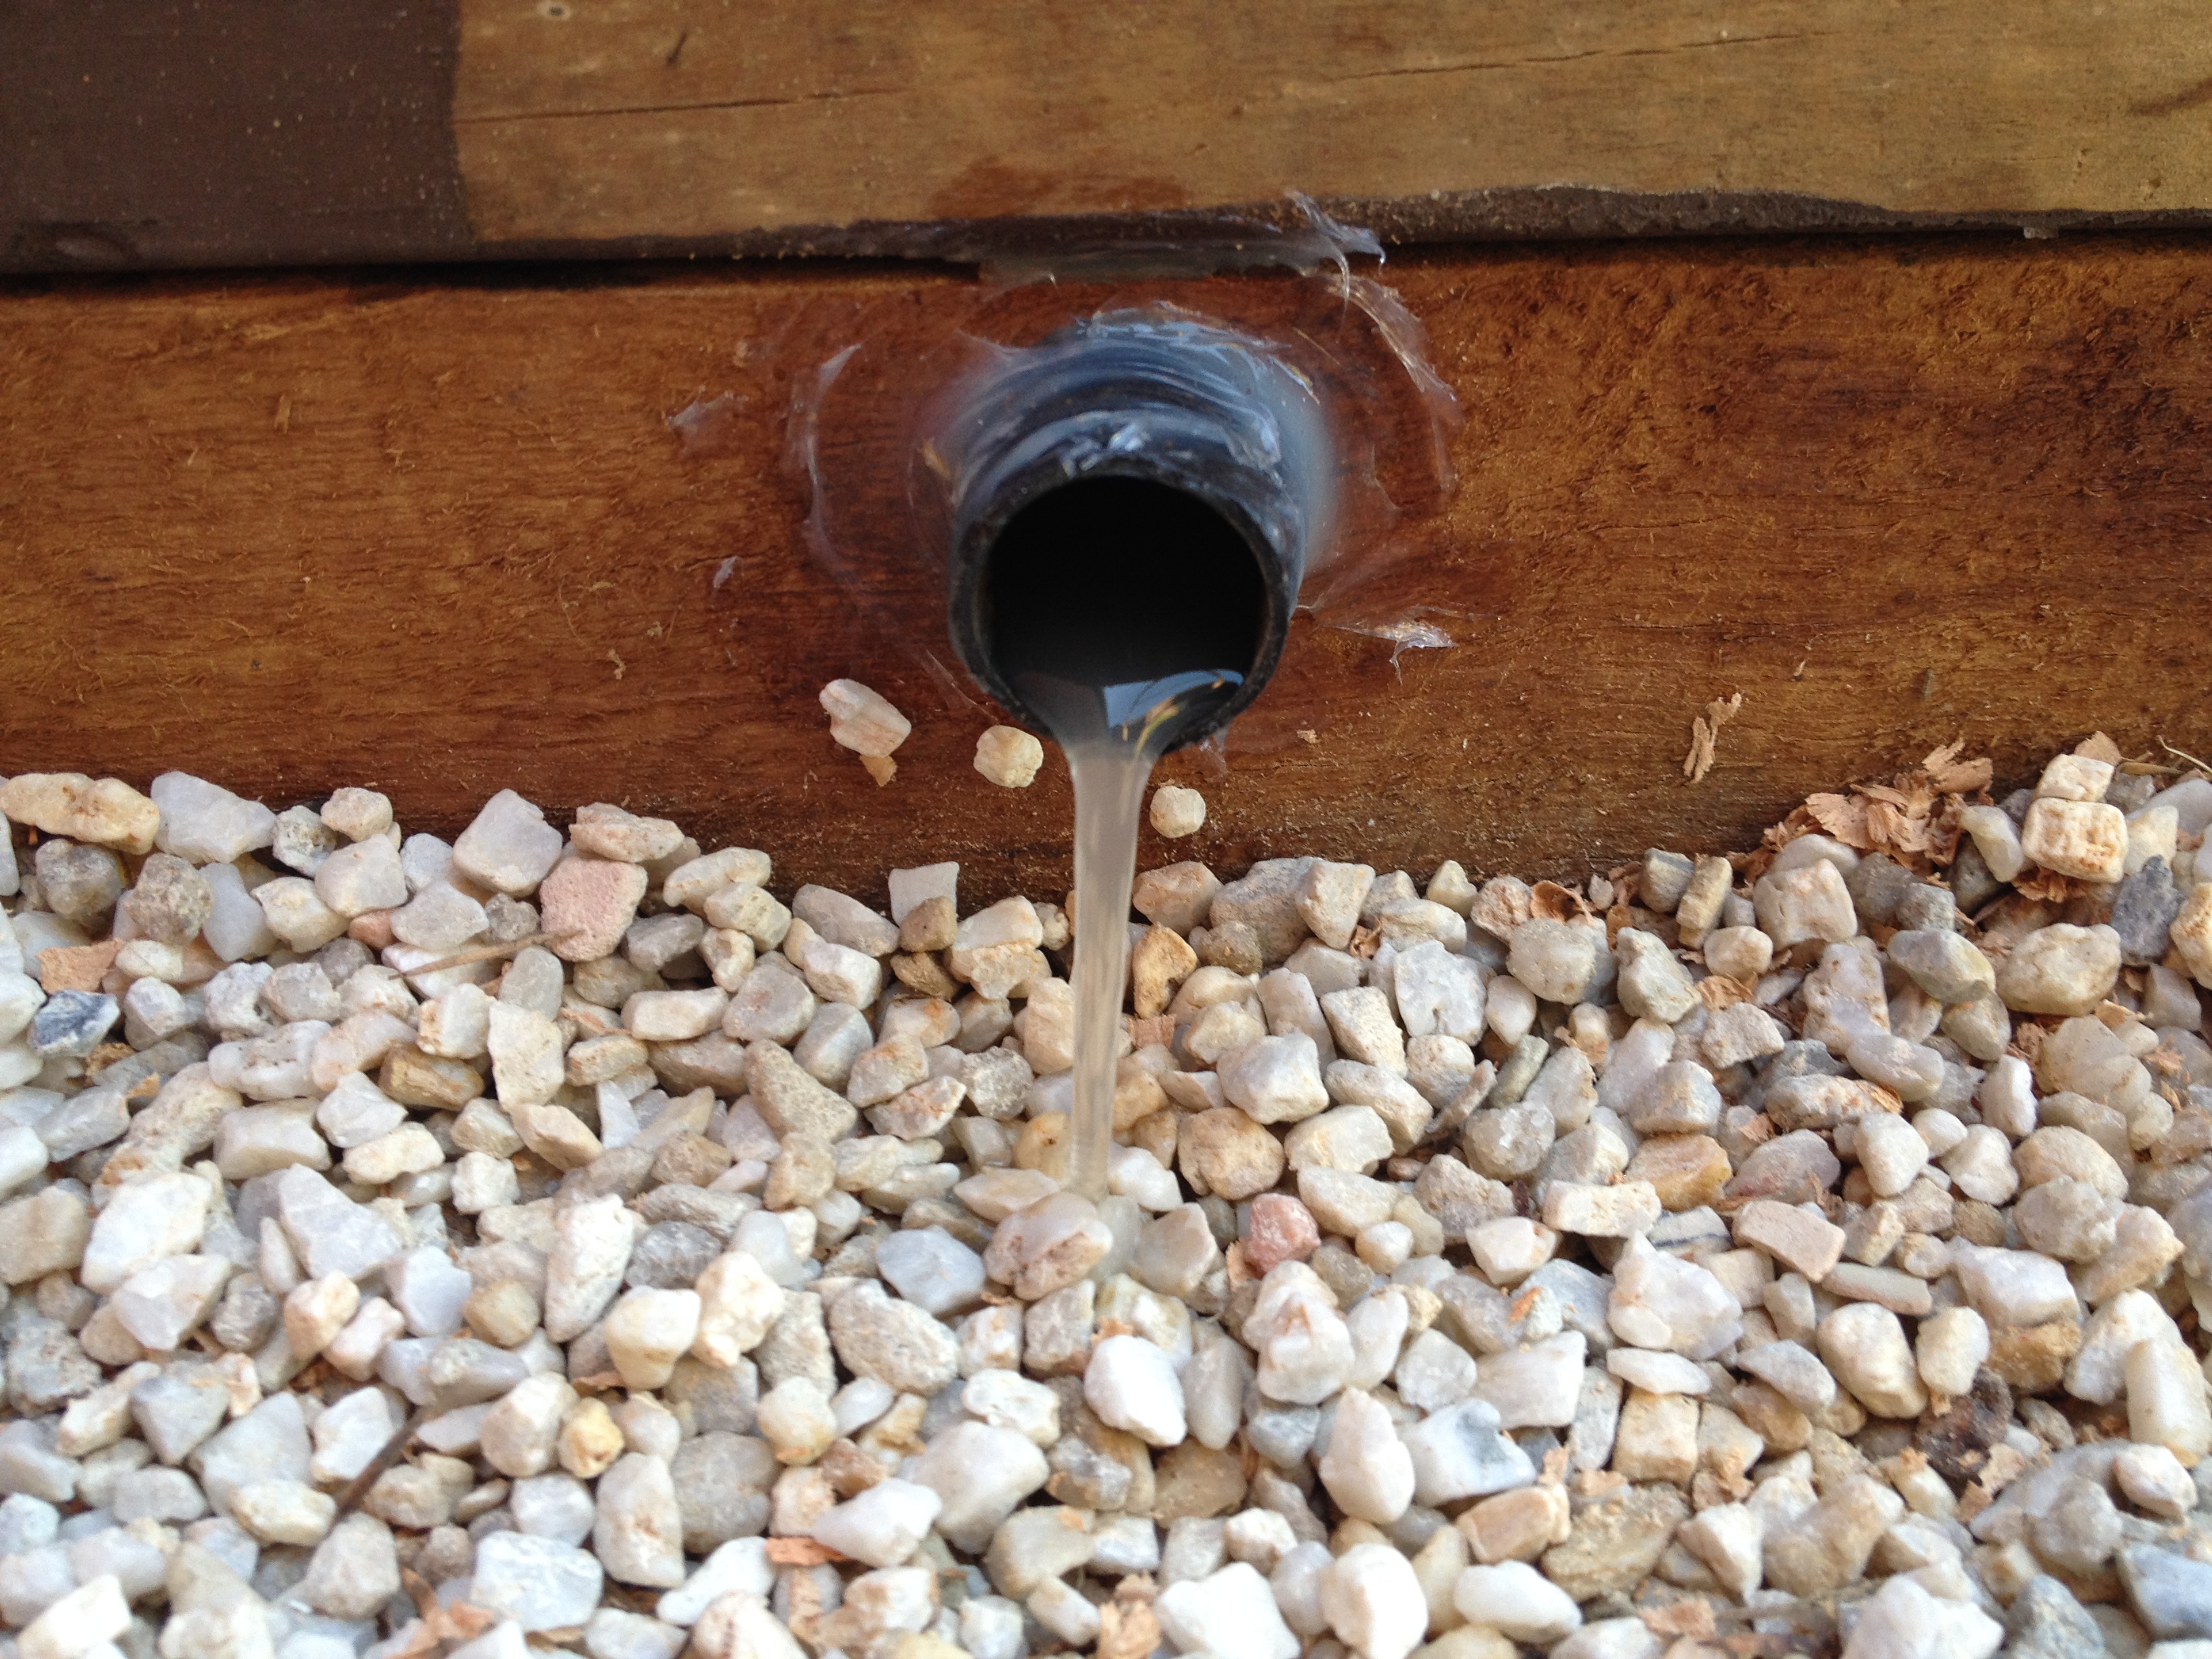
Overflow pipe test
Brilliant, if I do say so myself. The soil will stay moist during hotter weather and will only need to be topped up twice a week if it doesn’t rain.
It was now time to plant the bed out. We didn’t have any pick-and-come-again lettuce anywhere in the garden, so this was the perfect place. I did have to purchase the seedlings, which was included in my $11 outlay, but I wanted something quickly established as we have a private garden tour for next weekend.
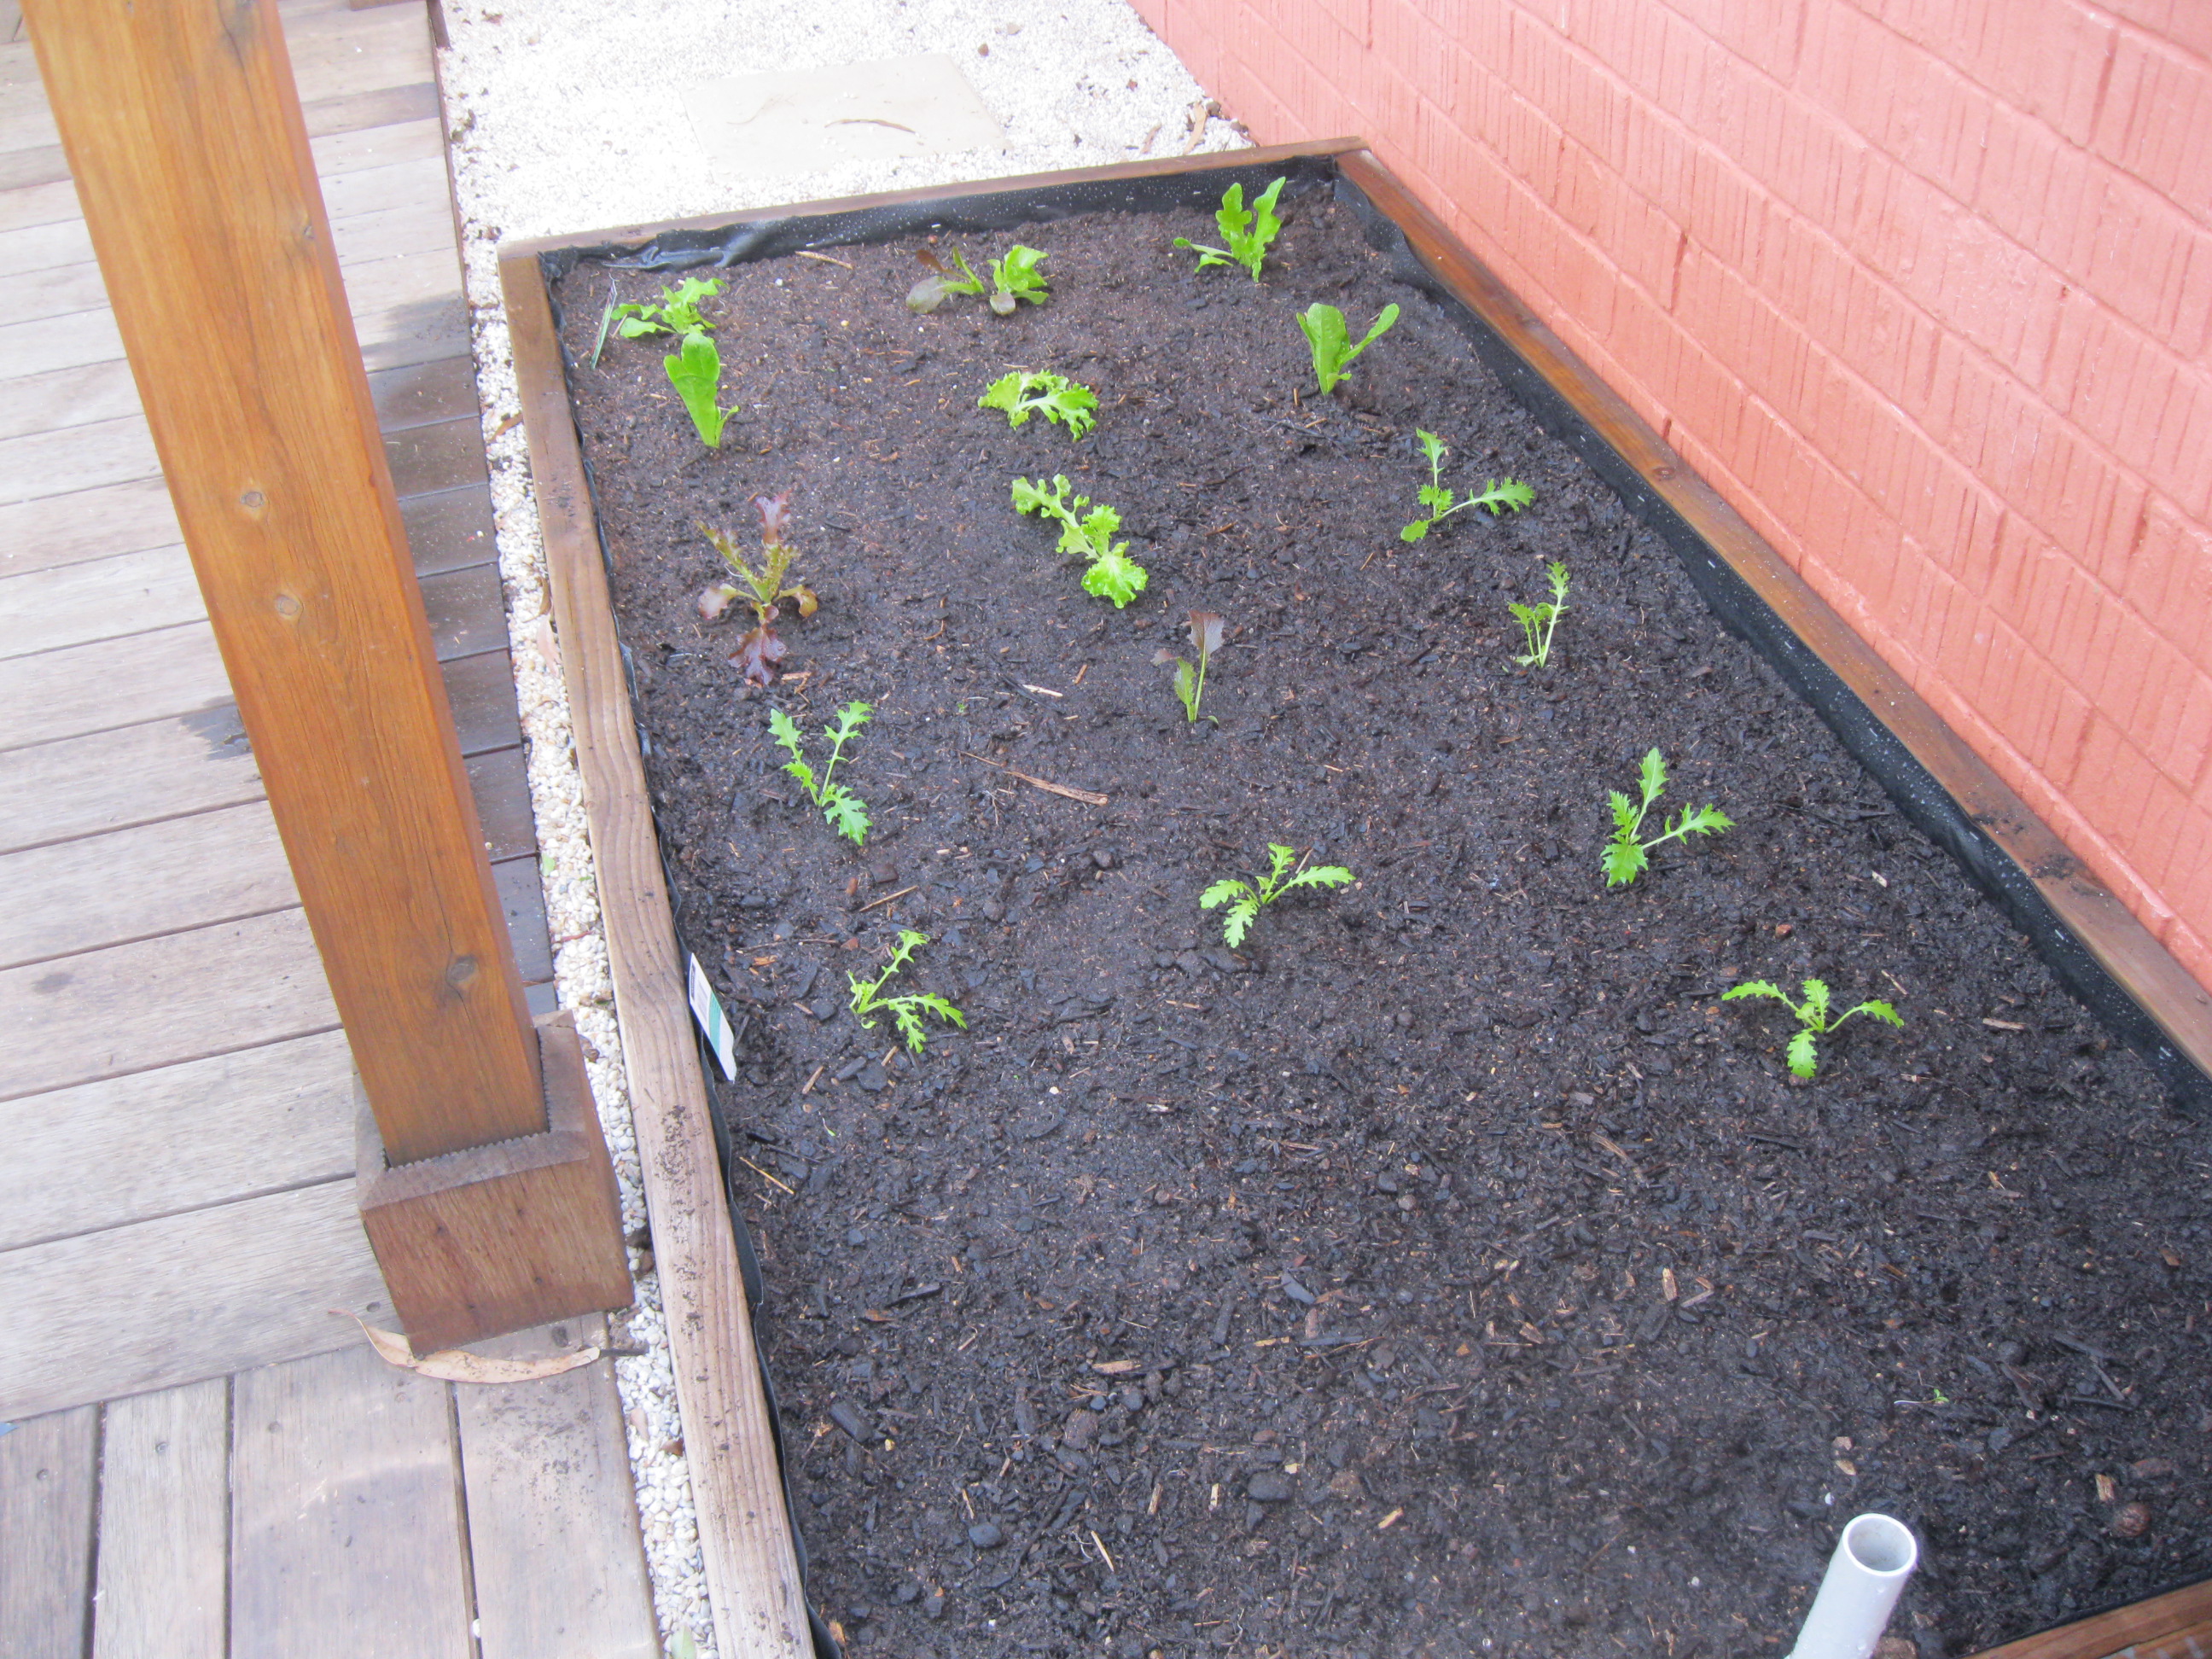
Wicking bed planted with lettuce varieties
You can see that I need another punnet of plants and as Kim wants more spring onions, her wish is my command. I will buy some spring onion (shallots) seedlings tomorrow and plant them out.
Anyway, I am proud of my efforts. Building a wicking bed on concrete is a great way to add growing space if you can’t remove the offending concrete slab. It was an easy project, and is the third wicking bed that I have built. This one is especially nice as it blends in with the aesthetic of the decking area.
What do you think? Will you be covering up some concrete near you soon with a wicking bed?
It looks great Gav, well done!
Thanks Charmaine!
looking forward to seeing it on our private tour next weekend
claire in kalorama
Thanks Claire. Looking forward to meeting you again.
We don’t have any concrete here but we did buy one large wicking bed, have made another and started on the third one this week. We had a fairly dry summer here in SE Qld so they came in handy.
Nice one Chel. I may end up converting some of my other garden beds to wicking as well if the summer heat gets much worse.
Brilliant!
Bloody Hell , this tablet is hopeless for typing Lynda
Yes they are! I do have a post coming up that may help you. A bit of a green tech flavoured post.
Thanks Lym (or is that Lynda :-0)
I have 9m of wicking beds on concrete here and I love them.
I recentle made 6 more garden beds at my place and would’ve loved to make them wicking beds as well, but they’re designed for the chook tractor to move around them. Chooks and wicking beds just don’t go together!
Brilliant. Do you find that you get a better crop in summer in the wicking beds?
Gav
What a great project and having more lettuce and spring onions instead of concrete is a bonus. Great photos and step by step instructions. Regards Kathy A, Brisbane, Australia
Thanks Kathy. Yes, the concrete is a bit tough on the teeth 🙂
Wicking beds are very popular here in Perth. I currently don’t grow anything myself as I live in a flat with no possibility to grow anything (no light) but I’m moving in 2 weeks and the new space has a balcony which I intend to turn into a FARM! (well, sort of!) Its all concrete, so I’ll be doing the whole lot as wicking beds. I’ve been to a couple of workshops so I know how it’s done, I’ve just got to get to and do it. Looking forward to it!
(When I lived in England I had an allotment and grew loads of my own veggies, so I have the bug – I just need the space here in Perth!)
Well done! Best of luck with your balcony garden.
Gav
I have some wicking beds made in the polystyrene boxes you can get from the supermarket. I use them for eggplant and tomato as we have bacterial wilt in the soil. this way I can control the soil they grow in.
Hi Gillian, those boxes are a good substitue for a full blown wicking bed, and besides, you are giving the box a second/third/fourth life. Otherwise they would just end up in the tip!
Gav
god job sir,what I doing just lays little coral stone and porous material and on top with fertile soil, but imposible in our home using wood because it will be eat by termites ( : happy gardening and save our world. green is cool.