In late April 2007, I began to plan an organic vegetable garden for one side of our house. We had a garden (if you could call it that), that was the main entrance and it was half dead because of the lack of rain. We thought that if we built the garden beds as a feature of the house then we were more likely to maintain it. This was based on permaculture principles (not that I knew this at the time), whereby your basic food needs should be as close to the back door as practical. Well, our patch was going to be at the main entrance, so even better. Everyone who visited it would see the wonder of our vegetable patch in all its glory!
 |
| Before the transformation |
I based the design on the “No Dig Garden” developed by Esther Dean. I read her little book, which was full of great information about establishing a garden for Australian conditions. I modified the method slightly as per the excellent book “Greeniology”, by Tanya Ha, and added raised garden beds to make it easier to work on. The soil in Melton is clay based and is very hard when dry. There was very little organic matter in the first 2 cm of topsoil, so I had to improve the soil before I planted and improve drainage.
I decided to use redressed old red gum sleepers as the frame for the beds and constructed them 2100 x 1200 x 100 cm and spaced the beds 70 cm apart. This was enough space to lay some pavers for a little path between each bed. The beds were fastened together with 100 mm galvanised nails with a butt joint, and the wood was so hard that I had to pre-drill each nail hole. During the construction I managed to hit my left shin with the full force of a hammer blow! It swelled up like a melon. Nice and sore for the rest of the day, but some ice helped the swelling go down.
 |
| Just after construction circa May 2007. |
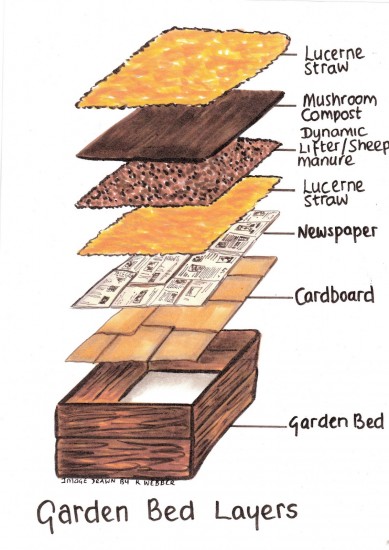
As recommended by Esther Dean’s book, I filled the beds in the following order. The first layer was a cover of cardboard and newspaper about 5 sheets thick. This ground cover was to kill the weeds, grass and provide food for the earthworms. Next was a 10 cm layer of either Lucerne hay or pea straw. I chose pea straw and Amy and Megan laid it for me. The third layer was a 2 cm layer of Dynamic Lifter (you can use well-rotted sheep or chicken manure). For the four beds I finished off an entire 25 Kg bag of very smelly Dynamic Lifter. I then covered the DL with another 5 cm layer of pea straw and then a layer 20 cm thick of mushroom compost garden mix.
I think it was a 50-50 mix of mushroom compost and a loam type soil. It was filled with organic matter and was very suitable for the purpose of growing vegetables. I ordered 2 cubic metres and used it all! Adam lugged most of it from the roadside and Kim and I raked it level in each bed. Lastly, I topped it off with a 5cm layer of sugar cane mulch, to help conserve water by stopping evaporation.
It was a very satisfying feeling to finish all of the beds in one weekend. The garden beds have settled over the years with the cardboard and newspaper eventually being eaten by earthworms, as has the layers of straw. I top up each bed with about 10 cm of home made compost each year, just before planting the next crop.
Back to the story. It was time to planting my veggies. Two great books helped me to decide how and what to plant where, “The Australian Fruit and Vegetable Garden” by Clive Blazey, and the “Organic Gardener” by Jeffrey Hodges. They taught me about how crop rotation works, what vegetables to plant in what season, how to compost successfully, and the science of mulching. I highly recommend each of these books for anyone starting out in growing your own food. Both were available at my local library.
I knew that planting in May was not the best time to sow, and that being late in Autumn 2007 it was better to plant seedlings where possible. So it was off to the hardware store to buy a selection. I only chose what I thought the kids and Kim would eat, so as to cut down on wastage. I planted broad beans, snow peas and peas in the first bed; beetroot, carrots, spring onions, and Spanish white onions in the second bed. In the third I planted green dragon broccoli, mini cauliflower, Savoy cabbages, red cabbage, and Brussels sprouts (big mistake). In the fourth and last bed I planted a herb garden but soon moved all the herbs to large pots so they were easier to manage. I replaced the herbs with a second crop of broccoli of a different variety, and a few more cabbages. Ben loves broccoli, hence the reason I planted so many.
Everything was successful and I harvested gradually over the next few months. The snow peas were first and we couldn’t stop grazing straight from the bush. The only vegetable that didn’t make it to the table was the Brussels sprouts for two reasons a). no-one liked them except me and b). the heads did not form properly, so I broke them up and added the plants to the compost.
 |
| Two years after the transformation. |
I can positively say that all of my organically produced food tasted fantastic. Fresh, crisp carrots, eye watering onions (I pickled 50% of them) and mouth-watering broccoli. I could go on forever about the taste, but I won’t, however I do urge you to grow your own vegetables if you have the room. Even in pots if you have a balcony!
There is very little maintenance if you mulch well. I water from the rainwater tank about three times a week depending on the frequency of the natural rainfall. I would say that between the planting and harvesting, I would spend about five hours a week working in the veg patch. Not much of a sacrifice, and much better than watching the rubbish available on the television these days.
 |
| Early days in my garden after landscaping. |
Besides, the view is so much better outside!
Every time I see photo’s of your setup it reminds me of the amount of work undone in mine. It’s both a source of frustration and of motivation.
Regardless, it is always a delight to see.
Cheers
Thanks Michael. I am sure that it must be time for a visit mate! I have some cold home brew in the fridge to tempt you!
Gav
Even with all those layers, as you have prescribed, i still have the bloody kikuyu making its way through. Gosh, i hate this stuff but Hubby is intent on keeping it around the beds because its soft and cool and looks good.
Yes Lynda, it is a curse. I have cooch in a raised bed near the chook house, so just let the chooks destroy the grass twice a year to keep it in check.
Gav x
It looks fantastic Gav. If only ours looked like that. They look pretty average until season time in dec when we are busy harvesting the rest of the property and the vegies fall by the wayside.
Thanks cuz! But then you have tons of fruit to fall back on. Swings and roundabouts I suppose.
Gav x
Beautiful beds and a great explanation of how they got that way! Love how you demonstrate how simple it can be.
Thanks Kirsty. x
if it would only stop raining in the UK (rained for the last three years!) I might be able to grow something
Hi Froogs, send some of your rain to my area. It is still unseasonably dry here.
Gav x
I think it is great the way you explain things by scratch Gavin. Sometimes we have farm stay visitors with the question ‘how do you start a vegetable garden ‘ and I struggle to answer concisely because it was so long ago that we started our beds ! Anyone who was just starting gardening would find this particular post a wonderful resource and I would certainly refer people to this post if they needed help starting a garden.
And Lynda … we have kikiyu climbing up into our raised beds too and a husband who also likes having it around the beds! My solution … get a small cage with guinea pigs in it – when the bed is ready to be replanted, put the guinea pigs over the grass for a week. They don’t get rid of it but they well and truly keep it at bay.
Cheers Kim. Rabbits or Bantams are another great choice for a grass remover. Which reminds me that I must get on to that project of a lightweight chicken tractor for these beds.
Gav x
But what is the wine? Isn’t it the reason for all the hard work?
Yes indeed! A wine to unwind.
Great post Gavin and very timely as I’m about to build some beds from scratch on top of a kikuyu lawn and have been told about using LOTS of newspaper – but I was concerned about how the worms get in to your beds. You didn’t find this a problem and they got in eventually?
Hi Hooliganhound. Don’t worry about the earthworms. After about 6 months they find their way in after eating holes through the cardboard.
Gav
As someone who has studied earthworms (and accidentally let them get out in her bathtub, yeah they can climb walls) those worms will find their way in no problem. Even if they have to go the long way around. They are ambitious creatures.
the transformation is amazing! I hope my garden will look like this one day
Thanks for the reassurance Gav. I’m madly collecting newspapers and cardboard now….
What a beautiful post ! I love gardening. organic vegetable gardens If you have ever considered planting a spring vegetable garden, attend a four-week series to learn all you need to get started. This workshop will be held Tuesday evenings from 6 – 7:30 p.m. starting Jan. 14 until Feb. 4. The cost is $30 per person or $45 per couple and includes numerous handouts. Classes will be held at the Milton and Jay locations of UF/IFAS Extension Santa Rosa…
Awesome! I am sooooo inspired!!! … I am about to embark on this journey – building raised beds and starting a veggie garden – any specific tips for an absolute beginner (in Sydney)? Eg, what should I make the beds out of – don’t have the same selection of hardwoods here as in your neck of the woods (urggh … sorry for the pun!)
Excellent reading. Love the wine glasses on the balcony – well deserved with such a great view. Thanks so much for info and inspiration.
Thanks for reading Natalie!