I once thought that making Camembert would be very difficult. I didn’t know how they got that soft, almost fuzzy rind around the cheese, and would not have imagined in my wildest dreams that one day I would make one. Camembert cheese originate in the French village of the same name.
It was discovered in 1791 by Marie Fontaine who got the recipe from a monk, and has become one of the most prized cheeses in the world. Penicillium candidum growns on the surface during curing, and the mould develops the sharp taste of the cheese and aids in creating its runny consistency at room temperature.
Well, guess what. I didn’t make one, I made 4 rounds of Camembert!
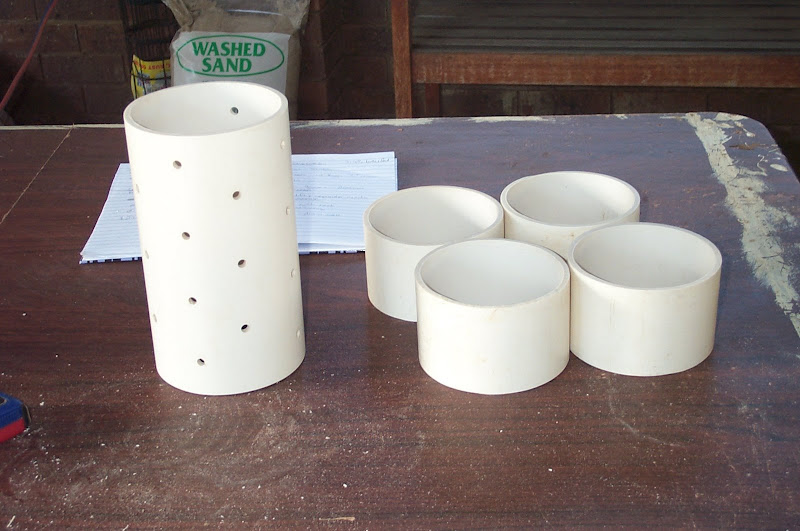
First of all I had to make the hoops or moulds that the Camembert would form in. I took a big piece of food grade plastic pipe and cut it into four 3″ lengths and gave the ends a sand with a sanding block to smooth them all down. While I was at it, I made a Stilton mould as well and drilled holes all around the mould. Here is a picture of my efforts;
So once I had finished the hoops, I washed them in hot soapy water to get rid of any plastic powder, and then I sterilised them in boiling water. Unfortunately the hot water warped them somewhat, so I had to reshape them when I took them out. There was a lesson learnt, don’t boil the hoops. So instead I sprayed them all over with white vinegar to kill any mould or bacteria that might be lurking.
I then followed the recipe in the “Home Cheese Making” by Ricki Carrol, which I won’t describe in details here. You will just have to borrow the book from your local library!
Anyway, normal process, heat the milk, add the starter, then the penicillium and ripen for 90 minutes. This is the longest ripening period I have found for any cheese so far. Then add the rennet and rest for an hour. Cut curd into 1.25 cm cubes, gently stir. Dorothy from the cheese making course suggested the lift and separate method, just like the bra add. The book goes into some detail about cheese boards and mats and moulds, but I found a simpler way that I learnt by observation of other students at the course. Use good old chux and two trays for the hoop process.
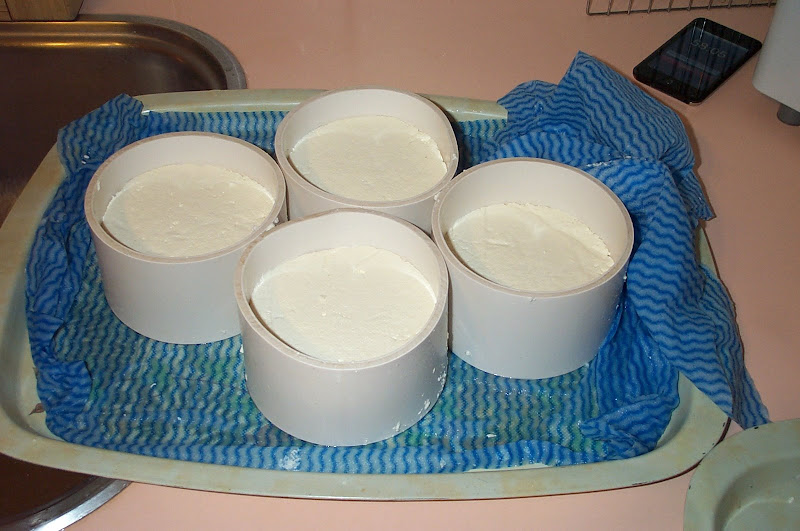
This is about half way through the turning process. When I filled the hoops they were over full and I just managed to get all of the curd into them with a bit of perseverance. As you can see, the curd shrinks as it expels whey. You can just see in the photo a second tray. To turn the hoops, place the second blue chux over the hoops, put the tray on top, squeeze the trays together, drain whatever whey there is, and quickly flip them over. A little bit of skill involved, but not too hard.
Now after 5 hours of doing this every hour your Camembert will look something like this;
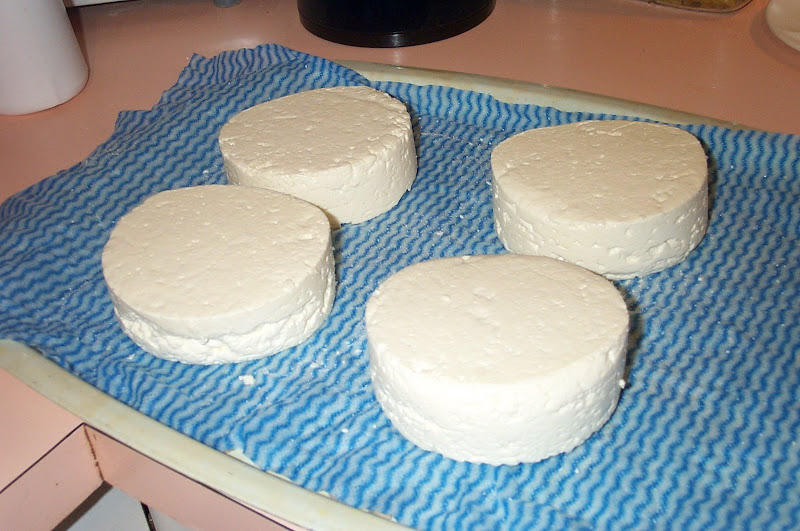
As you can see, they shrink quite a bit. They shrank from about 7.5cm to about 3cm once all the tray flipping was over. You then salt the cheese by sprinkling with non-ionised salt and rub all over. They are mostly firm, but I had to be gentle.
For a more comprehensive post, including a video tutorial, have a look at my full article about making Camembert over on my cheese blog, Little Green Cheese. It is worth a visit.
im definitely looking forward to havings some cheese making time. its all looked so good. How does time and cost work out against buying local cheese?
This looks excellent. The Wesleydale (sp?) was awesome but camembert! I wonder if there are cheese making classes up here?
@ Kel. Give it a go, it is so much fun. I figured out once that if I discount my time, the materials for a batch of cheese costs about $10.50 a kilo. For an artisan cheese, you will agree that it is a bargain. I discount my time, because I enjoy doing it as a hobby, and you can’t put a price on that. Camembert takes about 8 hours on and off for the entire process.
@ Rose. I can’t wait to show you the pictures of the finished Camembert. That should be pretty cool! I hope you find a class locally. There are quite a few places in Melbourne, so I can’t see why you couldn’t find something close by.
ohmygod !! yum yum yum !!! an inspiration !!!
Oh wow, how great is this? I’m going to have to try it some time.
Hi, this is wonderful and Im going to have a try so, where do you buy the food grade plastic pipe from. Thanks!
Hi Margaret,
I made them myself from PVC rainwater pipe 90mm in diameter. I checked with a local plumber and he said it was safe for food as well and would not leach chemicals into the cheese.
Gav
Hi Gavin can I use uht milk to make Camembert ? Because the unhomogenised milk works out to very expensive if your wanting to make four blocks of cheese . Thanks from Andrea
Hi Andrea,
I would not recommend UHT milk to anyone. I had a total disaster when I used it once. You can use normal pasturised and homogenised milk if you add about 1 ml of calcium chloride diluted in 60ml cool unchlorinated water to the milk at the start. This reverses the homogenisation process. You can get it a cheese making suppliers as listed in the blogs left side bar.
Gav
Wrt food grade PVC pipe I would not trust the word of the plumber myself. But I like your idea and I will try to do something similar. I am beginner cheese maker. I made cottage cheese for years using sour cream for inoculation. Last month I made first feta. Still not sure which culture should be used for camembert?
Kris
Hi Kris,
I actually have stopped using the home made hoops since writing this post. Partly because I was worried about the PVC thing, but mainly because the Camembert didn’t drain properly. The culture I use is mesophilic and penicilium candidum
Gav
Hi Gavin,
Ricki Caroll writes in her recipe that we should rehydrate Penicillium candidum (?). I bought mine from Green Living and they dont say to do that on the package. Did you just add the dry powder with Flora Danica? And how much ….. about 1/15th of what they sent you ?
Cheers,
Kris
PS. Made already swiss, gouda and cheddar. Strugling with Propioni Shermanii ….. it looks like one should divide tiny bit green living is sending into 15 portions.
Hi,
I recently made a batch of camembert, they were aging nicely in my “cheese cave”, then suddenly developed blue spots on them. Someone said it was probably too humid, which the weather has been lately, so i removed the blue spots and the rind hasn’t grown back yet. I have put them in the fridge, which I know is way too cold. The blue mould hasn’t come back, but I think I may have removed too much rind. The cheeses still smell like camembert.
Hi Jo,
With mold cheeses I find it best if you put it into its own container with a little bowl of water. This way, no foreign molds can infect your cheese. Have a look at how I did it in the post. I don’t think that your Camembert rind will grow back as it sounds like you scraped off the rind which contains the Penicillium candidum.
Gav
Hi,
Yes, I had mine in a little container like yours, but I had them in my “cooler”, should I have left them out of the “cooler” just in their little cheese cave?
Thanks, Jo.
Hi Jo,
They need to be kept between 7-13 degrees Celsius during the rind formation.
Gav
Hi,
Ok thanks, I have noticed it is slowly growing the rind back, yeah, but not sure if it’s still going to be good to eat. I really need a room temperature gauge, and I am on the way to getting a wine fridge. Can’t wait.
Thanks, Jo.
Wine fridge may not be good enough for camembert (unless you try to run it at its lowest temp , which will be too low for hard cheese). I use wine fridge for hard cheeses and an old fridge for camembert. I have built proper PID controller and I control temp of the freezer at 7-8 deg C. I still get the runny (but delicious) cheese. I use flora danica, and I will try mesophilic culture in future.
Regards,
Kris
PS. BTW I am not sure about efficiency of the cheap wine fridge with glass door. I do not thing it is efficient and I may sell it. The best would be proper, small chest freezer with temp controller. Chest freezers are many times more efficient than freezers and fridges with door
You mentioned Home Cheese Making by Ricki Carrol and I looked on Amazon.com and she has two books and I was wondering if you have seen her Cheesemaking Made Easy from 1995?
Love your homemade molds and have shared you site with other friends.
I am very late to this party, but may I ask where you found the container and rack you use to age your Camembert?
I picked it up from the plastic isle in our local supermarket!
Hi Gavin – the images on this page aren’t showing. Other than that, a great post! I’m going to try and make a camembert soon following your thoughts…going to try and ‘make’ a culture from a camembert rind from a good-looking cheese from the market. Wish me luck!
All fixed. Check out the further reading link down the bottom as it has a video tutorial and additional instructions