Have you ever completed a project and had an overwhelming sense of pride? Well I did yesterday afternoon, when I flicked the switch on my stand alone Solar PV system and watched as it all came together for the first time. It took me a few hours to put all of the wiring together, testing every component with my multi-meter, and ensuring everything was insulated.
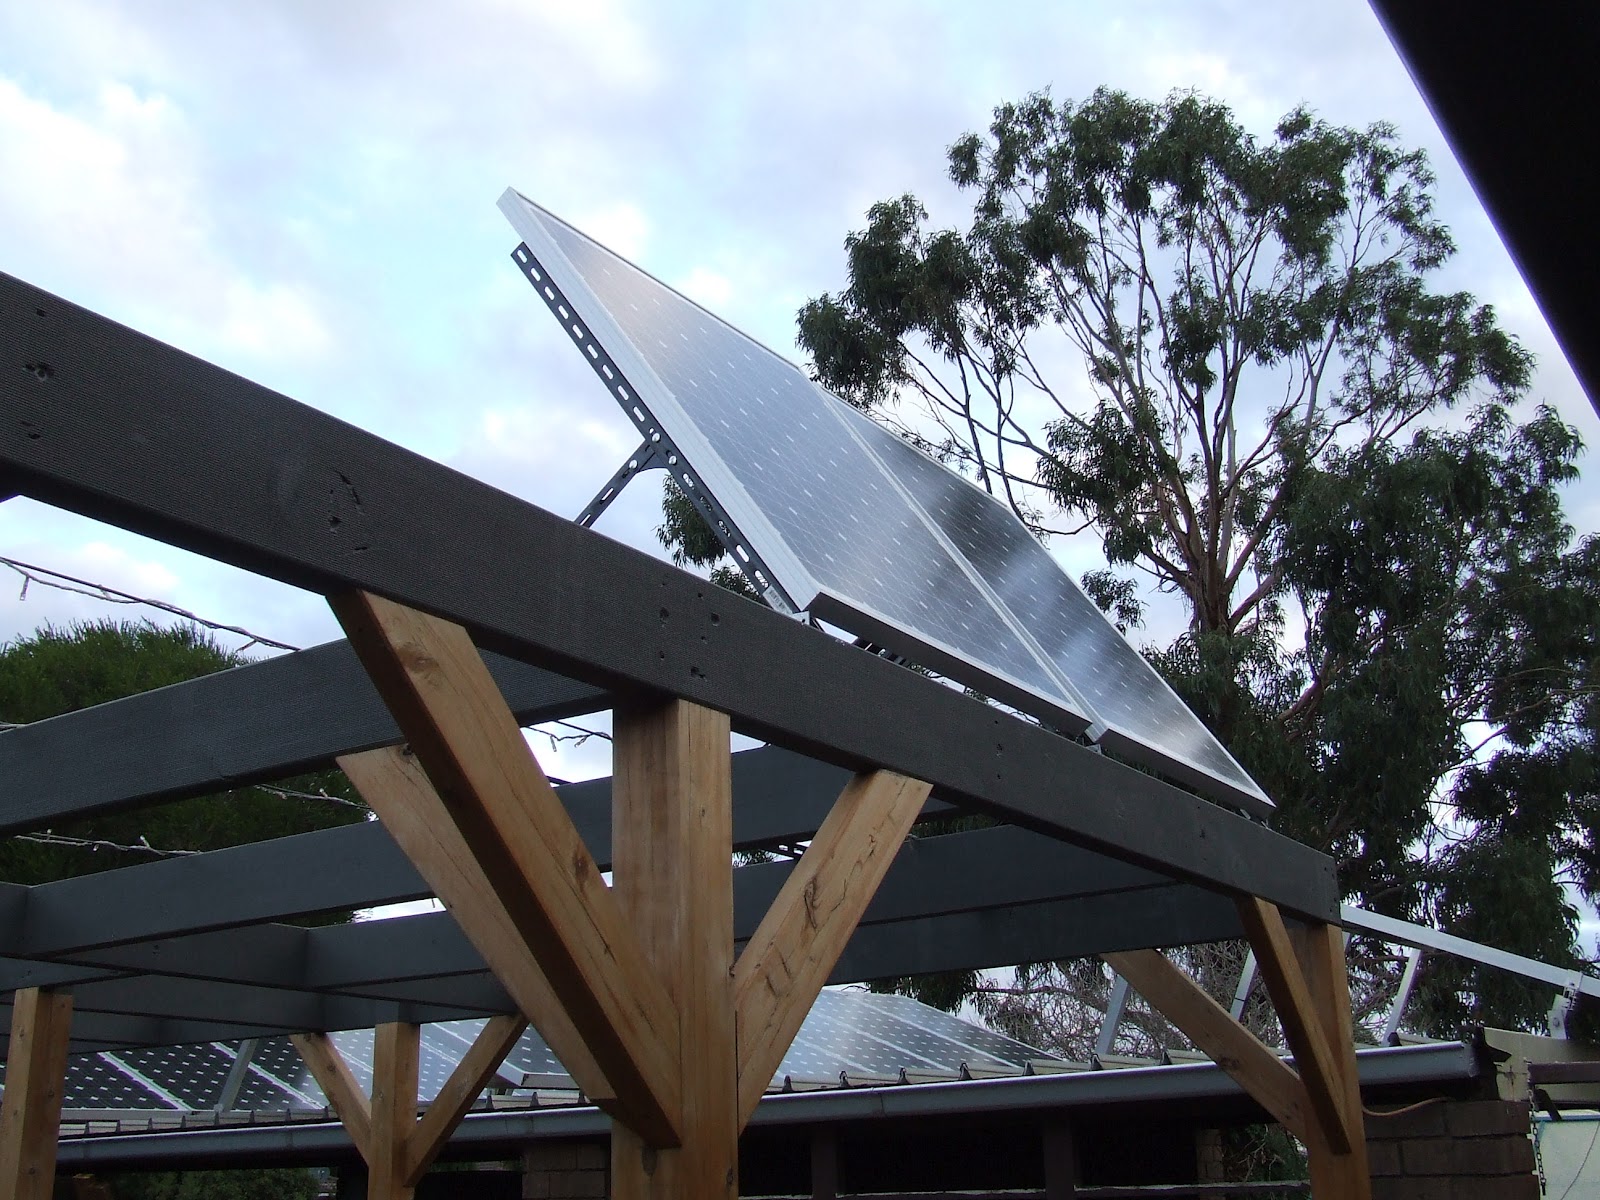
So, allow me to walk you through what I have done. In the previous post I hooked up the two 110 watt solar panels via a frame, connected them in parallel, and ran the cables into the carport.
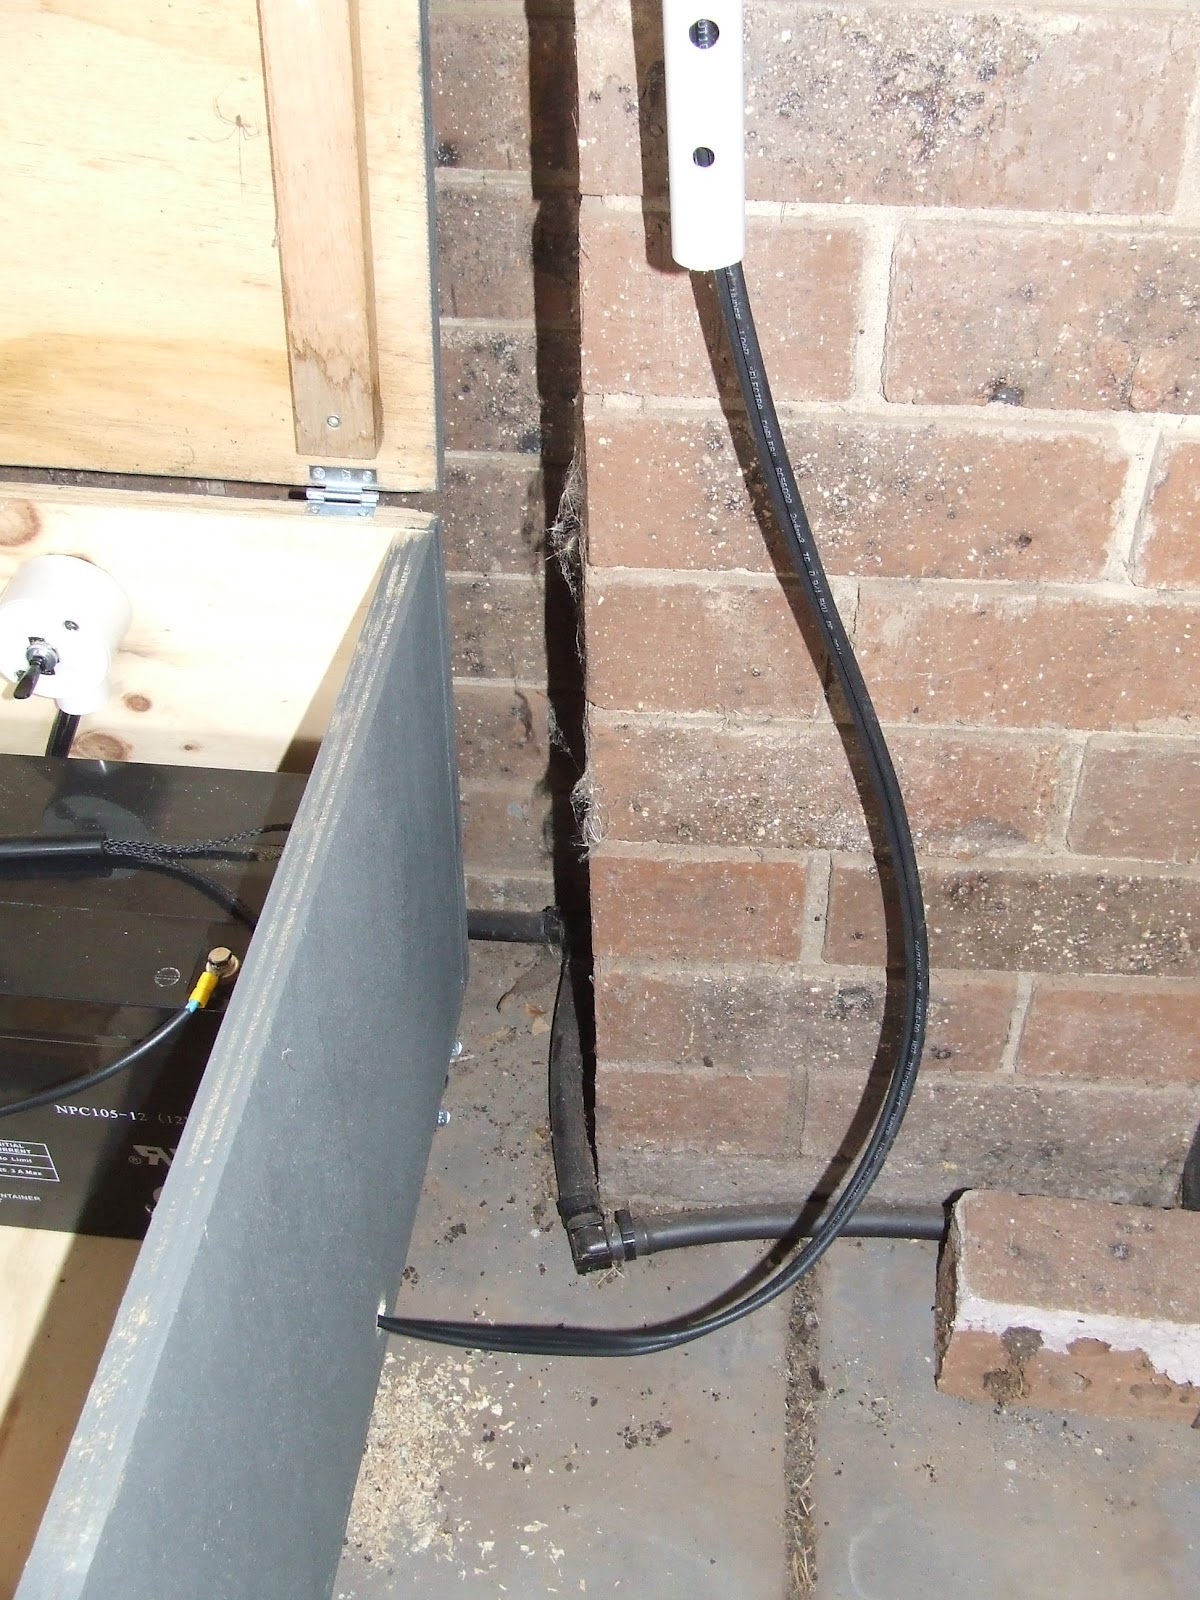
I ran out of conduit, so the last meter is uncovered and feed into the battery box.
I installed two single pole toggle switches with 30 amp fuses, and connected one between the panels and the solar charge controller, and connected the other between the battery and the charge controller. This way I can isolate both circuits if necessary.
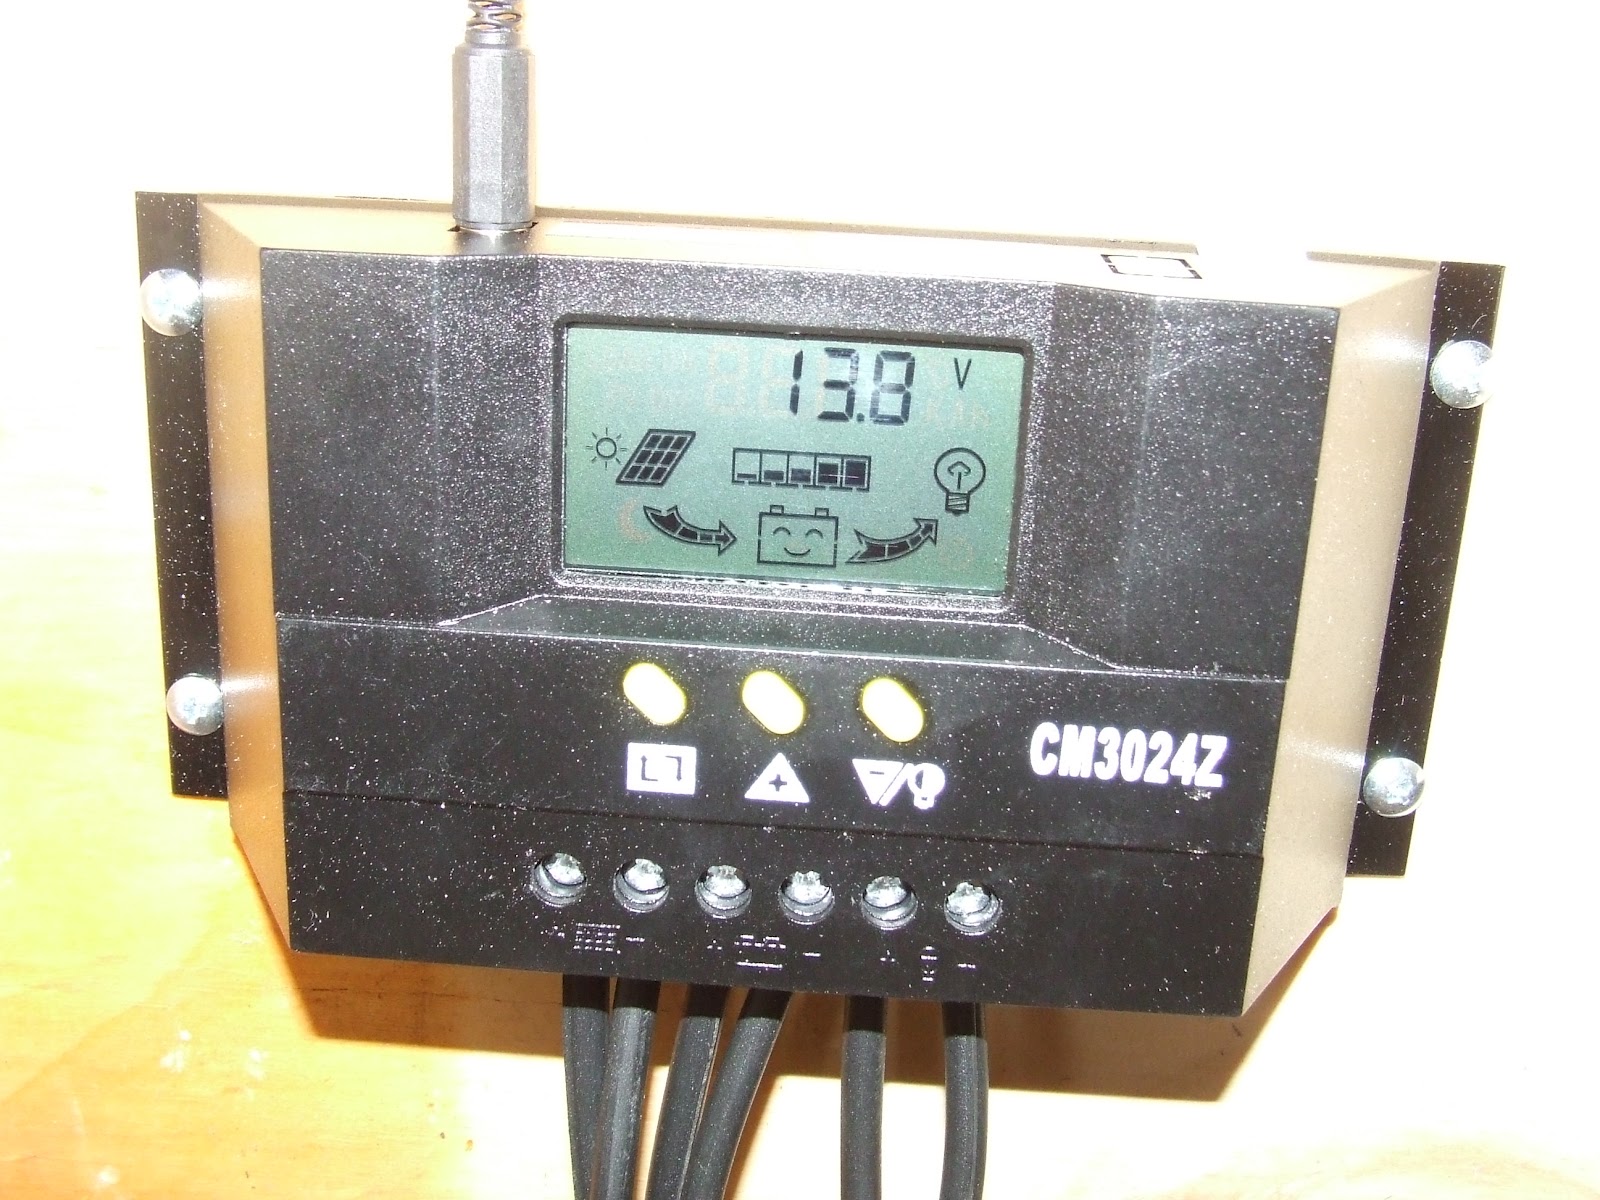
Here is the charge controller display showing the float charge voltage of 13.8v because the battery is full, and that there is input from the solar panels (left arrow) and load being drawn (right arrow to light bulb). The battery is fully charged as indicated by the little smiley face battery and the gauge above it. You actually don’t have to set anything on the charge controller, as everything is done for you in the factory. It is a very clever little device. You just have to make sure that you have the correct polarity when connecting the individual components.
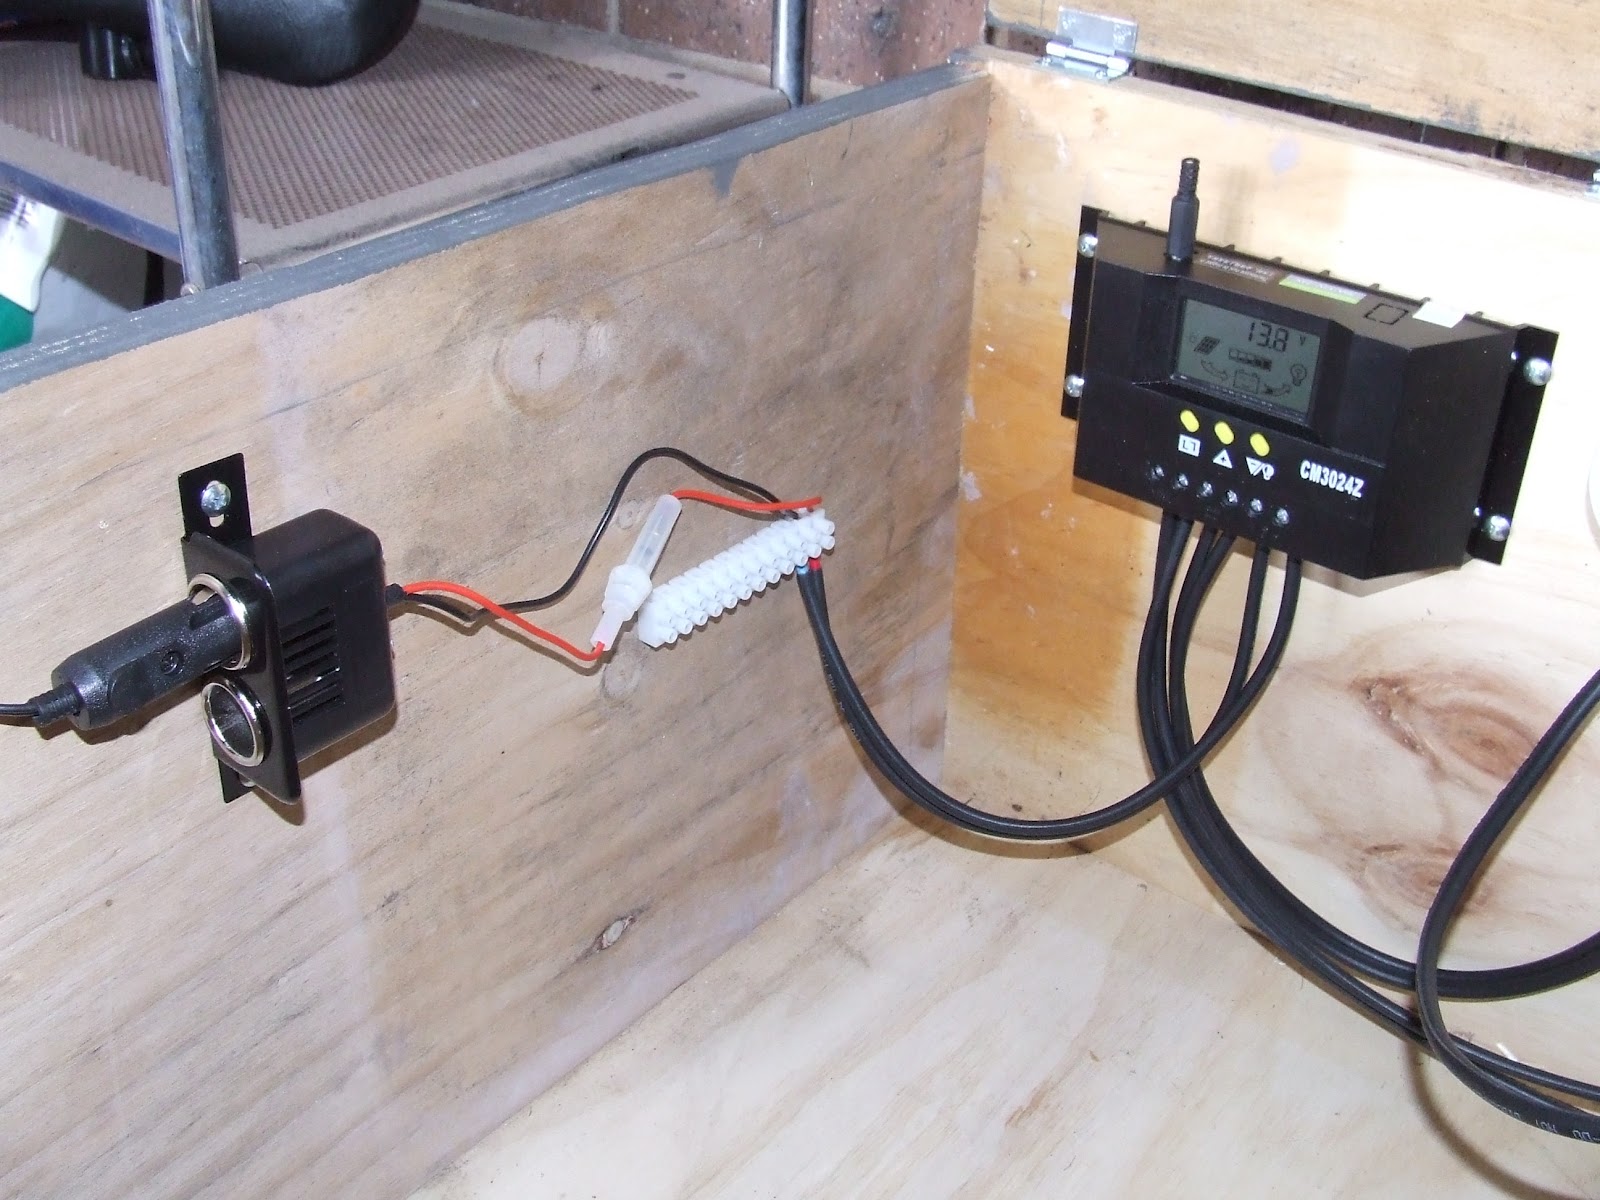
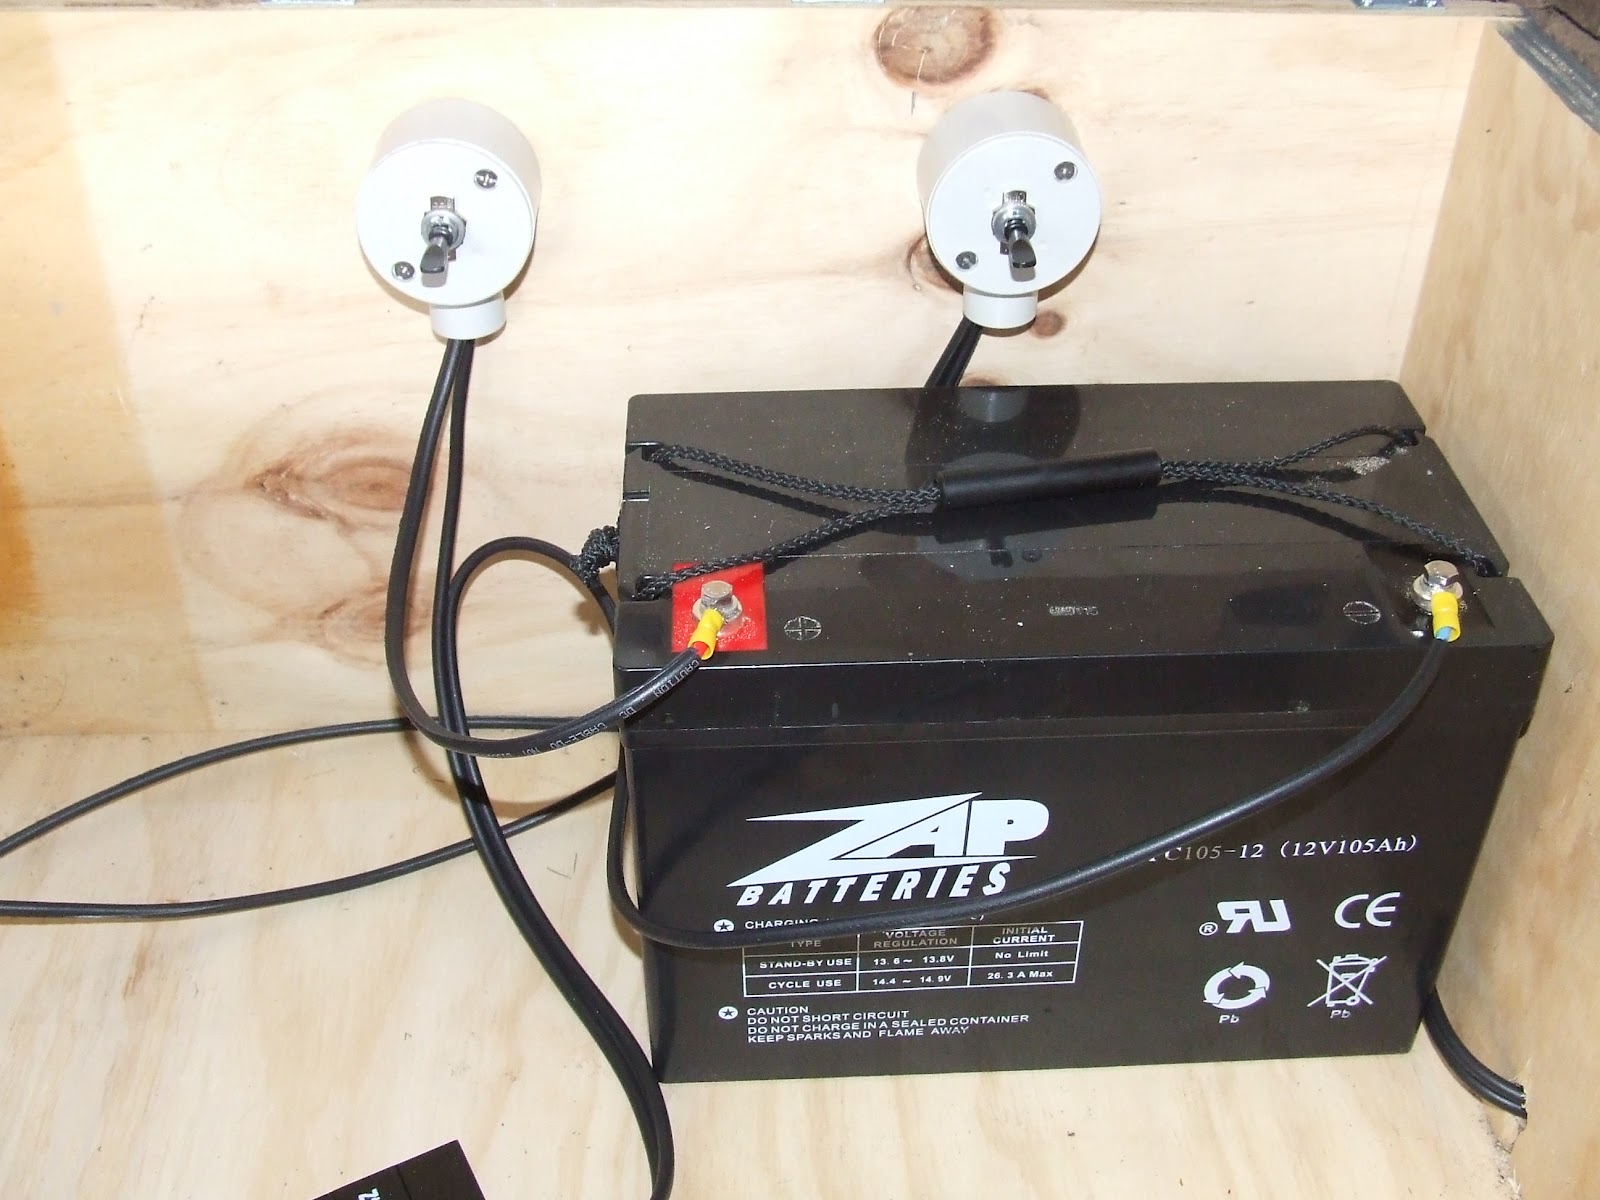
For the start of my 12 volts system, I connected the load from the charge controller and wired it to a terminal strip, and then to a dual outlet 12 volt accessories socket. I can now plug in anything that you can use in a car like a small compressor, lighting, phone chargers, small fridge, etc.

Here is me, proud as punch that I actually got it all to work, with the first appliance connected to the system. It is a 30 LED, 4 watt light strip which I plugged into the car accessory socket.
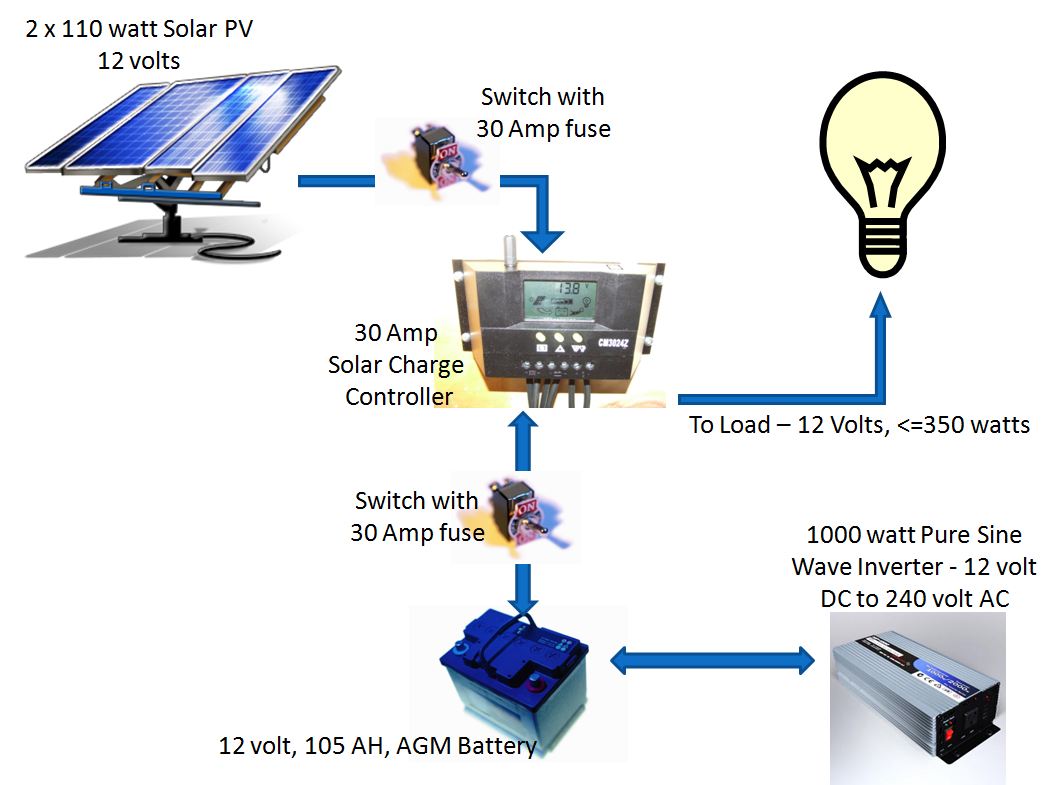
For those who want to see a bit more detail and a sort of schematic diagram, here is a slide that I whipped up in PowerPoint that shows the current flow. Note that I added a 12v DC to 240v AC inverter into the diagram. That is because I found a few bucks and bought one off of the Deals Direct website.
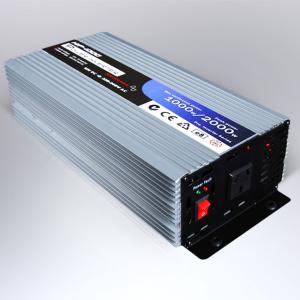
It is a pure sine wave inverter, which produces a clean power stream, unlike the cheap and nasty modified sine wave (technically known as a square wave inverter) that are also on the market. It should arrive in a few days, and I will connect it up to the system and hook it to a small 4 socket power board and mount it on the outside of the battery box. Once connected, I will be able to use normal household appliances up to a total load of 1000 watts. If I run it at full load, I would only expect the battery to last for just under an hour, however if I use it wisely, it would last all day until the solar panels recharge the system in a day. I am saving up for a second battery that I will be wiring in parallel to double the storage capacity to 210 amp hours.
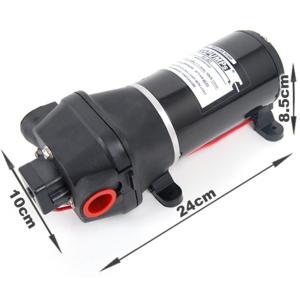
Whilst I was looking around the Deals Direct website (which my Dad put me onto), I found an appropriate 12 volt, 40psi, water pump for my drip irrigation system. It will finally increase the pressure and I will not ever have to use mains water to irrigate the veggie patch again. The 4000 litres of water storage that I have should be able to keep my garden sufficiently moist the whole year round.
What did it all cost? Well the panels were free, but valued at about $500. The other components like battery, some cabling, and solar charge controller cost $370. The LED light was $23. The frame to mount it on cost $150, the battery box cost $6.50, and the switches, fuses, and conduit elbows cost $70. Yet to arrive The inverter set me back $179, and the pump was $70. So all up, and if I had to pay for the panels this lot would have cost me the following;
12 volt system, 105 AH: $1096.50
12 volt system, 210 AH: $1295.50
12 volt system, 105 AH with 1000 watt 240v inverter: $1275.50
12 volt system, 210 AH with 1000 watt 240v inverter: $1474.50
Pump and light: $93
For an independent power supply, I definitely believe that it was worth the money. I feel good knowing that during a blackout, I can still run a few electrical items for a while. Time will tell just how long long the 105 AH battery will last under load, but like I mentioned before, if used wisely, it will last until the next sunny day! Once I get some stats, I will post about what sort of life you can expect from the batteries and how long it takes to charge from the panels.
So, early this morning, with a cup of coffee in hand, I opened the lid of the battery box and just watched the solar controller display for about 30 minutes, and felt a sense accomplishment and of ‘a job well done’. A very satisfying feeling indeed.
glad to help out gav. keep the dream alive dad
Cheers Dad, it didn’t break the bank either!
That’s a good feeling to have.
ah my question is answered! Great idea to use it for irrigation. You can also buy dedicated solar pumps, which are useful for remote stock water and garden watering (I like the idea that the more sun you have the more water your garden gets!). We have one 100 Ah battery in our campervan and that runs our camping fridge and lights for at least 24 hrs. You could always fit another battery in that box if you don’t get enough sunny days to recharge 🙂 From what I read at the time of choosing the battery, the slower you discharge, the more amps you get overall.
Hi Liz,
Your system in the campervan sounds great. It would be simple to add a second battery, however there is on important point to remember, and that is to connect them in parallel, and to ensure that you draw roughly the same amperage from both batteries, that you connect to the inverter to the positive of one battery and the negative of the other. Same goes for the connections for the charge controller. This website explains it better than I could.
http://www.smartgauge.co.uk/batt_con.html
Gav x
A while ago I read about a guy who made a very similar system to yours, but had the box mounted on a cart. The cart also had room for some storage of power tools etc.
The solar panels plugged into a connector on the side of the box for easy connection/disconnection. The charge controller, battery and 2.4 kW inverter sat inside the box, with the power outlets on the outside of the box.
He could then unplug from the panels and wheel his little power source all over his property, and run power tools wherever he need them. Then he could wheel it back and plug back into the panels to recharge it.
I recall he also had it set up so he could charge from the mains if the sun wasn’t cooperating. Very cool if you’re on acreage!
I’d love to build something like that one day!
That sounds very similar Darren. Sounds just what you would need. That reminds me that I do have a 240v battery charger in the shed that I should dust off and see what I can do with it!
Gav
I had the absolute pleasure today of visiting Gavin and his family and getting a guided tour including this neat solar system. Very impressive setup. Inspiring!
Thanks for a wonderful afternoon, the tour and the great chat over coffee. I have come away re-invigorated!
Cheers
Mick
I should thank you for visiting Mick. I had a great time showing you around, and thanks for the tips about extra low voltage setups!
Looking forward to listening to the interview for 3WBC radio.
Gav
Congratulations! Truly a great accomplishment and something you can be proud of for a long time to come!
Dani @ ONNO Organic Clothing
Cheers Dani
Hey Gav, just discovered your site today and loving what you are doing, very inspiring stuff.
I myself am working to greenify a 60 year old North Coburg house I bought and moved into six months ago. Solar hot water, check. Insulation, check. Energy efficient appliances, check.
Next up I’m keen to build a new shed in the backyard with rainwater collection and a small solar PV rig to run a 12V system just as you have done. Mainly will be used for irrigation, and to keep my car fridge running all the time as a beer fridge. But I’ll be looking to design mine as a detachable and portable setup so that when I go camping I can take the system with me on trips and rig the panel it to the top of the 4WD.
Cheers!
-CK
so cool, I’d be feeling proud as punch. It’s amazing what you do with just a little solar energy. Look forward to hearing how it’s all going as you refine it.
Hi Gav, is there any reasonaing why the free panels couldn’t have been added to you existing panel set and why the battery xouldnt have been linked to the same? Is it a case of different voltages or the fact you can diy this setup?
Dylan
Hi Dylan. Main reason was that the panel voltage are different. The free ones were 17 volts, and the grid tied ones are 28 volts. Also, I did want to make an independent system in case of grid failure. The main system shuts down when there is a blackout, and has no battery backup.
Gav