• About
  • Archive
  • Contact
The Greening of Gavin
  • Home
  • Our Green Shop
    • Little Green Workshops
  • Green Workshops
    • Cheese Making
    • Soap Making
    • Soy Candle Making
  • eBooks
    • Clay Oven eBook
    • Keep Calm and Make Cheese eBook
  • Podcast
    • TGOG Podcast
    • TGoG Podcast Archive
    • Little Green Cheese
  • Vlog
  • Cheese
  • Green Living
    • Chickens
    • Gardening
    • Soap Making
    • Recipes
    • Climate Change
    • Peak Oil
    • Solar Power
  • Resources

Clay Cob Oven Flue

August 19, 2011 @ 21:37 By Gavin Webber 6 Comments

Well tomorrow is the big day!  Our clay cob oven workshop takes place with lots of willing participants expected to lend a hand stomping clay and sand, as well as making the oven itself.

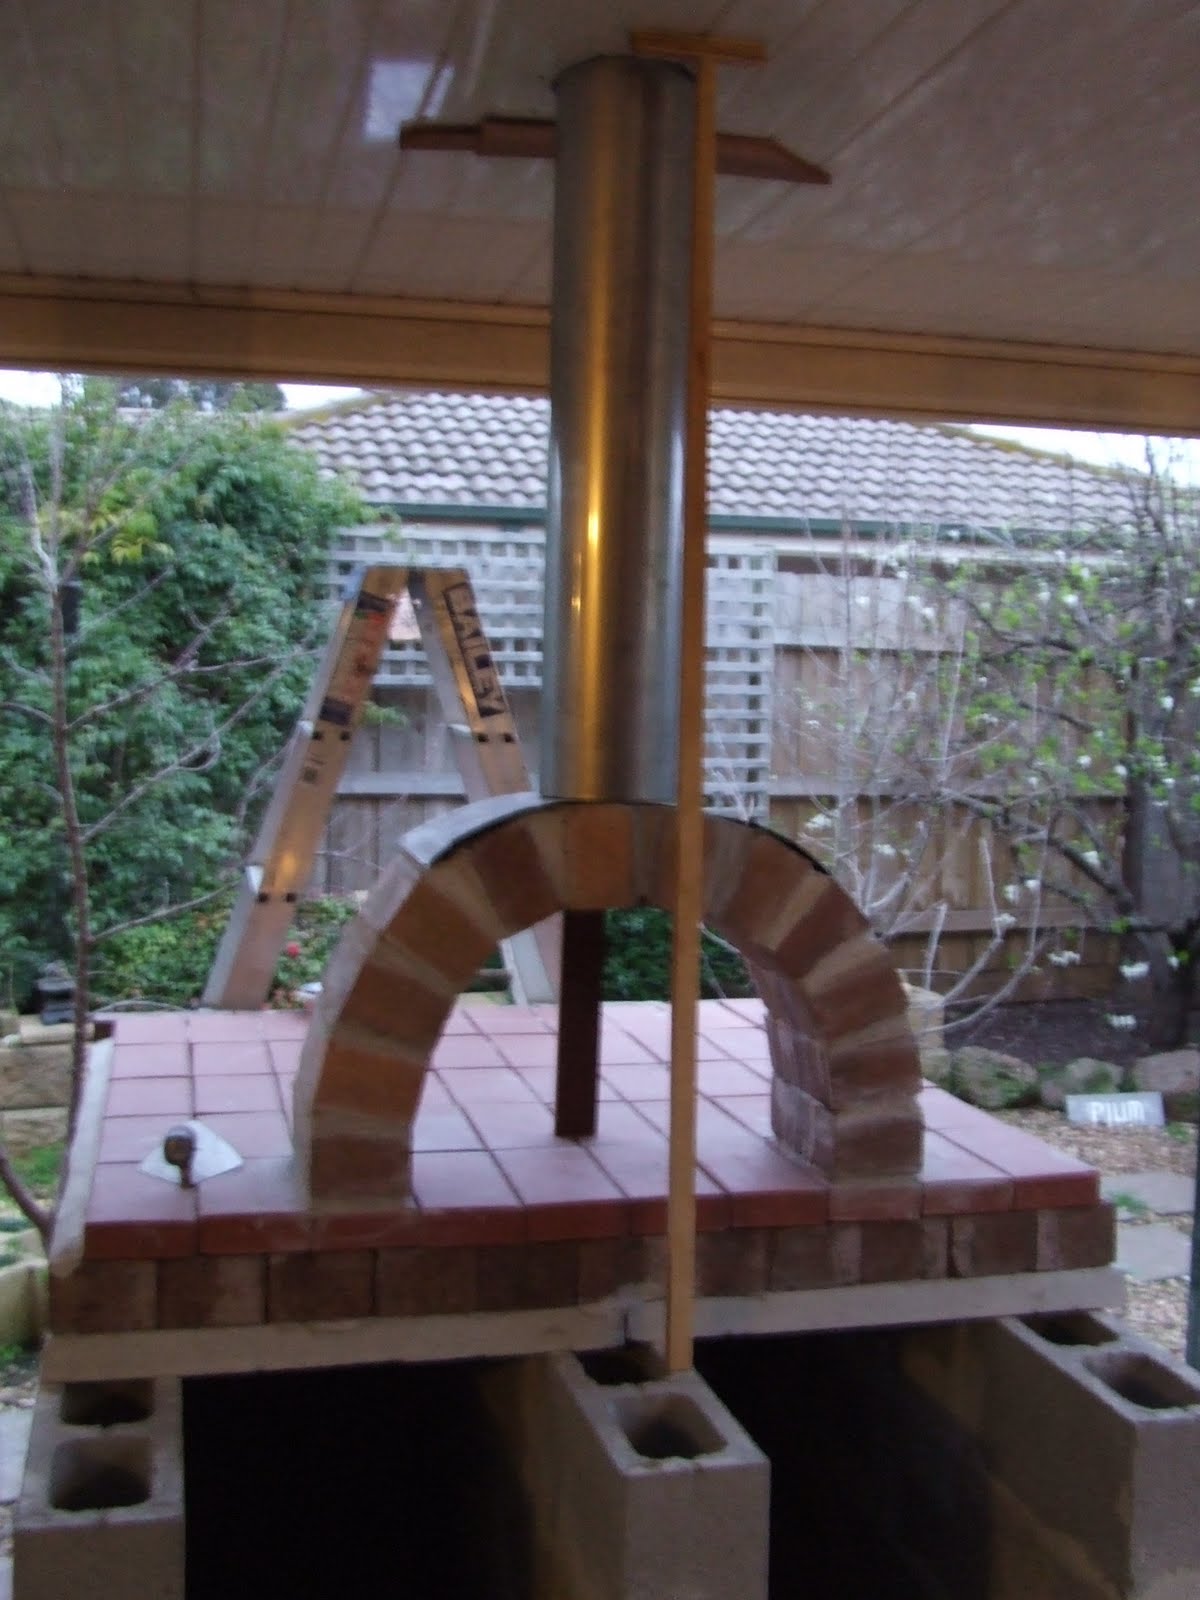
Today our builder friend installed the flue, as I didn’t want to make a mistake cutting the hole in the roof.  Click to enlarge the photos.

The flue is sitting on a plate made of the lid of an old BBQ that I saved, and we will mould clay over it and the bricks.  The sticks are to support the roof so that the rubber cowling above it is kept in place whilst the heat resistant sealer is drying.

It is going to be so cool making the sand dome, then whacking on some wet newspaper, then finally making the clay dome.  I am very excited!

Will this article help someone you know? If so help them out by sharing now!

  • Click to share on Facebook (Opens in new window) Facebook
  • Click to share on X (Opens in new window) X
  • Click to share on LinkedIn (Opens in new window) LinkedIn
  • Click to share on Reddit (Opens in new window) Reddit
  • Click to share on Pinterest (Opens in new window) Pinterest
  • Click to share on Tumblr (Opens in new window) Tumblr
  • Click to print (Opens in new window) Print
  • Click to email a link to a friend (Opens in new window) Email
  • More
  • Click to share on Pocket (Opens in new window) Pocket

Related

Filed Under: Cob Oven

← Limoncello Cluckingham Palace Is Finished! →

About Gavin Webber

Gavin Webber's daily goal is to live a more sustainable lifestyle, in an effort to reduce his family's environmental footprint so we can all make a difference for our children & future generations to come.

Learn more about him here and connect with him on Twitter, Facebook, and Google+.

Comments

  1. Country Woman says

    August 20, 2011 at 00:24

    I just seen an awesome stove.. it was a simple barrel stove. Parts can be bought at http://www.northerntools.com
    Anyway how it was built was first barrel was a fifty five gallon barrel. the second barrel was a thirty five gallon barrel. take the thirty five gallon barrel and put the door on it put the exhaust on the back of the barrel. ( you can line it with clay or firebrick etc..the one I seen had a log rack in it.. now take the fifty five gallon barrel and put an exhaust on the bottom of it to hook a fan up to and on the top put an exhaust to go to your duct work. cut the diameter out of the front of the fifty five gallon barrel so that the thirty five gallon can slide fit. or if the top has a removable top then weld the thirty five to it and cut out for the front. now put the thirty five gallon barrel in the fifty five gallon barrel and cut a hole in the back to accommodate the exhaust chimney. you now start your fire in the stove and turn on the blower. pretty cool..

    Reply
  2. garden girl says

    August 20, 2011 at 04:54

    Can’t wait to see the end result. Hope you get lot’s of willing helpers.

    Reply
  3. mountainwildlife says

    August 20, 2011 at 22:35

    Crikey thats looking a bit professional with the shiny flue! My plans are a little more..er, ‘rustic’! I might hold off til I see yours, I have cob oven envy already!

    Reply
  4. Sol says

    August 21, 2011 at 05:52

    I cant wait to see the results!

    Reply
  5. Susan says

    July 18, 2012 at 02:54

    Did you have to cut a hole through the brick structure you’ve just made for the flue or is the flue right behind the bricks? It looks as though it’s sitting right on top of the bricks. I understand how a flue works, but not understanding how *this* one works. Thanks and great video!

    Susan

    Reply
    • Gavin Webber says

      July 18, 2012 at 07:35

      Yes Susan. I cut the top four bricks into thirds before cementing in a third each side. Works like a treat.

      Reply

Comments build lively communities. Let me know your thoughts, but keep it clean and green! Spam is removed instantly.Cancel reply

This site uses Akismet to reduce spam. Learn how your comment data is processed.

Search This Blog

Follow my work

About Gavin Webber

About Gavin Webber

An Ordinary Australian Man Who Has A Green Epiphany Whilst Watching A Documentary, Gets a Hybrid Car, Plants A Large Organic Vegetable Garden, Goes Totally Solar, Lowers Consumption, Feeds Composts Bins and Worms, Harvests Rainwater, Raises Chickens, Makes Cheese and Soap, and Eats Locally. All In The Effort To Reduce Our Family's Carbon Footprint So We Can Start Making A Difference For Our Children & Future Generations To Come.

Delve Into the Archives

Visit Our Online Simple Living Shop

Little Green Workshops

Top Posts & Pages

Hot Chilli Chutney
Curing Black Olives
Home Made Bread Rolls
The Seven Stages Of Change
How To Remove Scaly Leg Mites
Black Aphids On Garlic
2 Fruit Marmalade
Outdoor Solar Shower
Tips for Growing Citrus in Pots
The Ant and the Grasshopper

Recent Awards

Recent Awards

Local Green Hero

Categories

Favourite Daily Reads

Debt Free, Cashed Up, and Laughing

The Off-Grid Solar House

Greener Me

The Rogue Ginger

Little Eco Footprints

Down To Earth

Surviving the Suburbs

Little Green Cheese

Eight Acres

The Witches Kitchen

TGOG Readers On-line

Carbon Offset website

Copyright - Gavin Webber © 2026